Flawless Frontal Bob Wig Install | Vip Wigs
- Posted on 23 May, 2019
- Bob Wig
- By Anonymous
Business email: [email protected]
IG: https://www.instagram.com/hairbykasia/...
Twitter: https://twitter.com/KasiaMae_Beauty
Website: https://www.vipwigs.com
Buy Here:
https://www.vipwigs.com/180-density-mi...
Wig info:
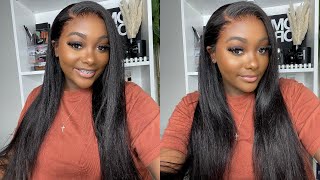
Length: 12”
Color: Natural Color
Lace Color: Medium Brown
Texture: straight BOB
VIPWIGS SALES:
---Get 1 Wig Free For Over Orders $ 400 OR
---Use Code
"A25" Save $25 (over $300)
"A15" Save $15 (over $200)
"A10" Save $10 (over $100)
(Excludes clearance items)
FB: https://www.facebook.com/VIPWigsOffici...
IG: https://www.instagram.com/vipwigsoffic...
YouTube: https://bit.ly/2NFmWFC
E-mail: [email protected]
Whatsapp: +0086 139 6394 1511
Skype: +17078207987
Hey y'all, it's cassia and today I'm going to be showing y'all how I applied this week and cut it. My cut was so rough, it's so hard to me to cut here when it's already on my head, but I did my very best and I hope y'all enjoy this tutorial. I know y'all gon na have a lot of questions about where I have to begin and why I haven't been on YouTube. I know I had got a few inboxes and questions about. If I had quit YouTube or not. No, I have not quit YouTube. I am still here um. I just I'll do another video as to why I was not on YouTube for the past few months and just to let y'all know now I am back it's the summertime. I'M gon na go hard, so y'all, I'm gon na be having about two videos, two to three videos every week, so stay tuned for that y'all need to make sure y'all continue to watch so that I can have you know a little motivation to keep putting videos Out there and please, let me know in the description bar below which I want to see and i'ma try to do my best to put out videos that y'all want a seat so without further ado, let's get into this video okay. So unfortunately, I lost a part of the video where I showed the packaging, but this is the packaging. The wig came with a brown wig cap, a comb and an elastic band. It was a 10-inch wig, but I'm going to just leave everything about the wig in the description bar below and I'm just gon na start off. The video with me plucking the weak. I already well. The wig already came with the knots bleached, but I rebleed them because I didn't feel that the knots was bleached light enough. So I just released them and then I'm right now, just going ahead and plucking out some of the hairline which it already came, pre plucked. They did a really good job with the plucking and the bleaching, but I just wanted to do extra just looking match my hairline better. So that's just what I'm doing for the first part of this video, okay. So right now, I'm just flat ironing and styling the wig. I already put it in the side part, so I'm just gon na go ahead and style it so that when I put it on, I don't have to flat iron it okay. So I'm starting with some braids that I already had, I just parted down the middle and braided it down cuz. I had these braids for a different week, but I'm just gon na be brushing my edges back using the got ta be good glue spray just to get my edges out of the way so that, when I put on the cap, they're not sticking out so now, I'M putting on the cap and just moving it back in the destiny and I'm gon na cut holes out for my ear so that the cap can lay flat by my sideburns okay. So now music still got to be glue gel to stick down my cap. I'M just gon na take that all across the front make sure that I'm covering up all of my edges and then I'm gon na make sure that I'm putting some by my sideburns in my ear just to make sure that the cap sticks down on the sides And then I'm gon na go over the gossipy glue gel with the got to be glue spray just to ensure that it sticks there really good. Then I'm gon na blow dry it and after I'm done blow-drying. I'M just gon na cut off the excess cap. Be sure to make sure you don't cut it too far back where you, where your hair starts to show, so I'm just trying to look in my viewfinder to make sure that I'm just only cutting where there isn't any hair. So if you see me like pulling back a little bit, I'm trying to make sure that I don't cut where I have hair okay, so once you're done cutting it off, you just want to put on your wig and make sure that your hair line is plugged Properly to where you don't see your cap underneath your wig, so I'm just adjusting it to see how I'm gon na wear it and then I'm gon na be cutting out my ear flaps. So I'm just gon na make a cut. Then I'm gon na part it with my comb and pin the hair up and then cut out the part of the hair so that the wig lays flat by my ear and then once I'm done with that side. I'M just gon na go ahead and do the exact same thing on the other side. Make sure that you have the other side secure when you're doing this side to make sure that you don't cut off too much, because if it's not adjusted properly and you cut off the other side, you'll end up with your front foot being too short. So be sure to make sure both sides are even they're gon na just go ahead and pull back your wig and cover your stocking cap with some makeup. If your stocking cap is the same color, if your skin or just one shade lighter, you won't need to do this part. I would suggest getting like knee-high from like Walgreens or something to do this part, but since the hair company always sins them, I just used them. So I'm just gon na be using some alcohol, 91 % make sure you have a high percentage of alcohol so that you know that you're cleaning, your skin really good. I'M gon na clean my skin with the alcohol two times and then I'm going to apply my Bohol active legs glue. Actually for this tutorial, I did two layers of my boho active and then I did two layers of our regular boho, which is the one that has like the blue label and just for the record. There isn't any particular reason that I use two different kind other than the fact that I'm running out of the active one. So I just use the other one, because I don't know I don't know it's no reason you don't have to use two different kind. You can use just one so when you putting on your layers, you want to smooth them out really evenly and make sure that you let them get completely clear before you put on your next layer. So, as you can see, I'm smoothing it out and then I'm letting it get clear which is pretty much dry before I go ahead and put on my next layer. So now that I'm doing all for my layers, I'm gon na pull my wig down into place. So I'm just gon na make sure that I'm lining up my hairline as close as possible to where I ended my glue. You want to make sure you don't have it too far back to where you have a lot of lace, and you want don't want it to be too far for when you have a lot of hair hanging over where you end up cutting off your hair. So I'm just going to be using the comb to push the wig into my glue and then I'm just gon na make three slits in the front just to cut off my hair, well cut off the hair cut off the lace in smaller sections, I'm just going To be using the eyebrow razor to do this part, so I'm just cutting off the lace. Try to make sure that you don't do what I just did. I accidentally cut into my lace where the glue is so I'm gon na end up having to go back and use some alcohol to get off the excess glue, but try to make sure you're not cutting it too far back. But since I didn't have a mirror, I was just using the camera. I kind of messed up right there, but that's okay, because we just don't get that out and I'm just combing my hair back to see how my hairline is looking on this side. And then I'm just gon na cut off the lace on the other side. Okay, so now I'm using some Nairobi moves. You can use any moose that doesn't have alcohol in it. Please make sure it doesn't have alcohol in it, because if it does have alcohol in it is going to make your legs lift your legs will not stay down it's going to lift. So what I'm doing is I'm perfecting my part and I'm just beginning to do my baby here. I did my baby here in small sections this time, which not really sure why I did that. I just wanted my edges on the side where my part is to look different from the edges that I'm gon na have in the front. So I'm just gon na be perfecting this part for quite a while, and I'm just gon na be cutting it and swooping. It and just doing extra stuff until I get it to be exactly how I want it to be so, when you're doing your edges, please be sure to be really gentle, because if you're too, like heavy-handed when you're doing your edges and you're using mousse, you will Cause your legs to lift up, but don't be afraid like if your legs does lift up while you're doing this part. If it does, you just want to stick it back down into place because once the Moose sets it will restrict your legs. So you won't have a problem with like if your legs does, you know, lift up during this part. You won't have a problem with there. Reese ticking down after the mousse dries just be sure to not have any hair stuck underneath the lace. If that makes this okay, so once you get your edges, how you want them, you want to slick them down. Well, you want to just put something on to hold them down. Usually I use rap strips, but right now, I'm just using my scarf um and then I'm just gon na be using my hot comb to make sure that I lay down the root part. You really want to invest in a hot comb. If you don't have one or you can use a hot styling tool like a curling wand or a curling iron, but a hot comb is the best thing to use and then I'm just gon na be styling it, which is, I decided to do a symmetrical bob. But I'm doing it longer on one side and short on the other. I ended up not doing the full cutting part on camera because I needed to use a mirror. So you gon na notice that it's shorter at the end, and it is right here when I'm cutting it, but this is pretty much it. This is the final look, okay yeah. So this is the final touch.
Comments
iamtrinaful: #BobSeason!!! girl u did this
Esther Kerry: Wish you did a video on how you cut it into a side bob but the video was helpful
Ahayah Yashaya: I love ya accident ! Keep em coming
Hunny MacBride: IFFN' you disappear on us one moe time But seriously, you have been well missed❤️❤️I love your videos ❤️ They are so informative ❤️❤️So basil leaves I'm just glad you're back hon ❤️❤️ MUCH LOVE AND SUCCESS TO YOU ❤️❤️
B Adams: great video. I wish you would show us each step you're doing first without the speed up and then speed up, that way we can learn.
Amber Lema: Yessss we missed you!
Monsie babe2: Fekkin flawless babe
Avanti Wingate: I love it
Erica Ese: How long do u wear this wig, it's almost like an install
Lexii Lexy: I wanna see can you do tribal braids ? or help me what braid style I should get next? because ill already had goodness braids or crockets braids or interlocks so idk what to get next ?
Shelbbbsss: Girl I then sat here and watch all your videos
sandra edouard: What size cap did you buy
amoyah williamson: ayyeeee shes back!!!
Doll Face: Ooooo this is a looooook
Tiamya Taylor: U did good
Shymeria's Vibes: omgggggggggg,
Erica Ese: You are beautiful
bioncaa Miles: feed in braids