Quick & Easy Curly Bob Wig Slay|Rpghair
- Posted on 28 November, 2020
- Bob Wig
- By Anonymous
Welcome to IAmBeautifulHustler TV
Be sure to SUBSCRIBE & Turn ON Your Bells✨
This BOB lace front wig is from https://www.rpghair.com/
====== RPGHair 2020 Black Friday Sale======
$15 Off Over $159, discount Code: BF15
$30 Off Over $259, discount Code: BF30
$50 Off Over $359, discount Code: BF50
Time: Nov.27th to Nov.30th
Wig Details in this video:
180% Tight Curly Indian Remy Hair BOB Lace Front Wigs[BCT04]
Wig Link: https://www.rpghair.com/180-tight-curl...
Hair Color: natural black
Hair Length: 14 inches
Wig Density: 180% Very Full
Cap Construction: 4.5" part lace front wig
More Trendy BOB Lace Wigs:
https://www.rpghair.com/bob-lace-wigs....
Hot 360 Lace Wigs:
https://www.rpghair.com/360-lace-front...
Join Rpghair.com on Social Media:
Youtube Channel: https://www.youtube.com/c/RPGHair
Instagram: https://www.instagram.com/rpghairwig/ @rpghairwig Giveaway is underway.
Facebook: https://www.facebook.com/rpghair/
TO PURCHASE MY HAIR & PRODUCTS FROM MY BRAND: (TheBeautifulHustlerBrand )
Use Link Below ⤵️
WWW.iBhSlays.com✨
We Ship Internationally ✈️
TO CONNECT WITH ME ✨
Personal IG: Iambeautifulhustler
Business Instagram:_Beautifulhustler & @thebeautifulhustlerbrand
Twitter:_Beautifulhustl
YouTube: IAmBeautifulHustlerTV
CONTACT ME✨
☎️ 786-571-1313
Email : [email protected]
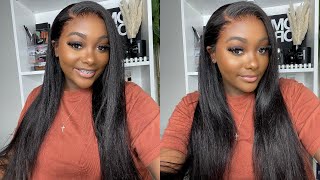
Hey beauties and welcome back to i'm beautiful hustler tv today, we'll be doing a curly bob look and um. Today'S has provided by rp g hair and they sent over this pre-bleached knots. Um curly wig unit, so all i had to do was just do a little bit more plucking and once i got it all plugged up um i started to install the wig. Thank god i didn't have to bleach the nose because it's just like one process. I already completed, but, however, we're gon na go ahead and install this look and i will be doing just a hairline full of mousse baby hairs, which i did not show you in this video, because it's going on our baby hair tutorial video, so um, i'm just Going to jump straight into this installation today, so of course i'm gon na go in with my foundation and add it on the inside and on top of the lace and the color that i'm using for her today is the color cognac from the kisses cream palette. Um foundation and once i finish, applying all that foundation on the lace and i will go ahead and begin to add my layers of adhesive and then begin to tack down the wig good. Now, after applying all of the layers, i'm going to go ahead and pull that lace down into the glue. I'M just apply some pressure at my fingertips on the front of the lace and then i'm going to have her hold each side down, because i'm going to blow dry on the heat setting and also hot comb it into place as well. You know before i tie it down with the mailbelt good. Thank you now, after letting that melt belt sit for about five to ten minutes, i'm gon na go ahead and remove it and just go ahead and cut that extra lace from around the ears that way. Um, your client is not um irritated with the cap or anything like extra lace around the ear because it will get irritating even if they don't fill it now. They will definitely fill it later and it can make them soar so make sure you do always cut any extra lace from around the ears that way the wig just lays nice and easily and they're not irritated, but once you complete that step just going in with The fresh eyebrow razor and begin to raise off your extra lace. Okay and of course, after you finish, uh razoring off the extra lace tack down any lace that still may be lifting that you did not uh get with the glue and just slide it under those little places, and just you know, of course take it down um. As close to the tip as possible and uh, once i do that, i'm just gon na you know pull the hair out for the baby hair section that i'm gon na be using um. After doing that, because you know all of that, hair will be cut off when i cut off a cut down and then i did the mousse method for her baby hairs, which you guys will see in the baby hair tutorial. But i will show you guys the ending look of it or as you've, seen also from the thumbnail and beginning of this video, so just keep watching. Oh, so i'm just being completely honest with you guys, um at first i was going to do like a side. Part with the baby hairs, but this part is more so um. Well, this wig is more so like a um, it's okay, it's a lace, frontal wig, but it's more so the lace frontal that only has like the lace in the middle up to four inches and on the sides. It'S only like an inch at most. So i did not want to do a side part that was going to be so high up. It'S going to look like a middle part, so we just decided to just do a no part like we're just going to do the flip over method, and you know usually i do still do like a little part with my flip over method, but i really couldn't Do one with this one at all, so it really had to be like a comb over look. So i just went ahead and you know um, you know, add a little wax stick to the top and then hot combed it out and just you know, sprayed the hairline down with the uh holding spray and tied it down again and let this sit till it Dries so this is what it looks like after removing it for their second time and i'm just going to comb those hairs out and i'm going to cut them on camera. But, as i mentioned earlier, uh the baby hairs will be done for the baby hair tutorial. So you will see that later on, which i'm trying to release um like beginning next week so stay tuned. For that, i'm trying to you know collect enough footage to get you everything. I promise that you will see in that video, so i'm just going to cut the baby hairs down to the size of an inch and just slide the baby hairs really quick um in a separate video and then i will show you the finishing look and i Did use the mousse method for these baby hairs, so just stay tuned, oh, and this is what the baby hairs look like. After removing it now, you can go ahead and comb your baby hairs into place, and i will actually do that here on camera. So you guys get to see a little bit of that, but um. I did use only the mousse method to create these baby hairs, and i just you know, swooped it and then tied it down, and this is what it looked like right. After removing um the black wrapping paper - and you know i did kind of like let it air dry this on and then i blow dried a little bit on the heat setting, but i'm just going to smooth out some of the baby hairs, not all of it. Just some of it, so i can have it swooped. You know more perfectly and honestly, with the moose baby hairs, you can get them to look very natural. That'S like one of the benefits of the most baby hair, but at the same time you might not always get the perfect swirl that you want, even if you shape them perfectly beforehand, once you tie them down and you know remove it, it could stay in place Or could just mess up a little bit but not like uh? Oh my god, my baby hairs are horrible, messed up. Just some hairs can't get out of place, but you can just comb and smooth it and you know just cut anything extra off that you do not need. So that's just a little tip when working with the mousse baby hairs, but um. All i'm going to do now is just take that same motions, mousse that i used to do the baby hairs and just apply it on the hair just to make the hairs. You know the curls more popping and give it off that you know wet, look and have the curls more defined, but that would pretty much complete this uh simple, easy tutorial. I hope you guys still enjoyed it, even though i left out some of the goodies for another video but um. Thank you guys for tuning in don't forget to subscribe. If you haven't already, because 80 of my population is always watching my videos, but still haven't subscribed. So stop being lazy, it's thanksgiving! You know i'm thankful for all you guys watching, but i will be even more thankful if you actually subscribe so love y'all, sending peace, love and full stomachs to you all on happy holidays, happy, happy, happy holidays to you all, and i will see you guys next Time, oh

Comments
Tatianalily: Love this! Could you please do a glueless frontal unit next x
MelaninMommy: I love the way you melt everything ♥️
Kemo Bennett: I love that look shay....the style compliment her face so much.....keep doing the good woto hun.
Moodahh King: Honeeeeey I am here for it look and all these updates yesss
BEAUTIFUL Queen: I love the comb over method no part
Valerie Naylor: Love this
proverb310: Hay Shae I U. The hair was beautiful and it looked great on your client. "Yes and ANOTHER 1"❤❤❤❤
Brownocean: Here for the slay
precious graham: hey this my first time with curly hair how do I keep the hair to have the wet curly look? And not dry
Aprea Thompson: Im gonna need that babyhair tutorial cus i be struggling with mines
Catina: Love this one nice and short please come to Houston
Meggans POETICAL Breeze: Laid periodttt... And She feeling herself as she should... Hell I would...
deseraymiles87:
Raynesher Rp: i WOULD LOVE FOR YOU TO DO MY HAIR.
Helene Saphir: Hello from Martinique
Christine Zapata:
Ht 2021: Baby hair is for little girl...it not classy at all for adults...