How To Cut Curtain Bangs On A Closure Wig | Unice Hair| Brionna Lakia
- Posted on 25 July, 2021
- Closure Wig
- By Anonymous
Hey Yall...
Sorry I’ve been gone for SOOOOOO long. My Ring Light broke and I still need to get a new one but I didn’t want to keep yall waiting any longer. So here is a video on how I cut CURTAIN BANGS in this 5x5 HD Closure Wig and how I install my closures. ENJOY✨
https://m.unice.com/unice-hair-pre-plu...
Sorry about the audio, I’m not sure why it sounds like this because it didn’t when I editing
Please comment if you liked this video. Share and SUBSCRIBE‼️‼️‼️
Stay Connected
Instagram @its.brionna
Facebook Brionna Carter
Hair Page on Instagram @styledbycarter_
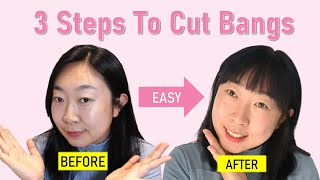
I'M starting to regret this and i don't want to regret it because i kind of actually like it from this side, see oh see, see and then from this side. It'S just like what am i missing: hey y'all. So today i'm going to be showing y'all. How i installed this 5x5 body wave closure and also how i cut curtain rings into this closure. Wig you'll see me do that shortly, but right now, i'm just going to show y'all how i do the stocking cap method for a closure wig. First, i'm going to take the got ta be glued. Excuse me got ta, be glue, free spray, um and spray it on the front or middle section of my head, and i'm also going to spread it on my braids just so that the cap won't pop back up. I guess from there i'm going to tie it down with this satin head wrap and i'm going to let that sit. I let it sit. I tried to let it air dry on its own, but it didn't work out all right. Y'All sewing back and my cap dried, i was trying to let it air dry, so i just got my blow dryer out and blow dried it. So now it is completely dry and now what i'm going to do is go in and start cutting these scissors suck or shears whatever they suck i'm going to go in and start cutting this cap, i was going to try to do a um voiceover, but i Think i'm just going to talk throughout it just to save me some time with editing and basically how i do my caps is. My hairline comes kind of in my face, so i have to cut mine kind of weird and i'm looking at my mirror off to the side. That'S why y'all that's? Why i'm looking that way? So, i'm sorry all right y'all! So now i'm back and i cut my cap, but i kind of cut it weird, because my hair is sticking out right here, but that's okay, i'm gon na use this bobo active to lay down the edges of my cap and i'm gon na put it on This so i'm back as you can tell i'm obviously going to do a voiceover, because i didn't do a lot of talking. I kind of get wrapped up in doing my hair, and i forget that i need to continue talking. But here i'm just using the got ta be glued to lay down the edges of the cap um. Yes, my hair, a little bit of my hair is out in the front, but it's okay. I know how to properly remove the glue and i have the glue remover to remove the glue. So when i do remove this wig, my hair is not going to get pulled out. Don'T do this on i'm going to take some of this powder, my flat brush inches and i've already sectioned out the middle. This is obviously now that i'm looking at it going to be too much for curtain bangs, i'm going to try to cut some curtain bangs into this wig. I already did some type of wand curling method at the back, but i don't think i'm going to keep it like this. I think i'm just going to do like some big wand, curls we'll see but yeah. So i'm going to go ahead and install this and then we're going to cut the bangs after i install it all right y'all. So here i am putting the kick putting the cap, putting the wig on my head securing the back of the wig and then taking out that braid. I had in the front now, because i do want to install the wig first before cutting the bangs. I need to brush this hair back and i'm going to spray a little bit of that got ta be glue spray on the front just to get those little small hairs out of the way right now, i'm trying to fit it to make sure i cut enough Of my cap off and i'm showing you that i did turn on my hot comb so that i can comb those hairs back as well all right, so i had to pin back the pieces in the front, so i can glue this wig down so to glue It down i'm going to be using boho active. I had to cut the top of it and i like to dab it on the little piece of cardboard that the cap come on, so i'm just going to squeeze some out. That should be a good amount. I'M going to use this the end of my edge brush and i'm going to start applying this to my cap and what i like to do is i like to take the glue on my skin, and i also put it like on the cap so about. I did like an inch of glue. I don't do just like a little line on my hairline, if that makes sense all right y'all. So here um, i just explained what i was going to do put some glue on. I did about three layers of glue because i did plan on wearing this wig for a little while i want to try to keep it on for about a week, so i did about three layers of this boho active, of course, letting them dry in between now. I didn't completely let them dry like i was supposed to, but if you use glue, let it dry in between, but don't let it dry too much because then it might not stick um. I'M also clipping the sides back, so nothing gets in my way and again just letting that glue dry. I'M going to put this into the glue, all right y'all. So now i have the wig on it's glued. I'M gon na go ahead and lay it down with this and actually gon na fold it. I don't, have an elastic band. I know everybody doing like the little elastic band trick. I don't have an elastic band, so i'm just gon na use this elise layer, downer and i'm going to tie it fairly tight, all right y'all. So i went ahead and tied that down. I let that sit for about 10 minutes. Then i peeled it off slowly. I also laid down, i cut it out the video, but i laid down the little edges that were sticking up on my wig and now i am going to basically show y'all how i part this hair to start the bangs, and you want a nice even part When you do this, bang, because you want everything to be symmetrical, symmetrical um mine's was a little bit off, and i noticed that after i had already cut the bangs that one side was fuller than the other. I don't necessarily think that it had anything to do with my part being crooked, because my part was straight. I believe it's just probably the hair. Maybe i over plucked on one side um, but one side was most definitely thicker than the other, or maybe that was just how the closure came. I'M not really sure one mistake i did do and i'm gon na point that out now is i put too much wax on there on the hair, but right now i am showing you how to part the hair for the curtain bangs, so basically you're going to Want to part a triangle, make a part down the middle and then make a part on the side now, because this is a closure. I obviously can't go too far over but you're going to want to make a small triangle. I am going to correct this in a second, because this is too thick of a triangle and you can test how thick you want your pieces to be by um holding them in the way that the curtain bang will fall and you can kind of eyeball it From there to see that that's probably going to be too thick or it's going to be too thin, you are going to see me correct myself once i comb these two pieces together or it looks like i'm correcting myself now, honestly yeah, so i'm going and i'm Correcting myself, and no i'm not i'm not correcting myself. Well, i'm going to these pieces are way too thick. I'M going to straighten out those parts like right now, it kind of looks like a half circle, i'm going to correct it. So it looks more like a triangle see like one side is bigger than the other. I think it's just the hair guys. I don't really think it's me, but yeah i'll come back in a second all right. So i did also want to say that, and i'm moving really fast, because this is better, but i was moving so slow y'all. This. I was recording this at like midnight until a little after 1am trying to get this right. I was really scared. I had never cut bangs like this before in my head, and i wanted to make it look as perfect as possible, and i also wanted to make sure that you guys understood what i was doing so yeah, i'm now, i'm going in i'm making those pieces smaller Because i did realize that they were too big and it's going to look more. Like a triangle now see, it looks more like a triangle already, and i was happy with the way that that looked and just i just keep checking it keep checking, see and i'm measuring to make sure that that's the thickness that i want it to be, and You want to make sure you comb. I would personally start off with measuring making sure that it's the length that you want it to be so start long and you can cut shorter if you need to, but you can't start short and make it longer, and this is a wig. So it's not going to grow back. I would just have to completely replace the closure, which i don't plan on doing so just keep double. Checking yourself. Take your time. Please do not rush this process because if you mess up you mess up, but y'all can already tell that this looks more like a triangle already and she is giving scalp honey but yeah i'm gon na go in. I think i'm about to cut it. Now. I'M sorry i recorded this last night and i'm a little tired, yeah, i'm about to go in and cut i'm just making sure that everything is straight. So i'm cutting above my upper lip and you see a buckle there. I stopped cutting because i didn't want to mess up, so i'm going to comb it out again, i'm going to cut yep, and so it is a little bit crooked. I noticed that now now that i have my bangs next. What you're gon na do is make sure you're going to cut straight across first at the length that you want, remember, don't cut too short and then next, what you're gon na do this is the hard part is you're gon na cross it. So your hair is gon na. Look, you don't get what i'm trying to do? Okay, i'm trying to explain this. So after you have your two sections of your bang you're going to take one side, make sure it's combed out and you're going to cross it cross. It over making sure that your fingers that you're holding it with are parallel to your part, and this is going to give us that look, making sure that they're parallel to your part and then you're, going to cut off all of that hair. So it should look like that, where it's short here and it's long up here so you're, going to cut all of that off where you, where you hit the short piece hold on, and it's gon na give us this. You can't really see it see how it's trickling down and you're just going to repeat the same thing when the other side darling so again making sure your fingers are lined up with that part. I'M going to do this hand this time. I don't think i can cut with my left hand i'm right-handed, but i need to do this correctly, so making sure it's lined up yo yo, i'm trying to do this. I'M trying to make take my time and not do this incorrectly so and bring it all the way down until you reach that shortest part, you kind of see it. My fingers are kind of fat hold on until you reach the shortest part of the hair, and now you have all right y'all. So after i cut my bangs, i'm going to go in and try to blend the bangs into the rest of the hair. So i did want to start off by using the scissors, but those scissors aren't that good. They don't drag well enough for me, so i used a razor comb to get that um. I called it the trickle, but that layered look in the front so that everything looks blended and i just drag that razor comb down the length of the hair, obviously not going overboard. I'M not trying to make layers throughout the hair, i'm just trying to make layers on just that front section, and then i'm going to take my flat irons and bend it. And here's when i actually got excited because it started to look like what i was going for no all right, i'm gon na style, i'm going to speed this i'm going to speed this part up all right. So here i'm just going in and bumping the bangs and i'm also just one curling the pieces in the front that i didn't want curl before they were in that big braid at the beginning. So here on my left side, it came out really really cute. I really liked it and on my right side, it's something about my right side that just doesn't give like. I don't know y'all, it's it! It'S like this, when i also just am trying to curl bangs, not like bangs like this, but like long bangs. My right side of my head just doesn't give like the left side does, and i don't know what that's about it never matches, because the hair is the same length y'all. I double check one thing i did notice today because this is the next day of me. After i'd cut my hair, i noticed that the right side is also bumped a little bit heavier than the left side. So, that's probably why it looks so different, i'm starting to regret this, and i don't want to regret it because i kind of actually like it from this side, see oh see, see and then from this side it's just like what am i missing. Maybe this is just my bad side, we don't know, we don't know, we don't know and yeah. So if y'all like this video, give it a thumbs up if you like my bangs, give it a thumbs up if you liked, if i explained how to do it, you know correctly give it a thumbs up comments, comment and tell me you know, can i you Know do you think they cute comment and let me know if you think i should just cut them into like the regular bangs or if i should leave it like this um yeah y'all. Just let me know um the hair comes past, my boobs, but yeah y'all. Just let me know what y'all think i think it's really cute. I never had my hair like this before all right, y'all, so editing brianna is here. I actually like the hair. Looking back at this clip now it looks great. I don't know what my issue was. So yeah, oh and if you haven't subscribed yet please subscribe thank y'all for all the love i got on my last video sorry. It took me so long to make another one. My ring light broke and i'm using this little tiny one, but this tiny one is kind of given, though like, and i will have more wig videos coming soon. I just ordered another wig. It'S a curly wig, so y'all go see me install that i can't wait to get that wig! That'S gon na! Be my birthday look, so i will do a video on how i do my makeup. For my birthday, my outfit and my hair, so yeah subscribe comment. Share my video as well repo um, i'm gon na go to bed thank y'all for watching love. You bye,
Comments
The Whole Package: Just subscribed