How To: Blonde Streak/Section On Curly Hair | Ft. Asteriahair | Beginner Friendly
- Posted on 01 August, 2019
- Closure Wig
- By Anonymous
Hey 's
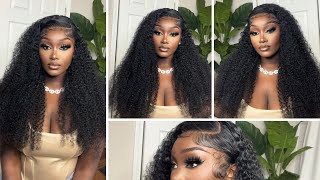
Tai is back at it again but today...with a little remake! Today i tried the blonde streak on curly hair. Even after bleaching this hair
it kept its curl & the bleach didnt dry the hair out! This wig is super beginner friendly & so was this color! Be sure to LIKE, COMMENT & SUBSCRIBE for more wig videos!
#blondestreak #curly #curlywig #beginnerfriendly #beginner #asteriahair
DID YOU CHECK OUT?!
BLONDE STREAK on Straight Hair
HAIR DEETS:
#DeepWave 6*6
clsoure wig
22''
180 denisty
Direct Link
#AsteriaHair OFFICIAL STORE http://bit.ly/2VYA1hm
For Beginners 6*6 Closure Wigs http://bit.ly/2VUbXfI
Affordable 13*4 front Wigs http://bit.ly/2VUJ9DI
#AsteriaHairDeepWave Hair http://bit.ly/2VSYhRZ
WHOLESALE Whatsapp: +86 15136424039
Subscibe AsteriaHair YouTube http://bit.ly/2VWgnCK
Follow AsteriaHair IG http://bit.ly/2VWgBd4
——————————————————————————————————
FOR MORE PICS OF THIS HAIR LOOK CHECK OUT MY INSTAGRAM
@ItsGlamByTai
ADD ME ON SNAPCHAT
@SNAPGLAMBYTAI
——————————————————————————————————
WANNA COLLAB? BUSINESS INQUIRES?!
-----------------------------------------------------------------------
-----------------------------------------------------------------------
Hey YouTube, I'm back with another video and it is ty aka glam by ty and today I'm actually doing something that I may have done in the past, but I just never did it with curly hair. I know I don't know why, but you guys have seen my video if you have you just be in my video of when I did the blonde patch or the bronze section in the front, I will make sure that I link it up in the cards so That you guys can check that out, but today I'm gon na be using this hair from asturias hair company, and they were kindly enough to send me this packaging, which I keep all my wigs and store them in there. But they actually sent me a 20 inch closure wig. So this is their deep wave hair and it's a closure wig. So you only have lace of the 6x6. Please so there's only lace and a horseshoe section of the wig there's no lace on the sides. It'S not a full lace. You actually have combs on the side that actually help you put the wig and keep the wig on. So we are gon na be working with Lightner and in Bleach. If you want to call it - and so you just want to make sure that you're doing this on a wig that you want to play with home, if this is your first time cases, so I'm gon na be using the kalida colors for dark hair, they're, Lightner And it's a blue tone, light nerd that looks like this and I'm also gon na be using 40 volume developer a mixing bowl and a brush. I'M also gon na need some hair ties and hair clips. And last but not least, I'm going to need a rat tail comb, preferably right, so that it's easier to section there ace announces. How you section is all is up to you. I chose to do a little bit bigger section than what I did in my last video. If you guys didn't see my last video, I will have it linked in the description, so you guys can go check that one out too, but I'm basically just taking a horseshoe out of the lease. If that makes sense, you could part it. However, you want, you can do a triangle at the beginning, you do a block, a box. Whatever you choose to die, that will be your section. All I did was. I took like a c-shape of the lace and that is going to be what I'm lightening or that's gon na, be our patch in the front. I guess you could say you are section and yeah. It took me a little while because y'all know I like to get everything perfect, but it looks like this and that's how much hair is going to be lightened and yeah. I'M gon na go on ahead and tie this up just so. I can get out the way I don't want it to be mixed in with all of the other hair. Okay. So now for the fun stuff, we're gon na, take the collider colors Lightner or the bleach. Whatever you decide to call it. Mines has a little scooper in it and I got it from my beauty supply store. I think it was like ten eleven dollars, I don't even remember, but it was cheap and I got it and I'm gon na be using that little scooper to measure how much bleach I'm gon na use. So so far I did one scoop just like that, and I'm gon na take my 40 volume developer. Now you don't have to use 40, you can use 20. You could use 30 40 is just gon na get you there faster. That makes sense. So I'm going to eyeball it and basically I'm getting it to like a thick almost like a toothpaste but like melted, toothpaste, consistency if that makes sense, icers take my advice and don't be as clumsy as I was spilling it and cuz this burns. If it's such as your skin, okay, okay, so this is the consistency that I wanted. It'S not too runny, but it's not hard stiff and so yeah you're gon na need some aluminum foil and it doesn't matter if you're, using hair for you or kitchen foil, you're gon na need some gloves they're. Just some like nursing gloves that my mom had laying around how's that I done stole so yeah. Okay. So now that we got our gloves on, I'm gon na take a piece of aluminum foil and I'm gon na be folding that foil in half. It doesn't really have to be. You know exactly like mine, it could be as big or small or whatever, depending on your section. I'M gon na place that on the back of the hair, basically where our blind part is not going to be, I'm just protecting that side of the hair, so I'm gon na start doing it started doing that outline of my section and I'm doing this just to Make sure every strand of hair is covered with Lightner, okay, okay, so one of my tricks is that I like to section the hair - and I do this just so that underneath it gets covered as well, so I'm taking some bleach and liner and I'm just painting Upwards and downwards in that section, and repeating I do this so that every strand of that root is covered and that I don't miss any spots, because nothing is worse than trying to bleach hair and you still got black or you know, brown streaks in it Mike Uses so another thing that you guys probably noticed that I'm working from the route down to the mid-shaft all the way down to the ends and a reason why I'm doing this is because the root of the hair is where it's more bulky yet. So I would definitely want to make sure that the root in the mid shaft is saturated, and then I worked my way down to the end. Okay. So now, once my roots are completely done, I'm taking a piece of aluminum foil and I'm putting that underneath. First section and I'm just going to finish bleaching or lightening the mid shaft just like so, but what I like to do is I do like to go up and down okay, but I also like to go side to side and the reason why I do this Is because I want to make sure all that hair is being covered with bleach or Lightner, you don't want to leave any patches, so I go you'll see I go from side to side. I go up and down as well. I'M just trying to saturate this area. Okay, so you're definitely gon na want to lift that up in bleach or light in underneath now. The reason why I'm doing this is because sometimes not all the time does the bleach go completely through the hair. So it's your job to go. I like using my side to side, but also lift it up, check, do little checks because there's nothing worse than trying to get a blonde section or a blonde page, and you got Brown Street says it's just not working so now, once we, you know see that Our hair is marinating and bleaches we're going to fold aluminum foil fold. It all the way up. I'M gon na take that back piece that I use to cover for the rest of the hair, I'm bringing it forward and I'm gon na use it to cover the front part of this section. Oh darling, so now for the rest of the hair, I'm taking it out of the hair time and I'm just gon na fluff it out let it fall naturally, and it's important that you're letting the hair fall naturally, okay, says so I'm just going to go on The ends and eyeballing it I'm literally eyeballing it I'm seeing where she has some defined curls at the end and I'm using it to light in it. Okay, so you can choose to do this, you could just do the blonde section. You could just do this and not the point home section, it's all up to you, but I'm gon na hair fall naturally and I'm just doing the tips so once I've completed the ends. This is what the wig looks like, and this is why it's important to let it fall naturally, this okay, so once I washed all that bleach out shampooed and conditioned Harrises, this is what she looks like she's super soft still. She still has a curl because y'all know some curly hair companies. If you bleach their curly hair, the curl pattern goes away, but she kept her curl. She kept her softness and I went on ahead and I plucked her and she's super ready to put on. So I didn't mention that this is a closure wig, so there's no lace on the sides. So there's only these combs, I'm gon na take those combs and I'm gon na put them in inside my wig cap and that's gon na help me secure this wiggle cases. I'M gon na take my got to be free spray and I'm just spraying that and tagging it down getting the wig ready, the laces okay. So when it comes down to tacking the wig down, I'm just pulling it forward over. I believe my god to be freeze for, and this wig was super easy to put on like if you're beginner friendly and you don't want lace from ear to ear because you're just like. I don't know if I know how to put that one and you're kind of to be in, but you still want a good enough part in space to do things with. This is perfect. It'S a six by six closure, so you get more or less than what a closure wig would and you don't have to worry about the full lace effect of trying to glue down lace from ear to ear all right, so Ivy, yep girl, don't got dog that If she ready to go somewhere, I ain't even going nowhere. Okay says: don't let me for you, I'm gon na go ahead, cut this release. This wig was super easy to put on, like I feel like the color might not be easy for you guys, but if the wig itself just applying and installing the wig, it's super beginner friendly, say you with me an inch okay, okay, sis. So now that we done fulfilling ourselves, one suggestion that I could make is that may be or may not be doing the ends again, because the section is a whole lot lighter than what my ends are, but that's fine. I mean it still works for me. So I don't care I'm gon na take a piece of the section in front and that's gon na be used to make my baby hair. You know my Luba shmoop yeah, I'm cutting that off. I'M taking my fries spray, my toothbrush and I'm sticking it down. I feel like it could be easier for those people that don't really know too much about wigs. If you only have to worry about a little section in the front of leaves with this parting, I probably did like three baby hairs. If that some II - it's not that hard - I mean that's something that's maintainable, especially for someone who doesn't know how to wear wigs. So I'm gon na take this argan oil that I got the beauty supply store. It'S a silk serum and I'm going to put this all over the hair, even though the hair is super soft super shiny still, I want to maintain it that way, because y'all know when y'all bleach hair could get a little dry if you get a little brittle Depending on a hair company, but so far so good with a steer, your hair and I really like them - they're beginner friendly and they got some bomber hair that you can do a lot with. Okay, alright! So for my styling product, I'm taking the Cantu for kids, there's styling custard, I'm specifically using the one for kids. I feel like it's not harsh at all. It keeps the hair super soft while defining the curls. So this is like my go-to for curly hair. Like I love the love this product, I like the curl cream too, but the styling custard, just just just fine for me - okay, guys so that wraps up this video, if you guys want to see how I shape and define my curly hair I'll put it in The description below don't forget to Like comment and subscribe. I will see you guys on my next video bye


Comments
Anastasia Zygmont: “Do it on a wig you wanna play with if it’s your first time” *Me full well knowing I’m doing this on my actually hair*
sxsav: You should do a video showing us your whole collection of wigs
Asia Mone’t: Def abt to try this on my next curly unit ! Loved the vid !
Marie Hardwick: Gorgeous as always
Itsmecoriee: You are beautiful! I love this wig on you !!
Blackgirlwithasthma: I need more finessing videossss i love them!!!
doc_ahs _: would the result be any different if i used it on my real curly hair? how long should i leave it in?! please respond !
Aneice Barnes: How long did you let the bleach sit before you washed it out?
House of farts: I would happily take this wig if you don’t want it!
AysiaAysia: You are gorgeous! How is the hair holding up?
Danni John: THANKYOU girl but when that model collapsed I lost it
Abbeyxo: I want to do this on my curly hair but I have bangs
allyssadray _: *Sniff sniff * I smell underattedddd also what hair type is that wig-? As in like 4B?
jayy: Siss the makeup‼️
Jordan Jordan: You’re so pretty
Miara World: how long did you leave the bleach on for??? ❤️
Chanel Mosquito: You are so pretty
sxsav: I’m pretty much the only one awake lol
Janett!: I’m I the only one who saw the head mannequin makes eye at 4:04
Nana Louis: Is this 384 golden blonde
Aaliyah Goblinkid: you kinda sound like nicki minaj