Best Big Long Curly Closure Wig Install! Looks Lke A Frontal! | Nadula Hair | Alwaysameera
- Posted on 12 August, 2022
- Closure Wig
- By Anonymous
Friend! this is one of my best long curly closure wig installs. Do y'all like long curly closure wigs? cus i think i am in love
●▬▬▬▬▬▬▬▬▬ ◆ #NadulaHair ◆▬▬▬▬▬▬▬▬●
❤All the hair can be paid in 4 installments
★ Use My Special Coupon to get 10% OFF: AA10
Direct link in the video: https://st.nadula.com/bl9iq
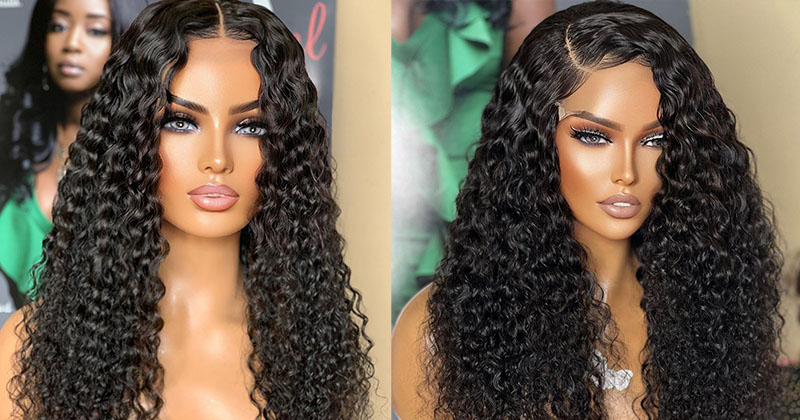
Hair Info: 28 inches 5x5 HD Lace Jerry Curly Wig 250% density
https://www.nadula.com/ ➤ Top-sale wigs: https://st.nadula.com/bl9sr
Can’t miss affordable V part curly wig: https://st.nadula.com/bl9ss
Invisible 13*4/13*6/5*5 HD Lace Wigs: https://st.nadula.com/bl9st
New arrival Fashionable Wigs: https://st.nadula.com/bl9su
Top-selling bundles with closure& frontal: https://st.nadula.com/bl9t2
Nadula Customer Service Email: [email protected]
Aliexpress Nadula Hair Website: https://bit.ly/33oOx83
Aliexpress Nadula Hot Sale Wig: http://bit.ly/3068Mlt
Amazon Nadula Hair: https://amzn.to/38ttXlC
Follow #nadulahair for giveaway:
☛Youtube: https://www.youtube.com/c/NadulaHair
☛Instagram: https://www.instagram.com/nadulahair/
☛Facebook: https://www.facebook.com/groups/nadula...
#nadula #nadulahair #nadulawig
T I M E S T A M P S
00:00 Introduction
02:55 NADULA HAIR 5X5 JERRY CURLY Wig Details
06:09 CREATING THE WIG BASE (NO BALD CAP METHOD)
06:49 FIRST IMPRESSION APPLYING WIG, NO CUSTOMIZATION
07:13 CREATING A FAUX FRONTAL HAIR LIKE
08:55 FLATTENING THE HAIR LINE USING MOUSSE
11:26 TINTING THE LACE USING LACE TINT
13:16 CUTTING OFF THE LACE
14:28 APPLYING THE WIG DEALER SPRAY
16:29 ADDING BABY HAIRS TO CREATE A REALISTIC HAIRLINE
19:46 LAYERING AND STYLING THE WIG
27:44 DEFINING THE CURLS USING MOUSSE
34:13 THE FINISHED BIG CURLY LOOK
36:05 $10 & $20 OFF COUPON CODE
H A I R / W I G P R O D U C T S U S E D
Annie shears- https://amzn.to/2MVwkDF
rat tail comb- https://go.magik.ly/ml/17cf2/
Wig grip (keep your wig in place): *LINK: https://amzn.to/2KDky1w
brown wig caps- https://amzn.to/2MVwkDF
ORS WIG GRIP spray- https://amzn.to/3q7xwIt
ors wig grip gel- https://go.magik.ly/ml/1jixv/
got 2b glued gel- https://amzn.to/2s052om
baby hair brush- https://amzn.to/2QoKS0E
hair clips banana- https://amzn.to/2T5mwLh
dyson blowdryer- https://go.magik.ly/ml/1jixp/
zeeellee wax stick- https://bit.ly/3IiPvSl
Shea Moisture flywawy hairline mousse- https://go.magik.ly/ml/1jixm/
shea moisture frizz free curl mousse- https://go.magik.ly/ml/1jixq/
wig dealer gel- https://bit.ly/36PDSoo
wig dealer spray- https://bit.ly/3sT4U4c
FOLLOW ME:
Instagram: www.instagram.com/alwaysameera
Facebook: www.facebook.com/alwaysameera
Twitter: www.twitter.com/alwaysameera
A LITTLE ABOUT ME :-)
AGE: 34
DEGREES: BA PSYCHOLOGY & HALF OF A MASTERS :-) IN CLINICAL MENTAL HEALTH COUNSELING
RELATIONSHIP STATUS: MARRIED
CAMERAS TO FILM: CANON EOS R & SONY ZV1 (SIDE VIEW)
EDITING: IMOVIE & WONDERSHARE FILMORA
SEND ME STUFF (PO BOX)
AFFILIATE LINKS WIG GRIP GEX WORLDWIDE on Amazon
*LINK: https://amzn.to/2KDky1w
*Scentbird: https://www.scentbird.com/?utm_campai...
*firmoo: https://shareasale.com/r.cfm?b=113205... _________________________________________________________________
Business Inquiries:
Email: [email protected]
*Some affiliate links are used, which means I may receive a commission should you decide to click that link and make a purchase. My content is 100% not influenced by brands, PR products received, usage of affiliate links, or brand partnerships
#wiginstall #wigreview #wigs #ALWAYSAMEERA
Y'All see that closure, where hi, ladies and gentlemen, everybody in between, i am back, i'm back with somebody else's hair and guess what it is: wine and wigs day, clink clink, clink, clink clink. What i say, click like that. I wish i could say i was drinking wine, but you already know you can guess i'm drinking tea, it's green tea! Y'All! Let me know what you're drinking down below do y'all see this hair. Because do you see these follicles look at thatI come on somebody, it is stunning, and can you believe that it is a 5x5 closure wig like come on y'all can't say i don't come through with the curly wigs, i'm just saying before we get into this new Scalp i got on my head and this lace that i got stickin' to my forehead. You can't even see it. I'M at y'all can y'all subscribe and can you hit the post notification bell just so you can see every single time i post. Why am i so? Hot, what's going on, did i get too excited? I'M really hot. Do you love curly wigs as much as i do, because i'm obsessed with curly wigs and this one is no exception, and i want to say thank you to nadula hair for providing this wig to me and sponsoring this video. This wig is another curly wig and it's a curly closure wig. Now i'm going to go ahead and get into the details, but look i'm just going to show y'all i'm giving y'all a little preview. See that oh wait, there's a track right there wait. Let me show this side cuz. I think i did it better, but y'all see. Let me do the front. Y'All see that closure where and look at the curls now this cut. I did myself but look at the curls. Oh, let me show you what it looks like from the side in the back. Did i show y'all look, look you see that oh come on somebody in this wig application. I wanted to do more of like a you know, like layered Sza, rockish sort of look. That'S always been like i love layered curly wigs. It makes them look. Bigger, fuller, livelier, {, im going to }, show you how i apply this wig, how to make your closure wig. Look like a frontal from the front. You know what i'm saying like when the wind blow the girls won't know. If you want to see everything, i did to customize this wig and get her looking like this, and you want to get more details about it. How she looked when she came out of the box, please keep on watching and i'll, be back at the very end, with my final thoughts and a coupon code. Okay, so now let's go ahead and get into the packaging. My lips are ashy every five seconds like that is really annoying. Now, let's go ahead and get started with the packaging on this wig and then we're going to get into applying this wig i'm going to make it quick easy, so i'm not holding y'all up today. So the wig comes in the nadula hair box. This is what the box looks like you know. You know it's nadula when it's a black box coming to your door, so inside of that box you receive gifts. Y'All already know i like to show you all the gifts now the gifts i receive may not be the gifts that you receive, but i'ma show you what came in this box. Of course we have the the nadula hair storage bag, keep your bag, so you can store your wigs, oh girl. They gave me a whole bunch of wig caps. None of these are my skin tone. Three packs of wig caps. For me, most likely you'll get one a headband, a nadula wig band, to melt your lace, which i love. I will be using that today they also gave me the little satin bag and inside the bag. I have another elastic band. Y'All have so many of these. It'S crazy, we have a bonnet, never can have too many bonnets. You already know what it is. It'S the elephant lashes, a powder brush, so we're gon na go ahead and put that to the side as well. All of the items that came inside the box as gifts now, let's get to the real gift: it's not a gift girl because you paid for it. Let'S get to the wig. This is the wig. Now this wig is a 5x5 closure, jerry curly wig. It is 28 inches long and 250 percent density baby. This wig is a 5x5 closure wig. I did oh girl, i kind of over bleach these knots. I rarely over bleach knots, but i was doing too much so i had a little bit of tequila and bleach and knots, and i was just when you pop the hood on the wig. You can see that this wig comes with three combs, an adjustable strap and it also comes with a piano key elastic band. This is so you can wear your head, your wig, glueless or gel-less, without having to adhere it to your forehead. It'S summertime girl. We need to be able to snatch these things off. You can adhere it to your head and it is adjustable as well, so you can adjust it to your head size. The knots were not bleached when i received the wig, so i did bleach the knots myself and i kind of over bleached them. As you can see, it's a little bit. It'S a little. She did a little bit much i'll, show you what it looks like before and after the knots have been bleached, but that's what it looks like after bleaching. Oh, i love a good bleach knot. Y'All know me they're, saying it's hd lace. Now we've talked about hd lace before hd lace is basically okay, so we have three types of lace. We have transparent lace right here, hd lace, right here in regular lace right here so between the three hd laces, my favorite, and you can tell why, when you're. Looking at my arm all three just don't they don't look bad, but hd lace is always that girl for me. So this is the one we'll be working with today. So now that we talked about the lace and the wig and all that type of stuff, let's go ahead and put her on our head base. I like her to be simple, because i'm gon na take this wig off in a couple hours, so i like to do the bald cap method just be taking way too long, especially if i'ma end up taking it off after i get done. I cannot sleep in a wig. I'M gon na tell y'all that right now i don't know if it's age, but i be hot at night. I tinted this wig cap before so. Hopefully this wig cap looks more looks closer to my skin tone base is done so now, let's go ahead and throw on the wig, let's throw one okay hold on girl. Oh, i over bleached the knots, but look at it. It looks so good. Okay, we're gon na do a middle part on this wig. Now, let me make sure it's straight. This is what the side looks like girl, it's giving very much um end of the row. That'S it it's just a dead end. So this is what it looks like on the edges. So let me take this wig off and we're going to do like a fake hairline. Why do i look like this? So let me plop her off. I'M gon na take a baby hair brush. Where is my gel hold on trying to be cute, so i'm gon na take some eco styler gel and we're just gon na lay down some baby hairs using a baby hair brush, and this is what i like to do. I'M just going to take some hair and brush it forwards. I'M going to do it down here as well. Y'All know i actually trimmed some baby hairs into my head, a shame. This is where we are girl. The same thing on this side. It'S just to give the illusion that there is an actual hairline here, make it look like it's a lace frontal, or at least like your real hairline. Now that that's done girl, that may not be enough, we'll figure it out, so we can go ahead and get to this hairline i'm going to stay up close just so you can see how i like to do the hairline, let's plop her right back on. Oh y'all, look at that hairline! Look at it, so i'm gon na part it down the middle. We'Re gon na! Keep it easy and simple. Today we're gon na. Do it down the middle moment down the middle hold on, let me make sure it's centered hold on. Oh, you can kind of see where i over bleach it girl. No, oh, that looks good, though next we're gon na go ahead, and you already know what it is we like to flatten our hairline now for me, when i flatten my hair lines, i like to use a mousse or something just to get it like really flat. So we didn't go anywhere, so the mousse that i like to use you can get it girl from your local target whatever. Oh. This is the shea moisture wig and weave fly away and wrap mousse, so i'm gon na take some mousse and i'm gon na flatten. It backwards we go and then we're gon na do the same thing on this side. I'M not plucking the hairline, because one i don't need to. Secondly, um i feel, like i over-bleached the knots and i actually ended up pulling out some hairs because i oh she did a little bit much so now that that's moves backwards. Next, i am going to go ahead and use my dyson, the dyson baddie, i'm a dyson baddie. Now, typically, when i used to flatten my hairline, what i would do is uh flatten it with a wrap-it strip, but i ain't got no wrap-it strips also. It takes too long to do so. What i'm going to do is use my dyson in the fly away attachment just to dry this, but i'm only going to dry it this way, i'm not trying to straighten it, i'm just trying to like dry it a little bit i'll. Do it on warm {, pastel, sky, music playing }? Now that that's done, you can see that the hair is over directed backwards and all i need to do now is um kind of flatten it with a hot comb. Now i'm going to use my andis hot comb just to kind of flatten it backwards and secure the wig going this way. So i take my andis hot comb and just hit the roots. Now you can also do this with the wax stick, but sometimes the wax. Stick don't be doing it, but we're moving y'all know i'm trying to be a mover and shaker in here. I'M not trying to be in here for six hours today, so that has been flattened backwards and, as you can see, let me pull this forward. It'S giving very much hairline, you see what i'm saying. Do you see what i'm saying you saw where i was going with this technically, it's not necessary to tint the lace, but i'm going to be honest with you. I like for my wigs to look seamless, so i am going to tint my lace. I always tint my lace. I feel like tinting. Your lace is a really good pra- practice. Now, when i take my lace, i use the same lace tint that i always use. It'S-, where is it? Where is she i like to use this lace tint spray? So this is the lace tint spray from flawless illusions: it is the flawless illusion by Kellon, Deryck lace, tint spray. This was created by Kellon Deryck Megan, the Stallions hair- wig stylist. I use the tone medium brown, it's the perfect tone for me and what i like to do is take one of these brushes. They actually provided one of these in the box for me i'll spray, the lace tint on it, but then i'll blend it in with the brush just to make sure it's even and we don't have any splotches. Now i've told y'all before i love this lace tint, but she is messy and i got a lot of white around me. I'M not trying to i'm not trying to turn this this office brown, so i'm gon na go ahead and take this wig off and i'm gon na spray, the lace tint into the cap and then blow dry it to set it. Why am i having such a hard time speaking today, what's going on { pastel sky music playing }, do y'all see the difference after i tinted the lace like i could leave this whole visor on and walk out the door. Oh, my god, is that your skin lifting up, oh girl, we're moving fast. Oh that's why we love closures, cause wow. Now we all we have to do is cut off our lace. Now i need to pull this back. I'M gon na pull this part of the hair back. I'M gon na pull it back like this, but in order to cut the lace i like to use um my annie shears and we're just gon na snip it off now, as you can see like right here, there's like a little folded part where the lace is. I try my best to cut part of it off so i'll, go like at an angle like this and then i'll do the hairline. So no i'll just go all the way across in a zig-zaggy. The lace has been cut. Let me tell you something friend: you don't need to glue this down. You could be done at this point, but i like for my wigs i like to gel down or spray down my wigs, so i'm gon na go ahead and use either like a gel or spray depending what type of mood i'm in, and i think i'm gon Na start with the spray and maybe go over it with the gel with the wig dealer gel, so let me show you the gel i like to use. So these are the girls, so i'm gon na use the wig dealer spray to lay down the lace and then i'm gon na go over the edges that seem to lift i'm gon na, go over it with the gel girl, we're moving quick fast and in a Hurry so i'm just gon na pull this back as y'all can see like look at look friend, friend, friend, friend, hey, linda, linda, linda, and i'm just gon na go ahead and spray across my forehead one time for the one time i'll make it real, quick. I'M gon na use the back of a comb just to spread it around and make sure it gets tacky i'm going to let that dry for a second, then i'm just going to go ahead and apply the wig and then, if i have any lifted edges i'll Use this wig dealer touch-up gel just to get those edges melted down and making it look seamless, i'm so excited rikun. Okay, let's keep going { pastel sky music playing } y'all y'all y'all. Where is THE LAAAACCEEE? Oh, my god. I lost it! Oh no! Now! Let me go ahead and do these baby hairs. I need to go ahead and part away some baby hairs, because we're going to do baby hairs on the edges just to cover up y'all, see that where the closure ends, there's like these little, you could tell that's where the closure ended and we're trying to make It seamlessly go into the hairline, so we're gon na try and make this work. So this is what i do. I take some baby hairs since this um wig was pre-plucked pretty well, we don't have to worry about plucking. Now i don't really care if these baby hairs are a little bit thicker, because it has to cover a lot more. I'M wanting these baby hairs just to be a little bit thicker and they may be a little bit longer because i want them to to double back and go into this part. You see what i'm saying to give it more of a hairline sort of look. So i always lose my baby hair, so i'm gon na clip that back and i'm just gon na cut this down. I'M gon na go a little bit. I'M gon na cut down the baby hairs chopped off some hair. Don'T be scared friend, don't be scared to do it, so i'm gon na take this baby hair brush and i'm gon na use some of my wig dealer spray. I probably should use some other spray because i'm not trying to waste this girl. This is gold to me, y'all see. Oh, that looks so good, oh, and what i like to do is take some of the hairs and just kind of cover up that little track right there i'll just take some hairs and just go this way. Just so i'm swooping into the hairline and there we go look at that. You can still see the track, but once i let the hair down, you won't be able to see it they're sisters, okay, so let's do the same thing on this side: {, pastel, sky, music, playing }, okay, i'm not gon na lie to y'all. I bragged on this side, but this side it's looking real thick, but i'm not gon na pull this hair up to fix it. Maybe i can like pluck out a couple hairs. Oh, this is where it gets to be. `` leave well enough. Alone'' yeah! I just need to take out a couple of these here. We go yeah there we go. It was just like a little bit too thick like right in there. Y'All could tell I overbleached these knots, though anyways girl, who cares. Let'S move on as long as the hairline is looking good. We are oh tay, so this is what it looks like if you were to just wash and condition the wig. Don'T add any mousse to it. Just apply the wig and go. I do want to add. Like some layers to it, y'all know i'm not the best at adding layers, but i'm a do it i'ma do it. I want some layers in the front i wan na. I want this hair to look big big, so i'm gon na take the hair on both sides like this. Oh, it is already slightly layered. The hair is already layered in the front, but i want more layers: ``, more division'', okay. So these are the parts that i'm gon na cut. So let me pull this hair back, because i don't want to get this mixed up in the other hairs. Now, where see, this is where i need to learn how to be prepared, i'm going to twist it like this right, twisting it down, and i'm just going to cut right here: okay and i'm gon na re-twist, it take the ends and i'm just gon na cut Into them, so it's not so blunt, i don't even know if they did anything. Let'S see what happens, it's an experiment friend what happened? Oh, what was that supposed to do? Wow um, it's supposed to layer itself and i don't think it did that what did that? Do for me, i'ma cut these pieces to the top of my lip and then we'll start from there, so i'm gon na cut these. Oh did i want it that short, probably not. That is way too short, oh friend, so i'm gon na start from there and i'm just gon na layer downwards so start from here and i'm gon na layer like this and we're gon na start in tiny sections. You see like that and i'm doing like long layers continuously moving the scissors okay and from here i'm gon na start from where i last stopped on the last piece and i'm gon na keep going down, i'm just dragging the scissors along. I need sharper scissors because there we go. We gon na make this work. We'Ll do the same thing on this side: {, pastel, sky, music, playing } wow, that's uneven too well. Y'All won't be able to tell once the hair is down. Let me fix this girl. I'Ma fix it, don't worry, okay now, for this part, i'm gon na take some of the hair and i'm just gon na layer into it. Just so it like looks like it's going together, so i'm gon na frame, i'm taking like a little chunk right here and just cutting into it like that, and i need to take some of these hairs right here and i just need to chop into it as Well, just so, it's not like yeah i'll be getting ahead of myself. Oh no, okay, okay, okay, y'all, see, please don't click off the video okay, so i got ta. Do the same thing on this side, i'm gon na chop into it. I'M gon na take a section and that's framing the face. I'M gon na take a section of this frame in the face and i'm gon na cut into it as well. I'M just gon na cut into it: { pastel sky, music, playing }. Okay, it's rounding out! Do y'all see the vision of what i was trying to do and what happened? Okay, so i think i just need to do a little trimmation on the bottom just to make this make sense, so i'm just going to take some of the hair, just pull it down. Oh girl, this hair is looking big, oh okay, so just down at the bottom i need to take off. This is 28 inches, so i'm gon na cut it down, like maybe a couple of inches on the bottom. So here's what it looks like and i'm just gon na - take the scissors and just cut across because the ends you see are like a little bit dry. So we took those off and now we cooking with grease, i'm just gon na try to make this transition. Like that do the same thing on this side: {, pastel, sky, music, playing }, okay, so i'm just going in and kind of evening out everything; okay, so this is about right. Oh, this is huge baby! Oh girl! This hair is big now, okay, now i feel like. Okay, let me show you what it looks like in the back. Hopefully it's not too choppy. Oh, this is what it looks like in the back. I should have told y'all showed y'all what it looked like in the back. Initially, i'm so sorry, okay, so yes, it's giving more of a rockish sort of oh. This is what i was trying to do. Oh my god, i'm so excited! I want rude big hair. You can't see if you sit behind me, i'm gon na go ahead and start adding the mousse. You already know you already know what team this is. I'M gon na use the shea moisture, coconut and hibiscus frizz free curl mousse. I don't know why i'm reading it because i use it all the time, the mousse and then the evolve 572 brush and brush it through and work the product through the hair. So it gets really really fluffy and beautiful. I'M gon na try and concentrate the mousse on the ends just to make it. You know like more. The ends need to be really curly the the roots don't have to be like super curly, but the ends need to be so we're going to start doing that. Let me start sectioning away the hair, i'm going to part her down the middle, but first hold on. Let me call my husband, i'm just going to work from the back, i'm probably gon na work in bigger sections and just focus on the ends, because this is a lot of hair and i'm not trying to be here all day. And i say this every time and guess where i be here all day: i'm gon na try my best not to do that, but i guess we'll see. I need another clock clip or something. So let me add some mousse trying to get it all up in the hair. You know. Oh girl, it's raining raining out there. What is happening y'all, see that just adding the mousse concentrating on the ends. I need to figure out how much mousse i actually have. I probably just need to go stand out in the rain and get this hair wet. Well, oh chile, not the thunder! It'S georgia y'all, so it'll be sunny in a second once the rain passes. So atlanta has been so strange. Georgia is so strange y'all and that's what the curls look like on the ends. So pretty. Oh, my god. I love it. On top of the mousse, i'm going to add a little bit of this uh coconut curls air dry cream. I'M just gon na add this to the ends to like really get the curls to to be jumping off. Oh god, what did i lock? This put it on the ends, my girl, holla at da kid said. I should do that. She said add a little bit of cream on it. I said how- miss nuneo in the comments y'all see her. That'S my girl, my girl said: hey just add the cream. This is how the curls look after adding the mousse and brushing through the curls, beautiful, beautiful, beautiful beautiful, so i'm going to do this for the rest of the hair and i'm going to work in sections larger sections because girl. This is a lot of hair 250 density. We won't have time to do nothing else today. Let me work through the rest of the hair just to get the curls going and i'll be back once all of it is done. { pastel sky, music, playing }, okay, y'all. I this is a finished. Look, i'm sorry! I was about to jump. This is exactly what i was trying to do. I was trying to get clumpy short curls in the front these little these little short curls in the front like little bangs and i wanted layers i wanted, like rock style, SZA style, hair and that's what i got the curls are just so juicy. These curls are like really fluffy juicy curls and with the layering the layering brought out the curls like i just i don't know what to say friend, but i'm in love, and i want y'all like look at the hairline. It is so realistic. It melts right into the skin, it's just everything i wanted it to be, plus some like gorgeous. Let me show y'all what it looks like in the back. Do you see this? Okay, let me show you, oh not my hanes. If it's not even don't blame it on me girl, i don't know who you're gon na blame it on, but don't blame it on me. I want y'all to tell me what you think about this wig down below were y'all scared. When i was cutting the wig because it was touch and go, it really was. It was giving very much mullet situation, but it came together. I want to say thank you again to nadula for providing this wig to me and sponsoring this video. Of course, if you're interested in this wig y'all know, we have to end the video, but that don't mean that you're going to leave out this door without a coupon code. So we have two coupon codes down in the description box down below, but i'll leave them down in the description box, so check that out. Thank you so much for watching. I hope you enjoyed this wig review and girl. We were on the edge of our seats. Both of us all of us were on the edge of the seat edge of our seats, and i thank god that it worked out so happy. So thank you so much for watching. Where is my drink? I don't have one. I love you all and i'll see you me and my wig will see you in my next video bye.


Comments
Cassandra Hannah: Great job as usual! You’re so brave to cut it and I was rooting for you to rock it and you did it again, gorgeous!
Jazmin Lassiter: Another slay girl! I love how you show the struggle moments lol but it always turns out gorgeous ✨️
Nancy Williams: Love the curls pretty lady. Gorgeous. You always make it slay. I was a little nervous when you were cutting it but it is gorgeous
Diana Simone: This 250% density unit is gorgeous!!!
kaystarlo: I love that you didn't do heavy baby hairs and that you left it curly at the part, it looks so natural
Starroze aka Kawaiicutiebaby: This wig is absolutely gorgeous on you. ❤️ yes you did that sis. I was a little scared when you started cutting but like always you pull it off.
Treina Payton: Nadula hair be showing out and you be acting up..another beautiful look sis.
Carlene Clark: Yes This woman is always doing it! ❤️, Fabulous
D Scott: It's beautiful love those curls
Gill Perry: ♀️Girl as soon as you said 250% density 28" curly wig...... I knew the scissors were gonna come out You always do your thing and it turned out beautifully
The Original Goddess Network: Goddess, I like watching you cut your wigs randomly, with precision . As usual, when finished, you both look Gorgeous!❤ I like long closure wigs, but as a mature Goddess I tend to wear my wigs shoulder length.
Ashanti Mahdi: I was rooting for you as you were randomly cutting this big beauty. Beautiful, I Love It All!!!!
T. Lewis: They picked the right one!!!! You did that
Sepelda Johnson: You worked that friend gorgeous !
Angela Swope: ❤️Girllllll you did that Beautiful gifted hands
Cream 7180: GIRL you and those scissors have a love/hate relationship. But I'm here for it
Keni JT: See, when cutting starts so do the palpitations. You always make it work, but you are killing me.
mythoughts 176: AMAZING JOB
Katia Delva: I love curly hair I be loving your videos boo
Juliet GIGGS: Great video. you've remind me of what someone once said❤The richest people in the world build networks; everyone else is trained to look for work.” “There is a difference between being poor and being broke. I once attended seminar and ever since then i been waxing strong financially, and i most tell you the truth.
Hair Junoda: so beautiful, dear.
monike woods: The hair is beautiful and the way you styled thst 5x5 girl who would know lovely.
Sandra Sutton: "Love It all day"!! ✌✌
thaskins: I love it!! Wine and Wigs
Blaque Beauty: Let's gooooooo!!!!
Missy Sims: You look like Janet Jackson and Beyoncé
lneal2800: Girl Speaking Volume here! Yeeez!
Gill Perry: ♀️Lemon and green tea with a little honey
Tisha: This unit costs $600
Tee Aye: I love you sis but can you do one video where you don’t attempt layers? Lololol
D Scott: Love the curls but can you do some straight wigs .
Shay Slays Official: I’m getting tired of you sis! Not another one to buy ! Lol