How To Make A 7 Inch Lace Frontal/Closure Wig | The Best Wig Ever!! | No Glue Or Gel | Celie Hair
- Posted on 03 May, 2018
- Closure Wig
- By Anonymous
Hey Luvs!! It's Shay Amour here and today's video I thought I would do a video showing how to make a lace frontal/lace closure wig. This is a tutorial where I will be showing how to create a 7 inch lace frontal wig. I decided to cut my 13 inch frontal to 7 inches so I wont have to deal with the hassle of laying down a full frontal. I will also be doing a hair review for Celie Hair.
Make sure you check out my video on how I hide my knots on my lace frontal:
HOW TO COVER YOUR KNOTS WITHOUT BLEACHING IN SECONDS!! https://youtu.be/-A8PGrVM9Xg
★☆★ OPEN ME FOR MORE DETAILS ★☆★
Hey Amour Gang!!
Celie Hair
Official Store: https://celie.aliexpress.com/store/635...
Website:
HAIR SPECS:
Peruvian Body Wave
16/18/20
16" Lace Frontal
DIRECT LINK TO HAIR:
https://www.aliexpress.com/store/produ...
Brazilian body wave with frontal
https://www.aliexpress.com/store/produ...
Brazilian body wave with lace closure
https://www.aliexpress.com/store/produ...
Email:[email protected]
Whatsapp:+8618236809617
Instagram: celiehair
Youtube:Celie hair
NEW VIDEO SCHEDULE: 7-8PM EST
SUNDAYS (SOMETIMES TUES & THURS)
↓ HELPFUL HAIR/WIG TUTORIALS ↓
HOW TO MAKE A WIG TUTORIALS PLAYLIST:
https://www.youtube.com/watch?v=iUQsIs...
Sew-In Weaves, Custom Wig & Quickweave Tutorials Playlist: https://www.youtube.com/watch?v=9BVJpQ...
★☆★ FOLLOW ME BELOW ★☆★
I N S T A G R A M ♡ @iam_shayamour
F A C E B O O K ♡ https://www.facebook.com/Icyunvme0912/...
T W I T T E R | @iam_shayamour
★☆★ I AM NOW SELLING WIGS & 100% VIRGIN HAIR ★☆★
Shay Amour's Wig Company: Amour Wigs
Website: http://www.amourwigs.com
Contact Amour Wigs: [email protected]
O R D E R V I R G I N H A I R
♡ If you are interested in ordering 100% virgin hair, please visit my website: http://www.nvmyhairboutique.mayvenn.co...
♥♥♥♥♥♥♥♥♥♥♥♥♥♥♥♥♥♥♥♥♥♥♥♥♥♥♥♥♥♥♥♥♥♥♥♥♥♥♥♥♥♥♥♥♥♥♥♥♥♥♥♥♥♥♥♥♥♥♥♥♥♥♥
M U S I C
Title: Hard Drop
Artist: HeroicMonk [No Copyright] - Intro/Outro
YouTube: https://www.youtube.com/watch?v=8rYAG...
Music Provided By: No Copyright Jamz
✉For business inquires: if you are a company that would like for me to do a product review, giveaway, sponsorship, or other opportunities, please email me [email protected]
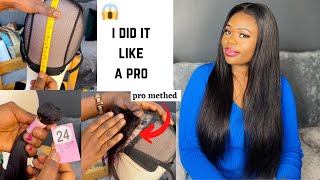
Hey well so I am back with another video and today's video is going to be a tutorial to show you how you can make a seven inch front, o slash close your wig. I think this is by far the best way you can wear your wig without having so much trouble to laying down the hairline and still have that frontal natural look. So if you guys aren't interested see exactly how to make this type of wig then definitely keep watching this video, so the hair that I will be using to make my wig is from Seelye. Here I have three bundles, as well as a 13 by 4 lace. Frontal the texture is in body wave and the lengths are 16 18 24, the bundles and for the frontal, it is a 16 inch. So this is exactly how the wait I mean, I'm sorry how the hair look straight out of the box. The body wave pattern is so nice. The frontal has a very nice natural, looking hair line and it already comes slightly pre plucked with some baby hairs. Okay, so we're gon na go ahead and get right into the tutorial, and if you are a wig, where you know that at times the struggle is real when it comes to wearing a lace, frontal wig, the lace, frontal wigs, are very high-maintenance. You have to make sure that the hairline is looking at her as possible. You have to make sure that the Irit are Eretz halves on the front, so are laying down as well. So you guys this video is a great alternative. If you are, if you're still wanting to wear a lace, closure wig, but you still want that lace front to look so I'm gon na show you guys that by step on how you can revamp your frontal wig and make it into a frontal, slash close your Wig - and I still have that natural nice looking look so as you guys know that a frontal, the sizing of a frontal is there team by four, so it's 13 inches from ear to ear and then his four inches of partings face. And I, what I wanted to do was actually make my frontal actually cut it down to a seven inch by four frontal, slash closure piece. So, in order to do this, I am going to be using a measuring tape. A rat tail comb, as well as a pair of scissors, to make my seven by four closure - frontal piece: okay, so the first thing I want to do is I'm going to take that measuring tape and I'm gon na measure out seven inches and roughly seven inches Is about temple to Temple, or maybe slightly pass your temples when it comes to having the frontal on your your head. So once I measured measured how long I want my closure / frontal piece to be. The next thing I'm going to do is start partying, where I'm going to be cutting. Make sure that when you do part that you do not have that much hair in the way, because you don't want to be cutting the hair and then the hair turns into short pieces. So I made sure that I use my rat tail comb and then I also used a spray bottle with water to make sure that the hair is laying down and not in the way when I begin to cut so once I do that, I go ahead and Cut a straight line from the front of the front tool to the back of the front so - and I do this on both sides of the frontal. So once you cut those pieces off, don't throw them away because you can easily use them. If you were going to make a full week - and you want your closure piece on top of your full wig to have like a natural look instead of doing like that role method, so yeah, you can definitely keep those two pieces that you cut off your front. So I use it for another wig or two weeks. Actually you so the next thing I'm going to do is: I am going to be going in with my top lock, not sealer, and this is a great product if you want to reduce the shedding on your lace frontal and make sure that you seal it. So you so the frontal won't start shedding or balding, and the reason that I'm doing this is because I did cut on the frontal and you know lace is very delicate. So I just want to make sure that I try to reduce as much shedding as possible. So I will be going in with the spray and spraying the ends of the front side. So after I do that. The next step that I'm going to do is just go ahead and sew down that frontal closure piece onto my wig cap and I'm basically sewing it the same way. I would sew a closure or a frontal now the sides I sewn it down as a closure piece, I'm making sure that I'm doing a traditional stitching technique and I'm just sewing very close together and I'm also making sure that I'm gripping or making sure that thread Is going through the front too, because I don't want the frontal to start fraying where I cut it, so I did that to both sides of the frontal closure piece and then the way that I sold the back is, I saw the back like I was sewing Down a frontal - and you guys know my technique when it comes to sewing down closures and frontals. If you don't, I do have for our tutorials on my channel about that. [ Laughter, ], you so after I sewed down the front to close your piece. The next thing I'm gon na do is go ahead and start sewing down my bundles and I'm just starting with the longest length which is 20, and I think I only sold or installed two bundles. I only did the 18 and the 20 inch. I kind of left the 16 inch off. I probably will go back in maybe a little bit later and install the 16 inch, because you guys know how much I love a full voluminous type wig. So I just want to give you guys a little bit of information on how I started to sew the bundles in and how I ended sewing the bundles. In now it can be a little bit tricky, but if you guys know how to make a lace, closure, wig and a lace front wig, you shouldn't have any issues. So when I started making the or sewing down the bundles, I started sewing it as a lace. Closure, wig, okay and then, when I got closer to the frontal closure piece, I started connecting the bundles to the front to the back of the frontal closure piece and then I actually closed up the wig as if I was closing up a frontal wig. So I hope you guys kind of understand and understand what I'm saying so, when you do make this type of wig, you start off by sewing it as a lace, closure wig. But when you get towards like the middle / middle top of the head, you want to start sewing it as a frontal wig. So after I finished making the wig, what I'm going to do is go ahead and cut off that excess piece underneath the lace which is basically the excess cap piece. I'M going to go ahead and cut that off, and this is exactly how your wig your 7 inch front, so slash closure weight should look and I did install an elastic band because I really did not want to wear any type of got to be jail. I don't use glue so, but you can get away with not wearing anything at all. You don't have to install a banned glue or gel to this type of wig. This wig fits so perfectly that you really don't need anything but me to make sure that I have extra security. I went ahead and installed an elastic band and if you guys are interested to see exactly how I install and I laughed a bit inside my wig, I do have a tutorial on that as well. The only thing that I did was, I measured my measure exactly where the frontal closure piece ends and then I maybe took I think I took off, maybe like I have two one inch off of the band and then installed it and attached it to the ends Of the frontal - and this is basically the final look of the wig - I think it looks really nice - I still get that it looks like a closure wig, but I still get that natural hairline look of a frontal you, okay, guys. This is the final look of this hair and I wanted like a very natural type. Look, so that's why you guys see. I didn't install all three bundles of the hair. I think I only install maybe like two bundles, so you guys kind of see like it's really flowy really bouncy it go in and shampoo and condition the hair, and these are the products that I mainly use on all of my hair, bundles, as well as frontal. This is the one and only argan oil moisturizing, repair, shampoo and then the conditioner as far as applying heat. I have no issues with applying heat to this hair. This hair, straightens and curls. So well, I've actually been wearing this hair for about roughly a week. I think it's been about four going on. You know four and a half days. I have been wearing this hair and I only had to curl it once and, as you guys can see, I still have curls in this here. There is really soft. There was no smell or any type of odor with this hair. I think this is like by far like one of my favorite vendors. When it comes to hair is Sealy. Here I love their hair. This is not the first time that I've reviewed their hair. I think I reviewed their hair, maybe like two other times in the past, and I did do videos on that hair as well, and I just raved so much about sealy hair, because their hair is amazing. Okay did not customize this frontal. The good thing about Seeley's frontals if they already come slightly pre plucked, so you really do not have to go too much in and do your own plucking when it comes to the frontal. I did not bleach the nuts. On my frontal, you guys I always do the same method. I don't think I have it with me right now, but what I'm, what I have been starting to do and my past videos is, I do not believe two knots anymore on my front soles or my closures or my 360 frontals. I only use the Sally Hansen's airbrush leg, sprain and you guys that product is by far amazing. It definitely definitely hide the nuts on your french holes or your closure. So that's exactly what I did to get my frontal to look like this. I sprayed it and I just went in as if you saw me in the earlier in the video. I am using the Loreal face powder in the shade cocoa and I kind of like to find apart even more and hide the demarcation line where the frontal is with this and that little tiny brush that I had, if I can find it yeah. So it's this little tiny brush. This is the only brush that I use to define my part and apply the powder to my frontal. So if you guys aren't interested to see like a full-out tutorial on how I hide the knots using the Sally Hansen spray, I already have that video up on my channel so definitely check it check that video out, if you guys, aren't interested so we're gon na Go ahead and move straight on to does this hair tangle or have I experienced any type of shedding? I do experience a little bit of shedding, but I noticed in the past when I was wearing silly hair. Their hair really does not tangle or shed at all. The only reason that I'm experiencing is shedding now is because I did cut my woops when I sewed it down onto my wig cap. So that's probably why I am experiencing a little bit of shedding. But it's like a strand here and here are their it's not like a lot of shedding where I'm getting like a handful, or you know a lot of shedding coming out of this hair as far as tangling, I do not get any type of tangling with these Hair is if it is tangling it might be like at the knee, but you mainly get because when your hairbrush against your neck or brush against your clothes, you do get some type of tingling. But right now, as you guys can see, my hands aren't flowing straight through this hair. I can wear this hair every single day and not have any issues, because that's what I did with the hair that I got from Sealy before I used. That was like my everyday wig, and this is going to be my everyday wig B. So you guys, I don't know what happened, but my video cut off at the end. But basically this is the overall review and tutorial for sealy hair. If you guys are interested in their hair, I will leave all the information down below in description section. I would just want to say thank you so much for watching. If you haven't subscribe to, my channel definitely subscribe and then make sure you guys follow me on instagram and as always, I will see you in my next video


Comments
Levi: You always do such an amazing job. It looks so natural. Beautiful. Could you please do a video showing us how we can use the pieces that were cut off?
Tmoni 78: This unit is beautiful I love your techniques. This unit looks sooo natural
Nica Thompson: Your hands are blessed... Keep doing you because you can never do any wrong when it comes to hair
Lesa w: Love it, a " bigger closure" I have so much trouble with trying to do frontals!!!!!!!
Akinwale Hannah: Thanks for this video, i over cut a frontal .I guess i would use it for a new wig . You just saved me from a heartbreak . I had to get a new frontal for the client .
urgunnaluvmeh: Ooohh yaayyy! I used to do this when I couldn’t get my frontal right. Yours looks waaaayy better though lol
Tempest Bess: Beautifully explained Thank you for sharing!
Hair gallery usa 8 Corp: Love your videos! What type of scissors you was using to cut the frontal on the sides?
Brenda Morton: Wow!! That's a gorgeous wig!! You are so talented!!!
mydestiny84: Omg! I do this all the time. You're only the second person I see doing this too. The ear tabs are my enemy. Ppl afraid to cut the frontal but not me child
Rowena Sanders: Awesome as always!!! OMG!!!
Kaye Reeves: Thank you so much for this video!!
Resha Pesha: You always coming with the new ideas and I'm here for it! You slay everything thank you Shay
Monica: I love their hair. Have you tried the loose wave Peruvian hair?
Dana Simmons: Love your video I am learning how to make wigs just by watching your videos
rita mcfarlane: I’m so happy I came across this video because I been having trouble but thank god you made this video
Mrs.RED'VON 77: Just beautiful love it hey sis I'm going to have to look for that knot sealer because I've been using weft sealer on my frontals in closure it's been working but I think I'll try yours #Keepssupportingsmallchannel like mind god bless
Eryka Joseph: Yes! Also YWigs makes 6X6 closures and they are amazing! And the hair quality is super bomb; I wore my wig I made for 6 months and the bundles are in perfect condition, all I need is a new closure from wear & tear etc. But same concept as this but instead of cutting a 13X4 frontal, you get 6 inches of parting space going back. So much better than frontals!
Joshsalyn Elijah: Can you still do half up half down styles with this method?
Kersha Beaver: This os a good idea . They hair company need to make larger closures . Frontals are annoying
Erica Coleman: So helpful. I’m doing this.
Sshhh..LetsTalkSmack: I want to see this done with a 360 frontal. I have one and I just don’t think I’m gonna know how to maneuver it let alone make a hot glue wig out of it. And sew it down as a wig. And not separately (like sewing it straight on the head the 360 frontal then the bundles).
JQueenHair: This is a great idea....Thank you
Kia Jonsey: Great one. Thanks
Susie Roberts: You are brilliant..thanks for helping me
rita mcfarlane: Hey Did you pluck the frontal I did this to my frontal but I’m not sure if I need to pluck it
rena toatley: Love love love.....
Xosa L: Babyheircollection makes 7x7 closures !
Princess L.D.G's Kingdom: This is such a good idea. I am indeed trying this. I have spent weeks/ months trying to make a frontal wig, but I have no luck. I watch over 40 videos on how to make a frontal wig, but no luck. I honestly think that frontals are not made for everyone's head. I used to make closure wigs and did very well with them, but wanted the closure to be bigger. I was stressing out, but not anymore. You are a very gifted person.
Sophia Murphy: Great look
Kersha Beaver: And now the bigger closures are all the rage
All That Jass: hello what kind of scissors are those and where can i buy them ?
Mia j: I like getting my 5*5 and 6*6 closures from @Forever_Ritzy on Instagram
Linda anyebe: Please Can i cut my 360 closure into a frontal.
elamelanin: Did you buy it yourself ?
fulloflife9: Beautiful
immaculate108: did you bleach the knots or use the spray tan method?
Tequilla Josephine: Do you know if this hair can be colored?
Cassandra Nelson: Did you say *the sally hansen leg spray*?
De_cor&organize com Nivalda: Don't you have another song?
Kierra Malone: This looks like a full frontal.
Cristelle Duogene: How many inch is this mannequin head plz ?
_NailedHer_: Hey do you know what size is your wig block?