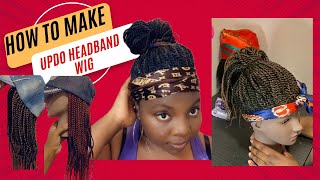
How To Make A Versatile Crochet Wig On Lace Wig Cap For Beginners| Quick & Easy|Jamaican Bounce
- Posted on 03 September, 2021
- Closure Wig
- By Anonymous
#JamaicanBounce #Crochetwigforbeginners #versatilecrochetwig
In this video you will learn how to make a Versatile Crochet Wig using Jamaican Bounce hair. I used 4 packs of hair to achieve this full look. On this Wig cap you can manipulate the hair and wear it as Center part, Side part or a Full Bang Wig.
Thank you for Watching Please remember to Like, Share and Subscribe!
YouTube Copyright Free Music: Bubinga by Quincas Moreira
Products Used: Freetress Lace Crochet Wig Cap-Purchased in local beauty supply for $7.99.
Lottabody Wrap Me Foaming Mousse, 7 oz-Purchased at Walmart for $3.78
Jamaican Bounce Crochet Hair: 4 Packs for $28.83 from Amazon-https://www.amazon.com/Packs-Deal-JAMA...
In this video we'll be making a jamaican bounce um crochet wig on this lace, um mesh cap that i have from freetress, okay and i'm using the color 1b, okay. So, first, what i'm gon na do is i'm just gon na line the rim off the wig and then we're gon na start working to fill the wig cap in. So let's go ahead and get started okay, so i'm gon na put the first one right here. Go through the mesh at the bottom here and we're just gon na go through once twice and then work all the way another way and we're good okay, so we're just gon na space it throughout the cap and i'm going to unrival i'm going to pick apart. The curls a little bit to make give it a fuller look. So for the back, i'm not going to space them too close once i get to the front i'll start, spacing them closer. So now we're going to start filling the inside of the wave up to the map to the closure, so this is pretty much a quick and easy way. The most you're, probably going to have to do, is just play with the knot. I look a little bit like you see, i'm doing right now to get the knots to be smaller once you um wrap the hair twice okay, so i went ahead and moved the hair that way once i start uh taking and pulling the curls apart um, then It won't be as frizzy, so let's continue do. Okay, guys, as you can see, i'm just going to pull the hair through wrap it around once twist. It and wrap it around a second time and i will be completing the same technique right throughout the uh to complete the wig. So i'm just gon na allow you guys to watch and for um some of them. You'Re gon na see me working on the knots. Just to ensure that i get the knots um down once i twist it the second time uh to get the knots um smaller and um secure to the base of the uh, the wig cap. Okay, i'm also going to show you as i go along how to separate the hair as well as you can see right here, so i'll be doing that um right throughout and i will be completing this side. Then i'm gon na move to the next side and then you're gon na see me working on the middle on the way to the top off um of the wig okay. So now i'm gon na move to the opposite side of our wig and i'm going to basically repeat the same process, which is wrapping the hair twice pulling on my knots to ensure that it's secured to the base of the wig cap. And then i'm going to start separating the hair um and i find out as you can see, you want to make sure that you're spacing your hair nicely, because once you separate the strands, then it's going to make the wig even fuller. So i don't i'll start adding the hair closer until i get to like the front of my wig cap, i also realize when i'm working on this particular wig cap, i like working on both sides. First and then i start filling in from the middle all the way to the top, but it's up to you, you can work in the order, that's best for you, so now that we're at the top we're going in closer okay guys. So now that we're to the front part of our wig cap, where we have the lace, i'm just going to separate the hair into three pieces and then i'm just going to start crocheting the hair alongside the lace. So i'm going to do it for both sides and then once i complete on both sides, i go back in and i try to ensure that um, the hair is aligned um side by side, so there's no gaps, no space. Whatever i see a gap, i just go in and i fill it with the hair. So that's what i do to make it nice and full in the front right by the lace, also when i'm crocheting the hair um to complete the front right by the lace. I try to go under about two pieces of the mesh. You can see two pieces of the strip and then i wrap the hair around it, i'm doing under the closure for it to look as far as not to bump your lamp, even though it's curly here, i still want it to be um nice. As far as the top of the hair, so i'm separating uh master into two pieces and then align right under where i have the hair all lined up and the closure. So let's go ahead and add it: okay, guys so we're gon na add the last two pieces and then i'm moving on to cutting the hair, shaping it just shaping it a little bit and then um adding a bit more molds, okay, guys! So now that i've shaped this side so now we're gon na shape the opposite side of our wig um, i'm gon na add just a little bit more mousse and that completes our finished. Look, i'm also taking out anywhere. That looks so crazy, okay guys. So this is our finished. Look so you're able to wear it as a side, part or center part, and then because the top is full you're able to just use your hands to manipulate the top and then where it also has a bang wig as well um. So i hope you guys enjoyed watching this video, please remember to like share and subscribe. You
Comments
Aretha P: Beautiful wig sis , new subbie here
Desire_Serenity: Could I still do the invisible knot method for the lace part without tying it so many times?