Pretty Copper Wig In Fall | Side Part Wig Tutorial| Alipearl Hair
- Posted on 06 September, 2022
- Closure Wig
- By Anonymous
Thanks for watching!!
Here Is the wig information below!
Shop Now➤https://bit.ly/3ckWbot
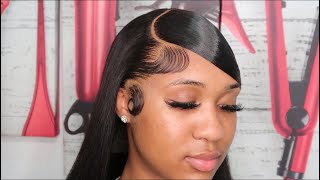
Hair Info: 22'' dark # 35 body wave 13*4 lace frontal wig, 180%density
❤#AlipearlHair Official Store:➤https://bit.ly/3crlk0I
Up To 50% Off, Lace Frontal Wigs!➤https://bit.ly/3ANLc06
In FB Group, EXCLUSIVE DISCOUNT! ➤https://bit.ly/3O1I8ku
1. 24h Flash Sale!
2. Free Hair and Cash Back!
3. Unlimited Coupons!
#alipearlhairwig #alipearlhightlighthair #alipearlhdlacewig
Instagram @alipearl_hair: https://bit.ly/34I3Oyd
Youtube @Ali Pearl Hair: http://bit.ly/2H0Gmmc
WhatsApp: +86 15890076489 E-mail: [email protected]
What'S up y'all, it's your girl, major and welcome back to my YouTube channel major everything I do got ta be major! So what's up y'all if y'all are new here welcome and if you've been a part of the major fire gang. What'S up welcome back today, we're going to do it we're gon na start from a weekly receive from Ali Pro Hair. This video is sponsored by Ali Pearl. They sent me a nice, copper, Ginger wig and we're gon na unbox. It we're going to install it and then we're going to review it. You know the routine, let's get into it bam, so this is the Box. Well, this is the bag. It came in the bag with the kill, and this is the wig, so she's cute we're gon na unbox, the wig. After we see what else is in the bag in the bag, we got a wig cap, you already know they stay with the wig cap. Some lashes a edge brush, yes, ma'am, a hair tie. Yes, we need those a waste. I mean, I almost said a waistband, a lace wrap so uh make it at least nice and laid yep. That'S it. Let'S see what the wig is giving. This is the hair. After pack ing, this is a cute little copper and I'm back wig cap is laid. I bleach the knots I attended the leg Club, the lace too, so we ready to rock around okay. This is the wig after I've washed it plucked it and blow dried. It. Yeah she's there so now I'm just lining up where I want my wig to be all right. So now that I put the wig right where I am I'm sorry, I'm feeling myself like this color is of you now that I'm back and I got it lined up where I want. I'M gon na go ahead and cut my flaps. The flaps help me figure out exactly where I wanted to line it up without gluing the whole wig and then regretting it after, because I can't shift it. I want my flat right here is that where I go flat, maybe right here so then I cut the flaps. I'Ve been using glue, then put it down so I'll just place my glue right there yeah then popsicle, stick that's the game. It gets that glue installed. Real flat - and you want black, you don't want no bumps, then I blow dryers a little bit because I go back here. I go up a little higher and make it flatten it out again. Now I'm coming back the hairs just so when I glue it, it just won't, be hair stuck all over the glue and stuff, and then I just comb it back while pressing it down flatten out now, I'm going in with my elastic band just to make sure That the hair is as flat as possible, I'm about to go in and cut the lace off. I like to do it kind of ragged. My lace is staying, secured, I'm gon na go ahead and blow dry. This thing, one more time before I begin to press it now, his hair is fully blow dried. I'M gon na go ahead and plug in my flat irons and we're going to start from the back and work our way to the front. So I'm gon na go ahead and section off my hair, so I've just fully pressed the lid. So now I'm going to just take the lace band off and just figure out. If I want a middle part or something I realized, I wanted the side part. So now I'm just going in and making that side part of the stink. Now that I got my part ready, I'm going to go ahead and move this hair to the side. Okay, now I'm gon na plug in my hot comb and I'm gon na show y'all how I get this week. It'S the secret right here you go Section by section. It'S gon na be my first section. So what I do is first, I go ahead and flat iron, The Roots, just as if it was a regular silk press. I go in with this. It'S going to do the job every time I put it up my brush and put it on the roots. Only the roots foreign and that's how you do it now that we got that part lay I'm gon na take one of these clips and put it on this side so that this side don't mess up. Once I get to the other side and what are you gon na do exactly what I do on this side to the other side, so I'm gon na skip ahead. Now that I went through the hard comments, but I ended all out: that's what it looks like. I'M gon na go ahead and take my lace tight off, so we can get it to these edges. Now, I'm going to take a little eyebrow razor and I'm going to save up and now we're going to do the edge down here. What this gives you? A natural look: okay, I'm going to take my little corner and curl the ears again and this time and I try to get as close to the room. So now I'm going to tie it down and I'm going to get to layering for my curl now, I'm just going through a layering hair. So how I do that is, I just grab a section and I just trim, trim, trim, trim, trim, trim, trim and a diagonal. So then it kind of makes a little easy shortest to like 12 is five. That'S what I want to go for. You can't come, then I do the same thing on the other side. Grab your hair to angle, your scissors and a diagonal like this. I keep it right in place because I don't want to miss cut now. It'S layered out of this layer we're going to get into the fun part which is curling so first, you start with a thing, because that's the part that you really don't want to fall, so you want to do it first, come on with all the way up And then pull the hair right here once you look like this gon na move it down still holding on to this roll it down roll it again the same motion and I'm holding right here, no more than 10 seconds. You know you want to burn off y'all. Seen that video that girl yeah release it after that, I want some spray boom, as he spread, go ahead and roll it up like that, get down and we're gon na pin it. I'M gon na show it on this side. Let'S see what you want it and then roll it grab. This style look up roll, it again, grab the side, roll it again and boom and then roll it up. Now that I curl all the hair, I'm gon na, let it sit and then I'm gon na come back with a cute fit and then I'm gon na show y'all the end product and give y'all final review foreign curves out. They don't just disappear. The body and that's the final review, that's the final product, Oh and let's get into this review. So as far as the shipping, the shipping was good, quick. You already know algebra hair, I shop with him all the time. The communication straight look at this hair y'all. I can't even focus day eight. This is a 10 out of 10.. This is a 10 out of 10.. The hair was easy, plug to bleach the knots just an instant w. The hair is so freaking full and thick like. I just love it, this ah yeah. So, overall it's a w, i mean I don't have no complaints if you think about getting this hair, get it okay, that's all for today's video make sure you like comment subscribe and let me know what you want to see next video and remember everything you do Got to be major period,

Comments
Ali Pearl Hair: Really gorgeous!!! Love the hairstyle~ Thanks for trying our hair❤
Nikea P.: Yes ma’am!