Dying My Hair Ombre Purple Ft Samsbeauty Hair
- Posted on 27 June, 2019
- Closure Wig
- By Anonymous
1. NAME OF ITEM
Uniq Hair 100% Virgin Human Hair Brazilian Bundle Hair Weave 4X4 Closure 7A Body #OT613
2. LINK TO HAIR
https://www.samsbeauty.com/service/Uni...
https://www.samsbeauty.com/service/Uni...
3. SAMSBEAUTY IG&FB
follow samsbeauty on instagram
https://instagram.com/love_samsbeauty/...
like samsbeauty facebook page
https://www.facebook.com/love.samsbeau...
Download Samsbeauty App
https://itunes.apple.com/us/app/sams-b...
FOLLOW ME ON SOCIAL MEDIA:
https://www.instagram.com/jada_laughou...
https://mobile.twitter.com/Jadawithout...
Email:
Music by @r0twist on ig
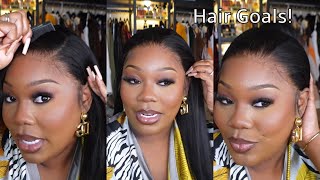
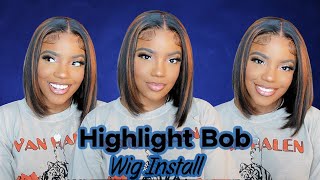
Hey guys welcome back to my channel for today's video, I'm gon na be reviewing this Sims beauty supply hair guys. This is a 1b and six thirteen, three bundles in a closure, and it's so bomb today, I'm gon na be showing you guys how I turned that purple is kind of like a purple dimension. Color, it's really cool, so I'm just showing you guys how the hair looks right now, it's 12 inches! So it's a it hits you about like shoulder length. So first I'm gon na be using the 150 platinum adore water, color dye, and I started off with this because I really wanted a silver color at first. But after doing this process over and over the hair, just would not get to that really. Nice silver color! That I wanted, so this is how it looked and it just I don't know it's just it wasn't working. I opened the bundles and everything it just did not look good, and this is how it looks after I dyed it and, as you guys can see, the closure part is a different tone than the bundles. So after that I said, no I'm gon na do purple. Instead, so for the purple process, I used the violent gem and the door water color, and I squeezed that in first and then I also went over the bundles after mixing it and it gave me a pretty nice color, but it wasn't as deep and rich as I wanted it so I just went over all parts of it just so everything would be even as you guys can see. The closure is a completely different color than the bundles by the way guys. So then I went in with rich eggplant and this was for the roots part. I wanted the roots to be dark black and then it went into like the rich eggplant color and then it went into the violet gem color, so it'd be kind of like an ombre effect. So that's what I did and, as you guys can see right here. It kind of looks darker at the roots and then it goes it gets lighter. But when it dried guys, I made the wig after and this is how it was looking right. So of course we still have some blonde spots. So after I made the wig, I went back and I dipped all of the hair in violet gem so that the top part wasn't too dark. So now I'm just gon na apply the wig for you guys, because I thought I was done thought I was killing the game, but my sister curled it for me and it was looking really nice and everything. So I was like. Let me go ahead and apply this for you guys, so you guys can see how it's looking so I'm gon na clean my forehead with alcohol. You guys already know the process and apply the wig to my head, pull it forward and I'm gon na comb out the curls, because I wanted the curls to be a little bit looser than this. Not as tight and um yeah just brush through and as you guys can see, the colors were mixing and it looked really nice so cut in the lace. For this it was really easy. Cuz, it's a closure. I used my scissors and I just hooked it in the front, and then I used a razor to just do like jagged edges in the front. As you guys can see, this closure is really nice. It'S it matches my skin tone really nicely and it lays well. So I'm using the bold hold active glue for this application process and I only did one layer for this and guys it lasted like three days. I'M not even gon na lie because it's a closure and you don't really do as much in it. So I waited for it to dry, as I put the wig down and then I used my rat tail comb and pushed it down like I usually do, and then I plucked a little and guys. I know I should have put my scarf on before this, but I was feeling to plug because I all could see it wasn't looking as realistic as possible. I don't like doing baby hairs on straight hair, as you guys know, but I felt like this. Closure was looking too boxy and that's why I don't really do closures as much as from tools, because it's not a lot to work with, but I did it anyways and I'm just laying this down with some even edge control, as you guys know from my previous Videos and after this I'm just gon na put a scarf on just to lay that in place and then I'll be right back. So when I remove the scarf, of course, some of the baby hairs were removed. So I just went in with makeup before I fixed them and then the makeup. You know what that just makes it look a little bit more realistic and hide some of the knots in the front. So you just want. I just went over everywhere that had lace and fixed it, and then I went over my baby hairs to make it look a little bit better. But you know it's a lot of moving around, so I brought them all the way back and because I went and I plucked some more because it just still wasn't looking good enough for me and the reason why I'm doing this is because I wanted it to Look a little bit more thin and natural, and it just it wasn't looking right. It'S a closure and you've got to really do this, so I just wanted to plug to my liking and, as you guys can see, it's looking a little bit better as you guys can see now it looks a little bit better than before. Look, it's looking a little bit more realistic because of all that extra plucking and the makeup, and, as you guys can see, the hair is looking so nice like the colors, are blending and I'm just feeling it at this point and yeah. I know like this is not for everybody, but I was feeling it in the moment. You know a little cameo flash boom, okay, bring it back. Okay, let him know so, I'm not showing you guys the scalp and how realistic this closure color is from Sam's Beauty. They actually did a great job and I'm just showing you guys some pictures of how it looks in natural lighting and in artificial lighting. I was feeling it, but I wasn't done because you know I'm just weird, so I went and I bought another rich eggplant guys and I wanted to go over all of the hair, because I was tired of the light pink on the bottom. So I used this entire bottle and I went over all of the wig again even the closure part. And after this I got a darker color. But, as you guys know, the closure is darker than the bundle part of the wig. So after this whole process of doing the watercolor again it was darker, but the closure came out even darker than before. So now the bundles look like the closure did before, but the closure looks like almost black, but it's not that bad right now it looks all uniform but as you guys will see in the end I inserted a picture. It looks completely different, so you know, if you guys want one. Even color you'd probably have to pull the closure back and dye the ends in a dark purple or you'd have to use like a regular box dye, because I think that's the only thing that will get everything to be one color, and this is just how it Looks after I did that part, I kind of like the darker purple better, because it doesn't look too like alarming, but anyways. Thank you guys so much for watching my video and I'll see you guys later in the next. One have a great day and remember to subscribe.

Comments
CuzImAwesome: Keep on grinding and inspiring hunni
CiearraB: Love this color so pretty !!
Jazziepopper: U make it look so easy I could never
Chrishay Lovely: Love the color
La'Joia Creary: Omgggg the color is soooooo pretty !!
Unique A: U look like Rihanna nice color lol