How To Make Baby Hair On 4X4 Curly Closure Wig For Natural Look
- Posted on 15 June, 2021
- Closure Wig
- By Anonymous
#BabyHairOnClosureWig #NaturalBabyHairOnClosureWig
In this video you will learn how to make natural looking Baby Hair on your 4x4 Closure Wig. I hope this video is helpful especially for my beginners.
YouTube Copyright Free Music: Sun's Rise by Silent Partner
Products used in this video: LottaBody Wrap Me Foaming Mousse, 7 fl oz and Eco Style Black Castor & Flaxseed Oil Professional Styling Gel 16 fl. oz. Plastic Jar-Both Items were purchased at my Local Beauty Supply.
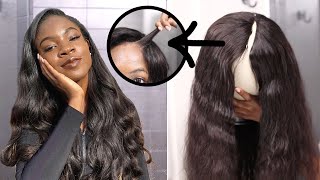
Hello guys in this video, i will be showing you how i'm going to make my baby hair on this 4x4 closure, uh kinky, curly, wig and i've already plucked lightly plucked. My hairline stop plucking my hairline and my curly wigs too much because i realized that the closure lasts longer uh, the less plucking i do so. I'M just gon na go ahead and get started so first, what i'm gon na do is just take a small piece out from the front okay, so we're going to start by parting out just a small piece from the front and then i'm gon na okay. So, depending on how thick or you want your baby hair to be you're gon na take out the hair from the front, and i'm not i'm not an expert in this um. When i just started trying to do the baby hair and it's it's so crazy, it was easier for me to learn to make a wig than to do the baby hair, which is weird. I had to um practiced and watched a few videos until i found something that helped me um to make it not look too crazy. Okay, so so there we go so now. I'M gon na cut this and i'm not gon na make it too short. I'M gon na just cut it and i'm shorter than it is right now uh before i do the final cut, i'm gon na try start laying it first before i cut it really really short um. That way. I don't make it too short, because i've done that before so i'm just gon na take it and before. Let me just go ahead and pin right here, and these are the two products that i will be using my water body, uh mousse and also my eco styler gel in the backcast, drawing flaxseed and first i'm just going to add the mold and i'm gon na Start shaping from the side since i wanted to go over here to the side where i have the sweep okay, so once i start sweeping, then i'm going to start cutting it shorter, so um so align it with how i'm sweeping the hair. So this i'm going to take this to this side and i'm going to cut this piece shorter and this i have to um just brush it off, because this i have to see how thick that is right. There, i'm just going to thin that out. Just a little bit, i don't like when the baby here is too thick: okay, okay! So for this piece see when i take my brush and i sweep it to the side like this, i realize that i have to cut it to curve it around right there. So i'm just going to cut it here now use my finger and this i could put a little bit shorter as well. Okay. So now i'm going to start using my gel to lay it because um some um, some people use just the most, but i realize when i use the gel it's easier for me, so to make the process easier. I just use my gel and you can use your finger or you can use the brush, so i just play with it. You curve it how you want to curve it. You see how easy that is to get the smoke with them. I used to struggle so much with the moose and i'm like this is not lame. What is going on, like you know what let me start and i started. I tried with the moose and it it worked out easier for me. So i just i've been sticking with the loose okay, so i need to just add some more time to get it to set and curve it with your finger, how you want it and then once it dries and that's the thing with the baby, you could just Play with it and get it to your liking, you just um cut it first cut it longer. Then, once you start leaning, you're going to cut it to shape it. The way you want it to go. Okay, so for this piece now we wanted to swoop it. This way, so if we scoop it this way, you're gon na see that it's, we could probably leave it and just brush it in the hair. Let me cut it, let's see what works better and i'm going to just move this bin from here and put it right to the end. So i can shoot the hair better. What you could do is you have two options. You could swoop it in the hair or you could just i think, i'm gon na cut um cut it a little shorter. As i say it's good, so once you start laying the hair, you cut it again to meet that. You don't want to cut it too short in the beginning and then um, it's short to do what you're doing so. Okay. So then we use a brush to just brush that in right there and once it dries, it actually um sets that way. The way you put it so there we go for that. I'M just gon na put okay so now for this over here, we're just going to continue the same thing, sweep it and once you sweep it, so how you want to see the hair, then you kind of cut it or you could just brush it in if You'Re not able to brush it in because it's too long then you you may want to cut it. It just looks like i'm not in this dollar. Just usually, i would do probably um do a space and then do another one here. But i'm going to see if i could just do the center one and just thin this out a little bit more and when you think, when you're thinning out the the hair going across. You don't want to make a big patch. And then you have hair and stuff, you want it to be uniformed in a sense, you don't want to have a big old patch here then hair, then patch right. So you want to take your time and take out the hair that way, there's not too much gaps that it looks better to me that way. What i do sometimes is, i cut just the front piece here, a little bit shorter right and then once i lay it back down, so it's going to give me, instead of rubbing all the way around, it has a nicer swoop to it. Okay, so i'm just going to cut a little piece off here as well, not too much and then lay it and we'll finish, i'm just adding some curling to the hair itself and then i'm just going to leave it to dry, okay guys. So this is a finished look for baby here. I hope you guys enjoyed watching this video, please remember to like share and subscribe okay guys. So this is a 4x4 kinky curly closure wig that was made on the sewing machine and it will be available on my etsy shop. I will have the link in the description box below um


Comments
Stacey-Ann Felicia Smith: Wow, very talented. I really like to see wigs with baby hair. It's a JAmaican thing I guess dwl, however, very easy tutorial. Keep em coming Sher!