How To Make Your Closure Look Like Scalp! Start To Finish Body Wave Closure Wig Install |Incolorwig
- Posted on 16 February, 2022
- Closure Wig
- By Anonymous
Hello my beautiful subscribers (and non subs) ☺️
Wig sales page - @CAwigss
Personal instagram- @holaa_caro
EMAIL- [email protected]
PRODUCTS USED:
1.Flat iron:https://amzn.to/3B1suAB
2.Hot comb:https://amzn.to/3siJ0Za
3.Wax stick:https://amzn.to/3uvG9OY
4.Edge control:https://amzn.to/335tves
5.HAir serum:https://amzn.to/3gqjwUb
6.Heat protectant and shine spray:https://amzn.to/35VRiyz
7.Hair spray:https://amzn.to/3oqzuSj
8.Video equipment camera used:https://amzn.to/34G0NRB
9.lighting:https://amzn.to/3otyDQO
10.Ring light:https://amzn.to/3rvDYJz
Within 15 Days NO Reason Free Return Only for My subscribers Place Order
Get Extra $10 OFF Use Special Code: Y1TB
●▬▬▬▬▬ ❤ #Incolorwig ❤ ▬▬▬▬▬●
☛Link to the wig:https://bit.ly/3BsjEvR
Hair Info: 5x5 HD Lace CLosure Body Wave Wig 28inches 180% Density
https://www.incolorwig.com/ ➤Hot Sale Wigs:https://bit.ly/3KTwF5S
❤Mose Popular Highlight Colored Wigs:https://bit.ly/3ubpmkb
❤30% OFF Keep Colors Wig:https://bit.ly/3g4jfG9
❤Affordable Lace Part Wigs:https://bit.ly/3KMV9xM
☛Top Selling #30 Ginger Curly Lace Frontal Wig:https://bit.ly/3glkNMh
☛Invisible 5*5 HD Lace wigs:https://bit.ly/3rWeHHs
☛2022 New Arrival Wigs:https://bit.ly/34hzUmP
☛Affordable Wear & Go Headband Wigs:https://bit.ly/35Amjbf
☛Recommend Colored Bundles & Closure:https://bit.ly/3rTRnKt
Instagram @incolorwig: https://www.instagram.com/incolorwig/
YouTube @incolorwig: https://bit.ly/32FRNsy
Facebook @incolorwig: https://www.facebook.com/incolorwig/
Tiktok @incolorwig:https://www.tiktok.com/@incolorwig
Inquire Now: WhatsApp number: +8618703861608
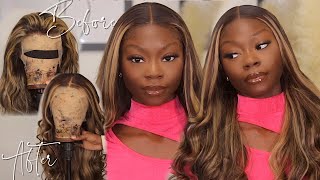
Oh hello, everyone! What'S good! What'S poppin, it's your girl, caroline, i'm back again with another wig install. So today we're going to be doing an install on this 5x5 closure wig from in colors. This is how the wig was looking right out of the box. It did come pre-parted in a middle part, but the knots were not bleached and the hairline had like a minimal to average plucking. You could definitely go ahead and install the wig like this straight out of the box and get something that you could work with and be finessable, but you know i'm always trying to give scalp. So i'm going to do some prep work before i install so before. Bleaching, the knot i used some 20 volume developer and i applied that just right onto the knot. This helps kind of like soften them up, so it makes it a lot easier to bleach them. This is great to do, especially if, like the knots on your wig are really large. Sometimes you need to you know, soften them up to help you get a more. Even you know lifting of the color once i let that sit for about 30-ish minutes, i'm ready to go ahead and bleach my knots, so i'm using a mixture of a blue colored bleaching powder with 40 volume developer. I will link that down below. Don'T worry to help um lift the color to give it like more of a scalp look and just kind of help go from black to brown. You know i have a more detailed tutorial on how, like i bleach my knots and all of that, it's more of kind of like a overview, so maybe more intermediate friendly and just to give you some tips and tricks, i guess but um. So i let that sit on my wig for probably 30-ish more minutes, i did add foil to kind of help. It all process faster and more evenly. Once that's finished, processing and the knots are looking nice and lifted, i'm going ahead and i'm just washing that out and i'm making sure i'm washing it all out and i'm going to use some purple shampoo to kind of help. You know help. What'S the word. Um cancel out the orange color, because you know your scalp is not orange. We'Re not donald trump, so, like your scalp has to be more of a neutral, brownish color after i've washed out the shampoo and let everything you know, get nice and clean. I go ahead and put the wig onto my mannequin head and i'm plucking under a white towel. Looking under something white. Just helps me see the knots a lot better to tip my legs and tay. So i'm just going in and just you know, plugging the hairline. A bit to kind of give it more of a you know, natural look, because, even though it was lightly plucked, i felt like i really wanted to give like. I said scalp make it look very natural, so i do some plucking and i do have a very perfect lovely detail tutorial if you understand how i kind of pluck my wigs closures, whatever i'm not gon na lie, though i did over pluck a little bit, and I did over bleach a little bit, which happens: okay, no one's perfect. We make mistakes and the great thing is that there's way to fix these things so i'll show you guys my little tips and tricks from whenever you make a little mistake, because i mean: what's life, that'll do the mistakes you know now before i go to install The last step i am doing is i using some foaming link that below as well, i'm just using this to help shape the hair and kind of mold it doing this step before you actually install. It really helps you like get the weight to be nice and flat helps you have to do a whole lot, less hot combing, and if you don't own a hot comb, this could be a great alternative. So i just make sure i saturate the whole head part. It the way i want to part it and just you know, brush it all out and let it set overnight, and i also let the hair air dry overnight. I think like letting it just dry without using a blow. Dryer works a lot better than you know. Adding more heat, but now this is the next day and our wig is ready to be installed. This is a marketed as a hd lace and i would say it's pretty hd to me like it's not like the transparent hd. It was quite thin. It had like a light brown tint to it, but for me to get a perfect match, i still like i do for all my wigs, no matter how hd it is. I went ahead and use my foundation and just buff that into the lace to get a perfect skin tone match and, as you can see, she's a little over bleached. You know which is fine. It'S okay, no big deal. What i'm gon na go ahead and do is i'm just gon na? What'S it called i'm just going in with my i'm sorry guys, i don't know why i keep saying: what's it called bear with me? Sometimes english is my best thing, but um i'm using my eyeliner pencil and i'm just going into that to just kind of you know clean up all the over bleach over pluck space, because, like i mean how would they know who has to know so once i've Done that i'm ready to install the wig, i'm just going and cutting off the little thick lace, that is at the end of your closures. If you know you know make sure you cut those parts off, do not install those parts and once i've successfully cut that off i'm going in and using my ebb and lace spray to help me spray down my lace. I do have a little demo video, explaining perfectly how to get like the best results, with the ebb and lace spray for those of you who are probably beginners and have some stroke like you're struggling with. It definitely go ahead and check that out, but i'm just going ahead and spraying that into a nice, even thin layer across my hairline, using my fingers to you know, help spread the product across. It'S not like all clumped up in one place and once i have that nicely spread around i'm going in with my blow dryer to just you know, help everything melt and just set into my hairline like i could barely see the lace. I was editing this video. I was like i need to zoom in because i cannot see that lace girl, she's disappearing, like chef kiss, is once the lace is nice and dry. I'M going in with this eyebrow razor to just go in and get a nice jagged cut onto the lace. I always find it better and it looks more natural whenever you use an eyebrow razor versus scissors to cut off the lace. It kind of just helps it like flush better into your skin. So, to really ensure the lace is a nice and melted, i'm getting it going in my elastic band and just you know letting that sit onto the lace. While i go ahead and do some styling, this just really helps make sure everything is nice and melted and dry, even though i've already you know, melted, not melted, but like kind of flattened out the wig using the mousse, i'm going in my hot comb on a Very high high heat, like i literally, had to buy this one from amazon link down below as well. This helps me make sure i'm pressing out the hair and getting the flattest results as possible, but definitely a lot more easier to do, because i did the whole mousse thing the night before so i'm just going in before i go ahead and style the hair and Cutting up some layers, i am terrible explaining how to cut layers, because, honestly, i don't think i do it right like i'm just winging it, but definitely y'all should just search up like you know, hairstyle videos like hair tutorials and how to cut layers. I like to watch the caucasian hair stylist cut caucasian layers because i feel, like i don't know, there's just something about white girl layers. I don't know if you understand what i'm saying you know what i'm saying but yeah. I just those the videos that i watch. I'M still getting better at my layer cutting skills, but you know just custom layers. It just works. The curls just look better the curls just look better whenever you curl the layers, so i'm going in with my chi heat, protectant and um shine, hair spray to kind of just help have shine and, of course, protect the hair. And now i'm going to be doing some flat iron curls and i don't know i just feel like flat iron curls are my favorite to do the flat iron is my favorite hair tool because she's very versatile - and i feel like it's just easier for me. I'M still working on how to use actual curling wand, like those not really one curling iron, like a little um clamp. Those are so hard but flat. Iron curls are super super easy once you like figure out how to do them and in my opinion, they work best if you use a one inch flat iron like the smaller ones, not like tiny ones, but a small standard, one that has a um curved mouth To it so, like you see this one, i have, i got it from amazon as well, and it has like a bit of a round shape, which kind of really helps with the curls, while i'm curling the hair, i'm gon na do i'll. Just have like a quick little, you know rant chit chat thing. If you don't care to watch my rant, you can. You know fast forward like about a minute to wish, but if you just want to listen to me, talk quickly about some things kind of interesting, then you can just sit down and listen now. I know as a beginner guys all these like extra steps from plucking and pre pre softening the knots, and all of that seem like a lot and can be very overwhelming, especially just like your first time trying to install a wig - and i know you're, asking yourself Like dang, do i have to do all these steps, like i'm just trying to wear my wig and slice this like this is a lot and my answer, in short, is no you really don't like, for example, this wig itself. I could have just worn it the way it was right out of the box and with some finessing, you know, make it work and that's how i kind of wore my wigs whenever i first started wearing them like. I wasn't doing all this. My first started wearing wigs, like i could barely pluck. Like trust me, i could barely glue my wig down. Like one thing my parents always say anything worth doing is worth doing well. So whenever i do install my wigs like even from the beginning, i always was trying and researching and freaking out ways to get better but seriously. At the end of the day, y'all a lace is still a lace and a wig is still a wig like you know, it's still not really scalp at the end of the day. So like sweetie, it's not that deep, really just do the best! You can and just don't look crazy. That'S that's! Really it or okay. If you, maybe you really just want to look slayed 100, but you don't feel like putting in all the extra time and effort or stress, then you know you can pay a professional or you can invest that money and you know get really quality quality like i. Don'T mean your best sheen your best aliexpress wig, like quality, pre-made, wigs that have like everything done for you, where they really just install and go, but those cost a lot, it's all about what you put in either you're putting in the time or the money. Thank you for coming to my ted talk and uh yeah. Let'S get back to this tutorial, i i'm is me. Oh oh foreign foreign, oh, oh once i was done curling in the hair, i'm adding some of this holding spray. It'S a light, holding spray from pink. So it has that, like luster shine, that's gon na add to it also helps hold the curls, don't fall that fast and last longer and i'm going in with a wide toothed comb to just comb out the curls first, i like to comb them out before i Brush them to kind of like them, and then i always end up wanting them to be much more looser and more of a flowy wavy look, but i like to comb them out first to see if i like the look once i've combed them out. I took off my elastic band at first, i was going for a no baby hair at all. Look because i wanted a very, like you know, simplistic look, that's kind of like what i like. It was cute, but i'm a baby, her baby hair girl. I, like baby hairs correction kind of nearby gold hair. I would say, because i didn't end up cutting the hairs that i pulled out. I just went ahead and did a large swoop, so i guess more of an edge because my actual baby hairs. So this is something you can do if you're someone who doesn't like having actual baby hairs, i want to add a little bit of that drama. You know, so that's what i did. I used my eco styler and i just went ahead and you know swooped the little long piece and boom bam. That was basically it. I did go in again and add some concealer in my part, which i didn't show on camera. Unfortunately, to kind of help clean everything up and make it look nice and pop in, and i used that same um eyeliner pencil to kind of clean up the hair some more, but that was pretty much it for this look. It was super cute. I was not expecting to like it as much as this like wow. This looks really good, but i hope you guys enjoyed it there's a video. I hope what i had to say was informative, helpful or just something nice to watch, and i really just appreciate you guys watching my videos and supporting me. I hope to see you in another one, as always make sure you like comment and subscribe and make sure you're checking out the description box. If you have like any questions, what products or the specs on this hair and if you don't have a conversation or just have questions always you know the comment section and yeah follow my socials peace out girl scouts have a lovely wonderful day or night. Is me? Oh, oh foreign is oh, oh me is um.

Comments
KAYLa BESLaYinG: I love when u do a step by step from start to finish bleaching,plucking Etc ...the wig came out stunning as always ,I love your tutorials !✨
Tasha P: Thank you this is one of the best tutorials I've seen for the closure wig. Great work.
Eno Young: Lovely video. Quick tips for over-bleached roots: Tip 1: take a tiny-teethed comb and lightly dab it on dye (in the same color as the wig of course), then lightly comb the over-bleached part of the roots with the comb that has dye on it. This is better than the eye-pencil or eye-shadow trick as it'll be permanent. Tip 2 (easier and quicker than tip 1): take a permanent marker in the same color as your wig. Paint the over-bleached part of the roots with the marker. You’re welcome.
Darlene Gierke: I'm new to your channel and wigs. You really slayed it. I just love the side parts. You made it look so easy.
Ashley: I'm totally trying this method ☺️
Alaina Richard: Great tutorial! Did you rinse out the 20v developer before you started bleaching the knots? ♥️♥️
Shannon Mason: Very informative video! Do you have a link to the blue bleaching powder?
mitchsantana: This came out bombbbb
Cameryn Williams: Bodied this install
Stephanie Nawa: You’re so soothing I actually listen and learn through the whole video
FloreMk: Once you let the developer sit for 30mins, do you rinse it out before you add the bleach or do you leave it there and add the bleach on top x?
tiffanyjackson521: You body everything you touch omg scalp at its finest
Incolorwig: Woww love,this hair is so pretyyyyyyy on you!
Kesha Jones: Hello beautiful you did that i have a question im new to learning how to install i notice some people use ghost bond glue and some use spray,do it make a difference
Ashawnta MOORE: So Beautiful
Ange Gabriele: Hello I love your videos . Do you sell out your wigs ? On Depop or another app ?
Princess Jess: nahhh you literally DID THAT
vava vogue: Love this
Nikki Harrison: Dopeness per usual
Angiel Rudolph: Great job, Thanks for sharing!
tiffany curtis: I bought a wig once shipping address correct everything correct believe me and fed ex still delivered it to the wrong address I wanted to kill they asses so I make sure my stuff is delivered usps never had a problem but yours is beautiful
EssenceofOma: You’re too much honestly!! Every upload slaps ‼️
Meah Wooten: Is it okay to go back and bleach knots again?
Fabian Allen: Can you add the products used such as shampoo, bleach
Cameryn Williams: Can u link the tweezers?
iaesha summers: This get into this skin tho
Pretty Nae: OMMMMGGH MY PLUCKING TECHNIQUE BEING USED ON YOUTUBE AGAIN YASSSS BLACK GIRL MAGIC
Kamilla Ali: Super cute
Ashley Simone: Okay what is the point of tapping the hairline after applying the adhesive? Are you checking for stickiness?
Carla R: I have a quick question. Are you plucking the hair or are you pulling the knot's out. My kids broke my glasses I can't see that well lbs.
ShondaLaLaLand: You’re giving me Capricorn vibes.
Jania Sanders: To whoever is reading this : May God bless you ! You’re gunna do great for ur school year ! Put God first and everything will fall into place ! John 3:16 says , “For God so loved the world, that he gave his only begotten Son, that whosoever believeth in him should not perish, but have everlasting life ! WIshing nothing but love , joy , peace, prosperity, faith, hope, etc. Have a blessed day ! God loves you so much
Aireonna Westbrook: Where did you get the purple bleaching powder?
Ashvonn Russell: I like to use mascara when I over bleach
I AM Motivated: where can I find this version of the song friend?!
Madison Wade: Can u link the plucking & bleaching vids
oluchi osakwe: Nice
DrippingCaramel: It was the shade towards Donald trump for me!
Yasmin Earl: You can lay a wig.! I wanna b like Caroline A.!
Sierra Queen: ❤️❤️
Ali Pearl Hair: Pls check email honey~
TayyMaari: Not cacausian layers lmaoo
Odette Vanga: God love you so much that He gives is only son Jesus Christ for us. Turn to Him and have a relationship with Him