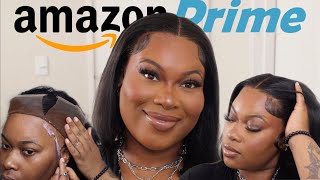
The Secret To Laying This Curly Wig No Glue! Best 6X6 Lace Closure Wig Install Ft. Asteria Hair
- Posted on 16 June, 2022
- Closure Wig
- By Anonymous
●▬▬▬▬▬▬▬▬▬♛Asteria Hair♛▬▬▬▬▬▬▬▬●
Black Friday In Summer!
$75 off over $479➤code: off75
$60 off over $379➤code: off60
$40 off over $279➤code: off40
$25 off over $179➤code: off25
Direct Hair Link➤https://bit.ly/3tDnBLD
Hair Info: 6*6 lace closure curly wig 20inches
❤#AsteriaHair Official Website➤https://bit.ly/3tDnCiF
Asteria Hot Selling Hair★ ★ ★ ★ ★
Top1 #asteriacurlywave Lace Wig➤https://bit.ly/3N0HumC
*Invisible Skin Melt HD Lace Wigs➤https://bit.ly/3NW931S
Glueless 5*5 Lace Closure Wigs➤https://bit.ly/3NY9ecZ
✨Win Free Wig In Facebook Group!Join Now➤https://bit.ly/3pcfZOo
#asteriahair30inches #asteriawig30inches
Wholesale or promotion? Contact Asteria Hair:
WhatsApp: +86 15238065852 Email: [email protected]
Instagram @Asteria__hair https://bit.ly/3Lobbxq
YouTube @Asteria Hair https://bit.ly/3m5EBoA
Hey guys, the wig that I'm gon na be styling in this video is from Asteria hair. So this is their packaging and inside the packaging they sent eyelashes, they sent a wig cap and they also sent an elastic band to do an optional elastic band method as well as their drawstring bag, so um the hair. Now they sent me their 20 inches six by six lace, closure, wig and the style is natural curly. The first thing I noticed about the wig was that the lace was very soft. It wasn't too thick or heavy, and the front was pre-plucked, so it was very light and I could tell it was going to be very easy to work with so to further customize the wig. I did go ahead and bleach the knots. So, as per usual, I prepared 30 volume developer and some bleach powder and then mix that into a consistency that was thick enough and I just went ahead and lightly spread the um, the bleach mixture onto the onto the lace, so yeah just take my time and Lightly spread it down and once everything was placed um, I let it sit for about 40 40 minutes until I before I washed it out, so I did go ahead and pluck it I after I was finished I did realize it was unnecessary to pluck it because The um, the wig was pre-plugged and they did a pretty good job at it, but but just out of habit I ended up plucking the wig anyways, so the next step I did was I tinted the lace using stushes lace tint in medium brown. I did transfer some of the product into another spray bottle because my spray pump did break, but, however, the product itself is amazing, especially for customizing the the color of the lace. So next thing I did was I set the front of the lace: okay by making a middle part and then I'm just combing it out um, just so that I can Define the curls in that direction. So I went ahead with the Hawaiian silky 14 in one Miracle spray um. So I use that in order to define the curls and to detangle the curls to comb it out, so I used a detangling brush and this was just to set. You know to set the curls and make sure the product went through from root to tip, and the next thing I did, which is very important to me, was setting it um using the Nairobi rapid shine, foaming lotion as well. So I ended up using this from root to tip as well, and I made sure that I at the front part, I made sure that I combed the um the hair on the frontal going back and down. So this is that when it sets it's not in my face it's away from my face, so I just made sure that I combed that throughout the hair as well from root to tip - and this is just going to define the curls even more when it dries And it's just going to show you the true beauty of the curl pattern, so once I you know distributed the product throughout the hair, I just used my wrap strip to tie down just to make sure the front was as flat as possible and I just used. I ended up using two wrap strips in total and then the next thing I did was let that dry using a hooded dryer, and I let it sit for about a half hour um until I found that it was dry enough to place it onto my head. Okay, so the wig is dry now, and this is how it looks. This is how it's set. As you can see. The lace tint made a big difference, because I must have been. I did over bleach the knots um yeah, the wig feels really nice and Light, and I can tell it's going to be a very fluffy and bouncy wig like once it dries and it you know, expands to that big look. So, as you guys can see, I did do a ball cap method. The lace at the front is only six inches, so I only really need it from like here to here, so I might have more than I need, but it's okay. So I'm just gon na put the put the wig on now there's straps in the back here and also comb. It'S like your standard wig. So I'm gon na use the straps to tighten it. They sent the elastic band so that you could do the elastic band method if that's what you're comfortable with, but I don't find it necessary. So I'm not going to be, you know, sewing those um sewing the elastic bands on. I think this is the tightest curl. I'Ve ever tried for a wig and I'm actually really excited. I think I'm gon na love. It love it time. Maybe imma make you swear, so I'm gon na cut it using this razor here. So it's like an eyebrow razor. I'M gon na cut down the middle with the scissors first, I think I cut too much all right. Let'S get in foreign look and not such a perfect. You know straight straight across you know, cut of the lace, so I find that it helps it. Look more natural, so I'm just customizing it some more. The hair is very fluffy. Like look at this. I haven't even glued it down yet and I feel like I don't. I don't have much to do. Um, I'm almost thinking. I'M not gon na glue this down. Guys the wig is so nice and snug. I use the comb at the back to tuck it in it's. It'S all. I'M gon na really need is my baby hairs, so yeah, I'm gon na pull some brownies um and it's gon na also camouflage the lace front. The lace at the front here, foreign anyway I go, I wan na, be happy, I think so yeah. So while this is drying um, I'm gon na just put on my makeup in the meantime and then yeah I'll be back to show you guys um. The finished. Look but taking these curls guys yeah, look how pretty and and they're so soft, it's so fluffy and soft. I can't even explain - and I also know that it's going to the more I touch it after it dries it's going to expand more and give me that nice natural look so anyway, let me go put out my makeup um, while this is dry okay, so my Makeup on, of course, you can see it's so pretty and I took off the wrap strip. So this is the scalp guys and, like you guys already know, I did not glue the wig down and the wig is sitting pretty snug. So I don't know if you can, if you can consider this a glueless wig but yeah, so I can move it. You know I can make a side part. Let me not try that right now, but I'm pretty sure I can move it over. If I want to do like a side part - or I could just part it out - um but yeah - the hair is already starting to expand and fluff out. I hope you guys can see uh yeah, so this is their 20 inches. Okay, so you guys can see everything now. Look how pretty that is. Let me show you guys, look how fluffy the wig was already pre-plucked. I only plucked a little bit. I could have went with not plucking it at all, as you can see right here. It'S very, I don't know if you want to call it scalpy, but that's because I did more plucking. I didn't have to do any more plucking. Also, the lace itself is very light like it's very um like it's thin, it's not too thick easy to bleach, which is why you know your girl went crazy, but it all worked out. It looked beautiful and I'm going out tomorrow, so I'm definitely wearing this wig and all I have to do is take it off and put it back on um. If I'm feeling like, I need more security, I'll definitely glue it down, but for now like this is fine, perfect, so yeah. So thank you so much. I stereo hair for providing me with this wig. I'M Gon na Leave the description and all the information um in the box below, if you guys want to know the details of this wig and how much it cost, and hopefully they provide you with a coupon code. I'Ll leave that in the description box below and yeah. Thank you guys so much for watching I'll, see you guys in my next video bye now you'll be the only one anyway.

Comments
Tuxiegirl B: so cute