5X5 Hd Body Wave Wig Install| Body Curls With Fishtail Braid | Arabella Hair
- Posted on 31 January, 2023
- Closure Wig
- By Anonymous
************** #ARABELLAHAIR OFFICIAL ************** ╱
The hair I'm using in the video➤http://bit.ly/3QJVPaw
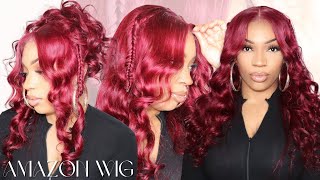
Hair info: 5x5 Real Glueless Lace Closure Body Wave wig 24 inch
Exclusive discount Code: AYTB get 18% Off
—————————————————————————
- Installment is available.Afterpay&Klarna&Credit card
- Free return service in 30 days
- Fast shipping service in 2-5 days
HOT STYLE RECOMMENDATION!!
[Top 1.]13x4 Loose Wave wig➤http://bit.ly/3ZJ7DOg
[Featured]Honey Blonde Piano Highlight Color wig➤http://bit.ly/3DgzR9R
New Highlight Gold Sand 13x4 Lace Frontal Wig➤http://bit.ly/3kbDXJq
5x5 Real Glueless Lace Curly wig➤http://bit.ly/3WkV8FM
[Melt HD Lace] Body Wave wig 210% density➤http://bit.ly/3kigtm2
360 Lace Body Wave wig➤http://bit.ly/3GJgOWl
#arabella hair social info:
Youtube: https://bit.ly/3Ou6vZe
Instagram:https://bit.ly/3QnQuEi
Tiktok:https://bit.ly/3zZbYSU
Contact for promotion:
Email: [email protected]
WhatsApp:+86 18937456160
Welcome Beauties to IambeautifulhustlerTv ✨
Be sure to THUMBS UP THIS VIDEO✨
Leave a COMMENT BELOW✨
And most importantly SUBSCRIBE TO OUR CHANNEL✨
To Purchase Hair & Products Www.ibhslays.com
Allow 3-14 Business Days For All Orders!
CONTACT & BUSINESS INFORMATION ✨
Instagram:_Beautifulhustler
@thebhslay
YouTube :IAmBeautifulHustlerTV
✨For Sponsorships ,Reviews,& QuestionsEmail:[email protected]
786-571-1313
#miamihairstylist,#miamihair,
#browardhair,#browardhairstylist, #Atlanta #atlantahair,#atlantahairstylist #reels, #explore #trending #tiktok #viral #miamimakeup #miamimua #miaminails
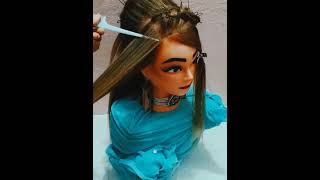
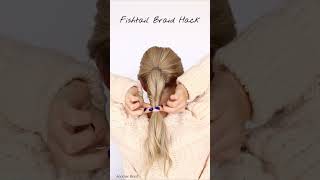
Thank you, hey Beauties and welcome back to. I am beautiful husband TV today we are back with another video and today's hair is sponsored by Arabella here now before we get into the wig, I want to show you guys um what they uh. You know sent me in the package and of course they sent me some wig caps, some lashes um like this pretty little scissor hair clip um a edge brush and, of course you know the wig itself and the wig that I saw me today is a 5x5 Hd lace, body, wave, wig and today I'll be showing you guys how I um freestyle the wig, which would be like some body curls, and also how I created the fishtail braid on the side and then after I styled the wig on a mannequin. I will quickly do the install on my clients so um. I hope you guys are ready for this video and here's. What the wig looks like a fresh out of the pack. So what I'm going to do is just go ahead and dip the wig and make it black and then um. You know bleach and pluck it some more and then we would get straight into the Spiderman on the mannequin. So the first thing I'm going to do is um. You know how come the front of the wig bag just to make sure everything is nice and neat? I already pre-parted the wig down the center and I'm going to show you guys how I complete my part in the back to make sure everything is nice and neat, and then once I have The Parting area, all slipped down and ready to go, we will get Into The Styling, as far as me, you know cutting the wig either and cutting some light layers in the front and then um creating a fishtail, braid and uh pre-curling it as well all right, foreign foreign foreign space is nice and neat. I'M going to go ahead and begin to, you know, cut the wig. Even so, I'm just going to take my scissors and just cut the ends of the wig even all around, and then I'm going to go ahead and create my angled layers in the front of the wig and then once I do that I will go ahead and Do a fishtail, braid and then get to curling up the wig foreign, I'm just going to just go inwards in the front and just keep going until I get like a nice clean guideline in the front and it's just to create some light. Little layers in the front that way when we curl the hair back it you know, Falls in some light layers. So once I finish doing this on one side, I will repeat the same exact step to the other side, and then I you guys up close and personal, how I created the fishtail braiding before this album foreign. So here is the part for the um fishtail braid and when you're creating a fishtail braid, you just want to part the hair into and then you're gon na keep those two sections separated and just pull tiny sections one at a time from both sides into the Middle of the sections and just keep Crossing them over. So that's all I'm going to be doing here. Y'All and I do apologize for my ring light. I don't know why it kept glitching like that, but I you're just going to continue to pull um thin pieces of hair from one side to the other, and you just combine it with the other hair on the other side and just keep it separated and just Be neat all the way down and that's how you create your fishtail braid, so I'm gon na do my fishtail braid. All the way to you know almost close to the end and then secure with the rubber band, but instead of putting them up in directly where I ended the fishtail I'm going to go down a little further and give it some more space of space. Before I'm securing it that way, that gives me room to actually um, like tease out my fishtail braid. So we can create a chunky or Messier braid, because when you do your fishtail braid you need it is going to be. You know smaller and thinner, but to create that nice chunky, uh messy look. You do have to tease out the braid once you are done, foreign, and this is how neat and thin the braid is after I finish this telling it so now what I'm going to do is like I mentioned before it is just keep pulling the braid apart To get to create that nice chunky and messy, look you just want to keep pulling it from top to bottom to make it widen up more, and here is the final look of the fishtail braid. It is nice and chunky and still neat, but messy and cute at the same time. So what I'm going to do now is just go ahead and take my um T3 curler and just curl back out of the hair and just pin it we're just you know putting like. I don't have to explain too much because you could pretty much see what I'm doing, but I'm just going to grab sections and just curl of the hair up using my teeth and curler and just pin it that way. When I did when I begin the install for how big the curls is already pinned up foreign foreign, foreign, foreign, foreign, foreign, foreign, foreign, that's good, thank you, foreign, and here is the final look of me. Prepping, the wig so pretty first Tail Braid is giving curls are Tans, and now it is time for the install. So today I'm using my beautiful model, her name is Evie. Okay, so um Eve, we're gon na. Do this quick little install and because I did the whole styling on the mannequin, the install it was very, very quick. It literally took us only 30 minutes to do the install. So the first thing I'm going to do is uh. Well, I already added the foundation underneath the um lace, part of the wig and I'm just going to cut the thick parts from the closure and then we're just going to go ahead and pull that back out of three layers of glue and begin to melt. That lace down into the glue foreign, foreign, foreign and comb it in and blow dry it and usually I would tie down the Melt belt but um. I just got straight to the point and after I melted that lace in with the hot comb I mean with the comb and the blow dryer. I just went ahead and you know cut that lace. So I'm just going to Slit that lace right down the middle and just go ahead and raise off the extra lace tuck down everything that needs to be tacked down, then pull down a section for the baby hairs uh spray that lace and tie it down. Foreign foreign, foreign, foreign, foreign, nice and smooth I'm going to spray that holding spray on the hairline and then tie it down and while that's being tied down, I am going to sew the wig all around her head. So it is more secure and then we're going to come back on Cut the baby, hairs and stuff, and you know comb the curls out and all of that foreign foreign foreign. So I went ahead and cut the baby hair and also uh combed out the curls on this side, and I will be using a gel to you know: suit the baby hairs um, my actual Edge curl, I have broke so I wasn't able to curl the baby Hair before I swooped it, so I just had to go in with the gel itself and just create my swoops naturally like how we used to do before we got into the whole um. You know Edge curler trick, so I'm just going to swoop it with my Edge brush and my finger and I'm just going to do two babies, two baby hairs on each side and once I have my baby hair swooped, I will blow dry it into place and Then you know comb it over uh, tease the crowd a little bit and then repeat the same step to the other side and then we're going to be working on our finishing touches and combing all the hair together for the final look foreign foreign foreign and as You can see the curls are giving on this side, so now we're going to go ahead and repeat the same thing to the other side and you know touch up the curls on that side as well, because I know the fishtail braid is on that side. So it'll be very mine. People like, if you you know recreate this, look about that fishtail being there, but I am going to cut this baby hair curl it as well, and then you know, touch up the curls on the other side as well and make everything blending with the fishtail braid And now I'm just cutting away in the extra flyaways or whatever um it's still supposed to be messy, but as far as the top part, so we just make sure it's laying down neat and then I'm gon na go ahead and conceal and black spray up. The part and, like I said finish, you know combing through the curls and fluffing them out and re-curling. You know any piece, that's necessary to be re-curled for the final look and just stay tuned for the final part of the video foreign foreign. Absolutely love it as you can see she loved it. So all we had to do was just conceal and black sprayed the part, and that was the very end of it. So yeah as I decided to leave those clips in there because she was feeling herself. But yes, I'm gon na go ahead and conceal that part uh black spray it and then I'm going to show you guys the finishing video at the very very end. Once again, this is a 5x5 HD lace, closure, wig body, wave 24 inch from Arabella hair and it was a quick, simple, install cute and simple style. That'S really cute and it's actually trending right now. Y'All know they is killing the internet with the fishtail braids. So um, if you guys want more of a detailed, slow motion way a video on how to create the fishtail. Just let me know down in the comments below but uh here is the finishing look. I hope you guys enjoy it. Okay and, like I said, y'all, be styled this on a mannequin. All we had to do was put it on the head, which makes it much easier, easier, mustache faster. I hope you guys do enjoy this video, just love this content and stay tuned for the final videos.

Comments
lneal2800: Gorgeous sis!
Kimberly Smith: Yes I love this slay ok Shay Queen of Slay does it again
L. B: The hairstyle came out sooo pretty love
Shamia Young: I’ve learned so much from watching your videos ❤️how can I prevent the flakey foundation? Once I put the foundation on my cap and wig I wipe my forehead with alcohol and apply the glue and tie it down but I always notice my lace seems a lil flakey from the foundation please tell me what I’m doing wrong?I need that perfect melt like you
Sammy Da Goat: Second Comment Lovely Wig Bomb Thumbnail Stunning Makeup