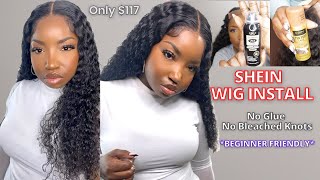
How To Make Your Wig Look Like Tape In Extensions | Yolissa Hair
- Posted on 29 January, 2023
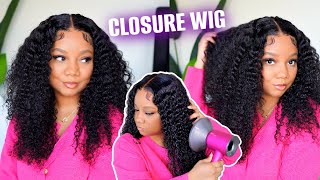
- Closure Wig
- By Anonymous
------------------------------------------------------------------------
Instagram : @ dieyna_sow
Tiktok : @ dieydollasign
Email : [email protected]
-------------------------------------------------------------------------
––Music Credits–––––––––––––––––––––––––––––––––––––
Cali Swag District TYLR EDIT
–––––––––––––––––––––––––––––––––––––––––––––––––
●▬▬▬▬▬▬▬▬▬♛Yolissa Hair♛▬▬▬▬▬▬▬▬●
Video Wig Shop Now➤https://bit.ly/3jZsc8K
Hair Info:#yolissabodywave 5X5 HD Lace Closure Wig 22inches 180% density
❤ #yolissahair Official Website:➤https://bit.ly/3IzDKtJ
Yolissa Hair New Comer? Look Here!
Get ❗️$100 Coupon Package❗️Join in Yolissa group:➤https://bit.ly/3momOuu
TOP 1 #yolissawaterwave :➤https://bit.ly/3Xfy3oL
Follow Yolissa Hair On Social Media
Instagram: https://www.instagram.com/yolissa_hair...
Facebook: https://www.facebook.com/yolissa_hair/...
✔Wholesale Contact +86 15803834514
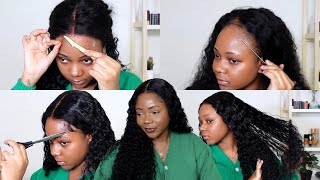
Hey guys, I know we have been all obsessed with the whole tapings 90s blowout look well today, I'm going to be showing you guys how to get the same look but with the closure got ta get straight into the Witchcraft. The sponsor for today's video is your Lisa hair, I'm going to be putting all of the hair details in my description box, but you guys know if you guys have been on this channel for a really long time. You guys know that I don't do frontals anymore. I'M a closure girl at heart and I will keep being a closure girl until I die. This is how the wig came straight out of the box. I think it was a body wave, wig, um, 22 inches and 180 density. They also sent me their HD lace, which was great. I did have to bleach the knots and I think I did this process twice because the first time I feel like it wasn't bleached enough, but right now, I'm just showing you guys literally like a list of ingredients that we're going to be using throughout the video And yeah we have to make the paste and if you guys, have been watching wig videos for a long time. I think you guys know how this process goes, but we basically have to make it into a paste and then apply it to the wig to the lace part of the wigs. I'M pretty sure I let it sit for 15 to 20 minutes before for washing, but then again it wasn't enough. So if you guys do this process make sure to keep it on for a little longer um, as you guys can see it's kind of orange, the lace is orange and we're going to use the purple shampoo to kind of cancel that out and make it more Neutral tones than orange because you don't want the orange, but then I put on the purple shampoo. I think I waited maybe 20 minutes and then I washed it off washed off the wig took my whole hair mask type of situation, but yeah I feel like. I need a minute a minute to tell you guys how much I love these Chi hair products. I use the hair mask the shampoo, the heat treatment they're, so good, if you guys have not tried them yet. You should definitely definitely try them out because they're literally gon na change your weight game and I'm not kidding, I am not playing with y'all, then I will pluck the wig a little more honestly. I was stubborn and didn't want to put in the clips like the wig clips, but I ended up learning my lesson and putting the clips at the end. You guys will see it, but plucking is honestly to each his own. However, you want your wig to look. However, you want it to be empty or full. That'S really up to you see I'm putting the clips girl anyways, I'm gon na put some edge control on basically the edges of the wig and also in the middle on the part. I don't know if you guys can see, but I feel like the wig is a little orange like the part, and everything is a little orange, but don't worry, I'm gon na fix that at the end, when I'm gon na install it, it's not gon na. Look that orange now this is the trick. I learned don't tell you that your good sister didn't put you on, because I did. I got this iron from Walmart and it works so much better than a hot comb. I don't know why, and it's so small like whenever I pack I can use it for for clothes and for wigs, it's great, I'm living so good, but then I'm gon na be using this. Basically um wax stick to flatten out the hair and iron. It even more and kind of part and iron and wax stick. It'S just like a repeated process, but yeah then I decided to kind of fix the part a little more and add some black eyeshadow to make a whoop like a line, a straight line but yeah. Then we're gon na get to the actual hair. They use this heat protective because I didn't have very cheap one. I wish I had the sheet one. It would have worked so much better, but this one did the job. It was okay, so another trick I Learned was that you have to straighten the hair before you curl it. Even if you want to do, I don't know tight curls or wavy curls or whatever you want to do. It has to be straight first. So this is what I'm doing honestly. I wish I took a little more time, straightening it, but it's fine. It turned out great nevertheless, but then we're gon na get to the install. This is your model for the day. Aka me. I hope you guys are not tired of remodeling, because I'm going to be modeling everything tiny braids, so I could keep them for a long time and wear wigs on top of them. If you tell me, that's not women in stem anyways, I'm going to be tinting. The lace with these two Ruby kiss um foundations. I noticed that mixing these two gave me my perfect shade. Listen, listen! Take a minute! Listen! Look at this. I think we have to zoom it in and really look at this material. I didn't even glue anything on yet anything nothing is done, but can you guys see the potential how melted this is gon na look when we finish anyways, I'm going to be brushing out the hair and getting ready for the curls I'm going to be doing some Really big curls on this, because I really want the layered blowout look. I don't want tight curls at all, but before that I think I fixed the part a little bit as you guys can see. My roots are a little orange, but I kind of like it. I kind of feel like it kind of matches with my skin tone. What am I talking about curls? I skipped the whole step before even doing the curls. We have to cut the lace and glue it down. If you guys know me, you guys know that I don't really like um glue on my wigs. I prefer got to be because one thing about me: I'm gon na wear a wig for a day and then take it out and I just don't want the stress and the rubbish. I don't want it. I it's really no stress so I'm taking off my wigs. Every day, but this is me getting excited because I know it's gon na look good. I also looked at the box and saw that they gave me a headband, and I was really excited about that because my headband was dead and this made honestly a really good difference. I was really happy, as you guys can see, I'm going to be spritzing. My got to be free spray, my favorite favorite lace, adhesive, because I can just take it off after a day and that's that's it for me. That'S what works for me, aside from them you're just gon na comb out the hair to make sure that nothing sticks that should not stick and then I'm going to be using these little scissors or whatever they're called and cut me some layers. I ended up cutting some a little shorter after and now it's on to the fun part, I'm going to be using this Barrel to have basically some really big curls. I actually don't use this Barrel a lot because I don't know I feel like it's. It looks better on long hair if you want really like not the fine, curls and so far. This is my first time actually trying out this look. So this Barrel came in handy and it's the babyless titanium collection. This is basically how I'm doing a curl. I think I'm just going to show you guys one curl and then speed up the process, because no one wants to see me throughout my whole head. I know you, don't you don't have to admit it, but I know you don't, but this is basically the technique. You just wrap the hair around the barrel coming up and down and then wait a couple seconds hold it. This is really important. You have to hold the curl before it falls and then let it fall, that's pretty much. It is. This is a good Tick. Tock. Behind the scenes, this is me filming this exact Tick, Tock that you guys see on the screen and I'm even gon na use this time to promote my Tick Tock and my social media. If you guys are not following me yet you should definitely follow me because we're having a good time over there. I know you want to be part of the party, so you should follow aside from that, I'm going to be taking off the bandana, basically brushing out the hair. I decided not to do baby hairs for this. Look because I wanted to make it look as natural as possible, but then I got to my bangs. The technique, for this is to curl them away from your face and that's exactly what I'm doing now. So this is basically the final look. I have to fluff out the hair a little bit more, sadly and shaping to my head, but this was basically it for my video. I really hope you guys enjoyed this little tutorial if you guys, like this wig the link and everything is going to be in my description box, and aside from that, I will see you guys next week in my upcoming video bye guys How to Dougie
Comments
Yolissa Hair: So pretty~ Thank you so much for trying Yolissa Hair
Bingél:
khadija sow: Love