Bleaching, Plucking On 4X4 Closure Wig | Tinashe Hair
- Posted on 20 October, 2022
- Closure Wig
- By Anonymous
FULL INSTALL TUTORIAL: https://youtu.be/IFKC6mc2Dn4
Hair Details: Curly 4x4 Lace Closure Bob Wig 14 inch
Shop The Same Hair➤ https://bit.ly/3f8ymRJ
#TinasheHair Official Store➤ https://bit.ly/
Welcome back to another video Styles Babes!❤️
forget to like and subscribe if you are new here! Join us become a Styles Babe!
If you are returning make sure to turn on that So you are notified every time that I post! (watch in HD 1080p) #stylesbabe #ROADTO2k ❤️
K E E P U P W I T H M E
IG: https://instagram.com/teeonjra?igshid=... @teeonjra
HAIR PAGE♀️: https://instagram.com/oreoniastyles?ut... @oreoniastyles
TikTok: https://vm.tiktok.com/TTPdMu29pW @oreoniastyles
Email:[email protected] (For Business Inquires Only!!)
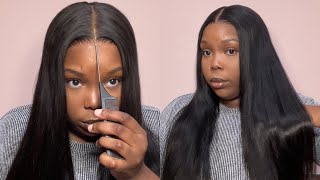
I just wan na be your favorite. What'S up style, babes welcome to welcome back to my channel it's time to Ariana and in today's video I will be doing a bleach and plug-in tutorial on my closure unit. This wig is from Tinashe hair. I have a separate video of me actually installing here and reviewing it, make sure y'all look at that I'll leave it down below and, like I said, there's going to be a bleaching plugin tutorial. As you can see, the knots are black and we want to get rid of that or make it as light as possible, so we're gon na go in with some bw2 powder. This is the white bleach and we're gon na go in with some very developer. Now I suggest using 30 instead of 40, because 40 is way too much like it'll literally process, your hair so fast and your over bleach. The knots - and you don't want that. So I'm going to take some got to be freeze my spray and get rid of them fly aways, because you also don't want any flyaways of hair in the bleach, because you'll have bleached hair and nobody wants that. So I'm going to use one scoop of the powder right now and I'm just gon na eye out the developer. As you can see, I did a little tiny drop because if you, if you add too much developer, it'll literally slip through the lace - and you don't want that and then you're gon na have to add more powder into it and you're really just wasting product. Because this is a closure, this is a small closure, so you really shouldn't be doing that much, but I did a little mistake and I will show you how I fixed it so, like I said, I'm just adding it little by little stirring it up. It is very chunky, and you know it's it's not enough. You wanted like a toothpaste, kind of consistently but a little bit thicker. So here I go in again with some more Developers and I'm just gon na stir that up to see, if that's what I need - and I think this is where I had messed up - I added a little too much developer and it's not the legging that I Usually, like I like for it to be a little thick like for the point that I could turn it upside down and it won't fall apart. So, as you can see, it's like a like a frosting kind of consistency, and you see it just literally fell right off of the spatula, and you don't want that because that means that it will seep right through your lace. So I have to go in with a little bit more bleach just to make it more thick, and that is what I meant before: try to not use that much developer, because if you do, you will have to go in with more bleach. And you really just wasting product like I said this is only a closure, and this is the consistency I like like. I should be able to hold it upside down and it will not fall and that's perfect so now it is time to apply it onto the closure, and I like to start from the back and work my way to the front. The back tends to be thicker knots, so it's usually like a double knot and that takes longer for it to process, and then I work my way up to the front, because the front usually is like a single knot, so it's quicker for it to process. I'Ve. Also seen people bleach the back first, like 15 minutes and then after 15 minutes they go in and paint the rest of each one. But in this video I didn't do that. Like I said, I worked my way from the back and moved it up to the top, and I just applied the bleach. You know be light-handed about it, try not to be heavy-handed because it will seep right into the lace and you will end up over bleaching. The knots, even if it is thick, you still will end up over bleaching knots if you are too rough-handed about it. Try to be. You know gentle about it, okay, so after that's done, I'm gon na place this closure onto a piece of foil and that's going to help it process. Like I said their developer is good because it doesn't process it too too. Quick - and this is just going to speed up that process and you want to work against gravity and make sure you have it faced in this way instead of upside down. So I let that sit on for about 30 minutes. You really just got to watch out for it, because everybody's knots are different, so some might bleach quicker. Some might take longer, so I usually leave it on for 15 to 30 minutes, no more, no less! So now after I wash that I don't want to air dries, I like to pluck my nuts when the hair is completely dry, not wet, but that is my preference. So here is the tweezers that I use. These are just some simple little tweezers. They work very well. I believe I got them from the hair store, and this is the way that I hold them, and this is the way that I pluck like that's exactly how I would pull the hair so right here, I am pulling out the pre-plugged portion. Sometimes this is the pre-cut portion or the pre-cut baby hairs. Sometimes I'll do, but this is the pre-cut portion so as you've seen. This is what you get when you first order the hair, and we just want to make that more customizable make it look like our hairline just a bit, because, even though it is a wig, we can make it look as natural as we can so like. I said this is the pretty flood portion and I go behind that one time and I start to put so. I hope that this is helpful, that you're understanding um. I'M really not sure how to explain this part, but I literally just pluck pluck and move along like I don't stay in that one same section, because you will end up getting a bald spot and this isn't the only section that we are plucking. So you know you don't have to stay in that one exact spot, so this is in real time. I didn't speed this portion up. Just so y'all could see how long it really does take to plug your wigs foreign sections so that first section of pre-plugged hair, then behind that and then behind it one more time so like I said this is the second time and I am plucking, and this Is in real time I didn't speed this part. I didn't speed this part up just so. You can really see how long it takes and really just want to take your time, because once that hair is plugged off, you cannot get it back. So I just really moved from side to side um. If the hair is really dense like the hairline, then I probably would plug it. I would pluck the same slit. I would pluck the same section twice. I'M sorry y'all. I will plug the same section twice if it is too dense, but this was good, so I only did it one time and then I parted out one more section, which is that third section that you're about to see and then I will be right back when I have something else to say: usually I don't do this often Thunder all right. So now we are done with plucking behind the prefix portion and those three sections that I shall drop so last, but certainly not least, I like to pluck in front of the hairline that I go like a little bit in the middle, like I'm not going directly In front of the hairline - and I just do the same exact thing that I did before just to you know - get rid of that boxy. Look because some of the wigs that are pre, you know, plugs they have a straight hairline and nobody has a straight hairline. Like that's just not normal, so you just go behind that and then right here in this clip is where I'm gon na actually pluck in front of the hairline, because, like I said I want to get rid of that boxy look. You will see a side-by-side comparison of the pre-plug section and what I plugged and, as you can see it does look more natural. It looks better honestly, like you see it looks way better. Like the Perfection is cool, you know, if you don't really want to do much or you don't know much, that's perfectly fine for that, but I like to pluck as much as I cannot too much because, like I said you cannot get that back. But here we have it, I'm going to show you a clip with the wig on my head. Like I said, I have the full video for that wig review and install up on my channel. I will leave that somewhere down below and I hope that this video was helpful, don't forget to like And subscribe if you are new here turn on your Bell, so you are notified every single time that I post follow me on my socials and I'll see y'all In the next one,


Comments
QUEEN: Great Job