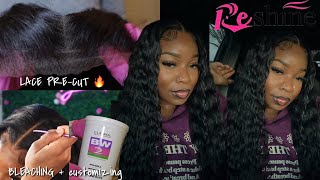
*Very Detailed* Bleach Knots, Pluck, And Install A Closure For Beginners | Kathy Odisse
- Posted on 24 December, 2021
- Closure Wig
- By Anonymous
*DETAILED* HOW TO CUSTOMIZE, BLEACH KNOTS, PLUCK, AND INSTALL LACE CLOSURE WIG. THIS IS BEGINNERS FRIENDLY BECAUSE I'M STILL LEARNING MYSELF. |
♡ F O L L O W M Y S O C I A L S ♡
Please Support My Business:♡
⇢ Instagram: https://www.instagram.com/pressgenius...
⇢ Website: https://shoppressgenius.com
♡ MY PERSONALS
INSTAGRAM: https://www.instagram.com/kkaitthty/?...
TWITTER: https://twitter.com/kkaitthty
TIK TOK: @kkaitthty
For any inquiries, contact [email protected]
Like, Comment, & Subscribe!
#pluckingfrontal #bleachinglacefrontal
Make me feel some type of way got me changing on my play: hey guys, welcome back to my channel, so, as you can tell by the title, i will be showing you guys how to achieve this hair y'all and this video was sponsored by i show hair. They were kind enough to send me their 4x4 lace, closure, wig and y'all will be doing a two-part detailed, get ready with me. I know i'm going to be showing you how to bleach how to pluck how to install your hair and for a bonus video. I will be showing you guys how to achieve this natural makeup look, but that won't be in this video. It will be in this video above here. I will link it up there or i'll link it down in the description box, so it will be a part. Two, i want to just say thank you so much. I show hair for sponsoring this video if you are interested in this type of video, just keep on watching. Okay guys. So the very first thing that you would want to do is take a look at your hair. Do you want to dye it? Do you want to keep it the way it looks, but for me i want to go in and dye my hair jet black. So this is the wig that i show here sent me their 4x4 lace closure wig and you can see it's a really good nice parting. The wig was perfect, it fit me and it was snugged. It was literally perfect. I believe the lace itself is transparent because it gave it gave me that like white look, but it don't take nothing but some foundation to fix. So the dye that i went in was the dark and lovely jet black midnight blue 40 developer and the quick and blue bleaching powder. So for me just to save all the mess and save me a little bit more time. I went in and did the watercolor method and yeah. This method is so so so so so easy literally. I never thought that we can use like a permanent dye box and you know colored our hair and it worked so i'm just taking the dark and lovely midnight blue and i'm taking the developer. Put your gloves on because yeah i had white nose, but my nose was messed up anyway, so i didn't really care to mess it up, but i still put the glove just to protect my skin. I mix the developer with the solution and you know you shake the bad boy up and then what you want to do is you want to pour the entire solution into the hot um bowl of water and make sure your water is pretty hot, but not too Too hot, but really in the middle, not too warm, but really hot and at first i thought i had to go in with another solution, because i only had one box but y'all. It worked like it, took everything and i don't know i just feel like it wasn't going to work, because i didn't see that the water was turning black, so i was kind of like dang. This is not going to work, but it did so yeah. I only used one box of dark and lovely and i only put like a little bit of water like mid size, and then i just kept my hair in for about, i would say five minutes, but you don't want to stain your lace. So now it's time to bleach these knots baby - and i, like my solution very very thick - and i know sometimes people will say, don't make it too watery, don't make it too thick. You got ta be in the middle, but i like mine's too thick because sometimes i would over bleach my knots and i won't have to go back and dye my knots. It'S just a lot of work, so i rather just make my solution thick and then you know it will save me time to um not having to go back and dye my knots and if i do have to re-bleach my hair again i'll just do that and Just avoid going back in the knots and dyeing it, it would literally save you so much time so now, it's time to pluck our lace closure, because you don't want a wiggy or bulky hair front. You want it to make it look very natural, meaning it's like your real hair, so my friend mo styles, i will link everything down below. She literally taught me how to really plug these frontals very fast and very nice. Okay, so i slowed it down for you guys, so what you want to do is you want to go in the back of your frontal and then push forward, and then you want to pull it and plug. You don't want to stay in the same area because you're going to start causing um bald spots, so you want to just keep going left and right left and right and left and right and literally you don't have to section off your plucking. You don't need to do none of that and she really really taught me so much with how to pluck my hair and now because at first it was really hard for me to pluck my frontals or lace closure. And i don't know if you guys see the big difference so far literally, i just went and plucked like five times and you already see such a big difference. Um again, you don't want to plug in the same area because you are going to cause bothering. So you just want to keep going left and right left and right and left and right so yeah, so so y'all. This is the end product of my hair. My makeup, i'm really feeling this look, because this is actually the first time layered my hair, pretty well y'all layering is not easy. What'S your thing comment down below you, like my hair, you, like my makeup or you like both. Let me know


Comments
PHASION TELEVISION: How did you protect the lace from the dye when you water dyed it?
treyesha neverson: Hey hun, where is the link to the plucking method you mentioned? X
Beauty within: Hey girl. What type of flat iron you used ?
Inside Trish World: