Half Up Half Down Curly Wig Install | Trendy Hairstyle Tutorial
- Posted on 01 February, 2023
- Closure Wig
- By Anonymous
●▬▬▬▬▬▬▬▬▬❤Ashimary Hair❤▬▬▬▬▬▬▬▬●
Biggest Discount,Get 25% Off, Code:Lee25
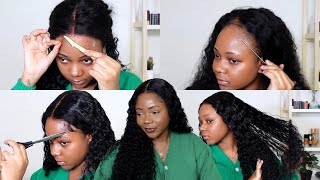
Hair Details:30inch Jerry Curly 13*6 Transparent Lace Front Wig, 180% density
Direct Link ➤https://st.ashimaryhair.com/ymj3
HD Lace Wigs:➤ https://st.ashimaryhair.com/ymj4
13x6 Full Lace Frontal Wigs:https://st.ashimaryhair.com/ymj7
Highlight & Cololful Lace Wig :https://st.ashimaryhair.com/ymj5
4C Hair Line Lace Wig:https://st.ashimaryhair.com/ymj8
Full Lace Wigs :➤ https://bit.ly/3TNHZVz
★ Ashimary Official Website ➤ https://www.ashimaryhair.com/
Find Ashimary on Social: Facebook: http://bit.ly/2Em6mo2
Instagram: http://bit.ly/2RUTBst
Youtube: http://bit.ly/38ArYea
E-mail: [email protected]
WhatsApp: +8613273746020 (Provide Wholesale)
Hi loves: what's up it's your girl shakely here back at it with another video as y'all, can see we're jumping right into it. Okay, so I'm starting off by plucking, my wig, of course, because y'all know y'all cannot put a wig on your head. If you have not plucked it, the knots on the wig are already bleached, so this was all I had to do was um well. I did bleach them prior to this video, so right now we're just plucking and I'm showing you guys my technique as I plug. I really just like to keep it between three rows, starting from the front um, and I just really pluck in between that and then once I'm done with that particular row, then I add that section over like y'all just saw, and then we just get the pluck In that part as well - and I just repeat this process all throughout the hairline - and it gives me the most natural look possible - and you can also go ahead and take it up a notch to even a fourth row. If, if it like matches the style that you're doing so with this style, I was really just worried about the front, as y'all can see right there. It was very, it was thinner than the rest of the areas and that's what we want to go for. So you really want to take your time doing this and right now. This is also sped up, so, as y'all can see just repeating the process all throughout the hairline, and it gave me the most natural look in the front as well and yeah. That'S really what you want to go for, so this wig is actually from Ashley Marie um and they are an affordable Hair Company online. You guys will find Lace, Wigs, bundles frontals closures. All of that goodness, this wig was actually a 13x6 Jerry curl, 30 inches y'all. So because the wig was 13 by 6, I was thinking of doing the style in my head and it came to life. I brought it to life and it just came out really good. So right now, I'm just applying front Foundation underneath the lace so that it can match my skin. This is also their transparent lace as well. So you do know if you are of color whether you are darker than me, or even a little bit lighter than me girl. You gon na need some foundation on that lace. Okay, it has to match your skin complexion and we just go and turn our music up. While we install yo. This hair is long long, Yes, Y'all 30 inches. It was so big. I was so happy because it's been such a minute since, like I've even done big hair like I've, just been sticking to my body wave, my Straight hairs and stuff like that. So doing this um style was really fun and I definitely want to just do like different styles. More and more with my wigs, I don't know if y'all noticed but like my last two videos, I've been doing Styles instead of just like installing doing a middle part and just styling. It like I've actually been doing different styles, and I really love it because it definitely adds something to my channel instead of it just being like a basic, install type of video um, so yeah. So now after we applied our three layers of glue, I'm just putting the wig down y'all know this part y'all. Nothing has changed in my hair in Star routine other than my cat method. So again I didn't get enough response on. If y'all wanted to see a video like that, so leave a comment under this video and let me know if y'all want an update on the different cap method that I have found works best for me, especially for that very natural and seamless look. So right now we're cutting off our air tabs and you just want to be careful that you don't cut yourself because your ears are right there. Okay, so just be mindful of that. So after you do that now we are going to just melt our lace and I like to do this before and after we cut our release. So doing this before definitely adds um some type of melting power y'all. I don't know what it is, but it just allows the lace to press into your skin much more than you just you know, pressing it in with your hands and then cutting the lace off and then tying it down like it just gives it more of an Extra melt effect - and I just really love it I'll, never not do this so after we cut that lace off the lace is looking really good. It'S matching my skin complexion and you know it's looking good. It'S looking good everything looks nice and plucked, and I was pretty happy with the way that you know the hairline looked so after this part, I'm really just trying to like figure out what type of style that I'm gon na do because, like I said, I had The vision in my head, um, so yeah so now I am taking out some baby hairs because we're gon na keep it minimal only doing them on the side and sideburns um. That'S really what I've been doing. I haven't been doing anything more, but these type of baby hairs and then I'm gon na go in with my ebbing hairspray and we're going to go in with our blow dryer as well on medium heat. Just to melt that lace in as well and y'all. See me pulling on my baby hairs. I do this while I do the hairspray, because it's gon na make sure that it's giving the lace enough pressure um. So while I'm holding that down and then applying the hairspray is going to give it more of a melted. Look so then, I just went ahead and put my band back on to mount everything in place, and then I just went ahead and part out um two parts on each side and okay. So now that we've parted that on each side, I am going to just section out that part and then try to get the rest of the hairs out of the way as well and right now, I'm really just making sure that my part is straight on both Sides um: you can really do this look even with the 13x4, but I just I don't know I feel like this was a perfect time to do this style with this length frontal. So right now, I'm just parting out the side. Parts um that we're also going to bring up into the middle as well. I just wanted to make sure that I took out enough hair and that all of the lace and the tracks were covered, and you want to do this on both sides. So now it's time to get the sides really nice and flat, so I'm going in with my Bed Head wax stick on both sides and also the middle. You guys will see that and I'm really just adding a lot of this because, like I said I want it to be really nice and select down okay, I want it to look straight at the roots and then boom curly at the top. So your flat comb is going to help you get the most sleek and flat, look of course, and then for our middle area, because this is a lot of hair. Like I said, 13 by 6 there's way more hair in the middle of the frontal than there is on these sides, so we actually have to take it a step further and part in between and flatten all of that out from the roots. Okay, so you cannot get a flat look from just putting the wax stick right on top of the hair and then just trying to hot comb it. No, you have to go in between and look at that y'all. It is so flat like super flat. It looks like it's a ponytail like with my hair: that's how flat it is. Okay and that's the look that you want to go for. So I'm just taking my time making sure that I'm going through the sections of flattening everything out from the roots and wow that looks so good. And then I just went in with a brush and we're just brushing everything together and I'm just making sure that my parts are good. They looking good and yeah. So now I'm going in with a rubber band and I'm just making sure that I am putting that middle part into a ponytail, because now it is time to work on the sides so with the sides I connected them really one by one. So y'all see how low I had it so before I even you know, put a rubber band rubber band around it. I clasp it with a clip and then I really just tried to play with it and mold it into the direction that I wanted it to go to and then once I was satisfied with the way it was laying - and you know in Direction in the direction That the hair was in, I just went ahead, and you know connected all of those pieces together, and my main goal here was to have those parts on both sides show so yeah. That is, I think this was the hardest part. Definitely doing this style on myself. If I was doing it on a client, you know this would have been one and done, but on myself it was a little bit harder because I had less control of the hair um. You know, because I'm doing it myself, but it actually really turned out really well and yeah y'all. This style was actually really simple. It'S not really much to it. After that. I just went ahead and did my baby hairs make sure that the hair itself was nice and sleek, and this is pretty much like. Oh yeah, I just poked myself in the eye, but this is pretty much like a claw clip type of look but with puffy hair and then with those parts in the front. I think it came out really cute and for my baby hairs I just went in with the Gorilla Snot, and this is my favorite thing to use for my baby hairs as y'all can see, the lace looks really good and I'm not gon na lie to you. Lace kind of looks 10 times better the day after so this is the finished look of this. Oh, my gosh y'all. This looks so good, so so so so so so so good and I am obsessed with the way that it turned out um and I actually forgot to film my outro and the intro to this video. So I just inserted some videos and pictures of how it looked when my makeup was done, but y'all. This looks amazing and I did a tick tock wow wow. So if y'all don't follow me on Tick, Tock go ahead and follow me. My name will be down in the description box below and thank y'all, so much for tuning in to yet another video. I will see y'all in the next one bye


Comments
Cori’el Sy’ray: This is so cute!
mo mo: Beautiful!!! What hot comb do you use girl?
Jassie Network: Yes . Show us your bald cap method ! Mine is outdated lol
Nwabisa Shiya: Yes bold cap method 2023 would be nice.