Glueless Water Wave Closure Wig|| Summer Series Ft. Luvme Hair
- Posted on 21 July, 2022
- Closure Wig
- By Anonymous
#luvmesummerseries
#luvmehair #summerwigs #waterwave
Hey girls & guys
Today we talk sunmer wigs. YES throw it on and GO !! This wig is glueless and perfect for the summer time! Continue to watch as I install this wig on my mom :)
Save some money with my code KARIN20
Direct link of unit in the video: https://bit.ly/3OislOc
Length: 12 inches
Let’s be friends:
Instagram: sincerely_freckles
Snapchat: sincerely_freck
Tiktok: karinw5
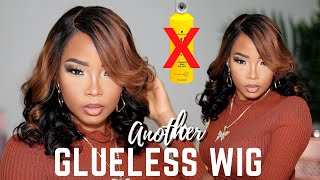
Hey everyone, so today we're going to be working with love me again. Y'All know. I love me. Some love me so today we're going to be getting into their summer series guys so right now, i'm just showing you the beautiful packaging and everything that comes along with it. So they sent me over this mirror that i'm definitely going to put in my purse. A love me head, wrap a edge brush, some wig caps and their information card. Now, let's get into the details of this wig, so they sent me over a water wave. 4X4 closure wig in 12 inches. One of my favorite things about love me: wigs is their construction. So right now, i'm just pointing out the four combs that come with this wig. There are two on the side, one in the middle and one in the back, and then it also comes with adjustable straps as well as an adjustable band. So right now i'm going to be showing you the knots on this wig y'all. It was already pre-bleached in the hairline, it's pre-plucked, so that is a plus less work is best okay, so i'm showing you these water wave curls and they are just so gorgeous. I went ahead and put this on my mannequin head. Just so y'all can get a better view and i'm going to give you another up close of those knots again, because this will save time, so you will not have to bleach them and yeah that that's the mood. So this is another shot of those popping curls y'all, but i ended up going ahead to bleach a little bit more, and this is what the hair looked like after i washed it. So i'm just going to show you me brushing through the curls, look how they just bounce back into place: beautiful beautiful yeah. So i'm just going to comb through it a few times and then we're going to go ahead and spray it with our water. Just to get it nice and wet so now that the hair is soaking, wet you're, going to go ahead and scrunch it up a little just to define those curls, and while i was letting it dry, i did go ahead and hot comb, the top just so Everything could be nice and flat and i wanted the hairline to look nice and neat y'all. So, as you can see, the girl is kind of getting better at plucking. I don't really, you know, have a method like i told y'all, but it looks good so yeah. I'M just gon na hot comb that and then we're gon na go ahead and show y'all what the curls is looking like once they dry and we're gon na go ahead and put it on our model, which today we are featuring, my lovely mother, so y'all say: Hey to her in the comments and yeah we're just going to go ahead and install this wig, so i went ahead with some cream foundation just to get the lace to match her more precisely, and i just put that all over the lace. I also went ahead and added that adjustable band, because my mom has a small head as y'all can see, i'm not trying to be funny by the way mom, because i know you're watching this, but i also learned this trick right here to get your wig snug. If you know you know sis, yes, so we're going to slide that wig on and i'm going to go ahead and adjust it in the back and then we'll move on to the next steps. Okay, so because i did not do a ball cap, i am gon na um just put the wig cap and push it back slightly and then add that same foundation color on her cap. So it doesn't look too light once i pulled the wig back down. So now we're going to pull the wig back down y'all and then what am i going to be doing? Oh yeah, we zooming in to see what that lace is looking like on that scalp and now we're going to go ahead and cut and zigzag motions, um yeah, just don't cut it straight across. Do jagged motions with your scissors or another tip? Is you can use a razor that'll help you get that jagged cut as well? So while i was um in this video, i did realize that the foundation i put down was a little bit too light. So i did go ahead and put a darker foundation at the end, which is what y'all seen in the beginning of this video. So right now it's still looking a little light, but still looks good for it to be glueless. So right now we're going to go ahead and wet those curls just so we can get them back nice and popping, because this is what it looks like with everything brushed out and again we did not use any glue. This is still glueless, so, okay girl. So i had to give y'all a close up of this glueless lace closure wig - and this is the point where i did go ahead and add a darker foundation. So it can match a little better and i use the little black spray in the part and, as you can see, this is glueless honey glueless, i'm also going to be showing y'all a few parts throughout the hair. Just so, you can see what exactly you can do with this 4x4 lace so now we're going to put it to the test. This is a glueless wig y'all see i didn't, took the whole wig off y'all and watch how easy it's going to be. To put it right back on, that's why i love this wig, because it is a throw on and go. You pull that lace back down comb those baby hairs into place. If you have any - and you are ready to go so i hope you all enjoyed this quick tutorial. Let me know what you think about this wig and i'll see y'all in my next video thanks for watching bye, y'all


Comments
Katesha B: Thanks for this beautiful look…. I absolutely love it
Berry Sweet: Beautiful can’t wait to get mine I’m going to ombré highlight mine with honey blonde and I really love the simplicity of it, just gorgeous
Lindsay Erin: oooh I like this one, this is cute!
Starring Shameka : Your mom is gorgeous