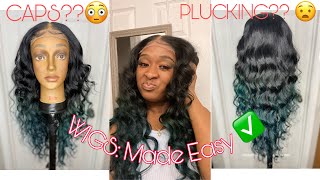
Slaying A Closure No Bleach | Precise Plucking Method | Julia Virgin Hair
- Posted on 12 April, 2018
- Closure Wig
- By Anonymous
Julia Hair mall: https://goo.gl/5kiVuU
Brazilian curly hair (18 20 22+16 closure) in the video: https://goo.gl/8Mv47x
Hot Selling: https://goo.gl/bLcjNt
ali_julia_hair Instagram: https://goo.gl/yVTv59
Goddess Day Sale from 3rd-7th, April
5% off for all Code:G5
So we're gon na be using this hair from Julia's hair virgin hair company. I have a 18 20 and 22 inch bundles Brazilian curly and a 16 inch closure. The hair is beautiful. The curl pattern is beautiful, so yeah. I should definitely check them out. They'Re super affordable, but we're gon na do is we're gon na start by pinning our closure onto our mannequin. Here you don't have to do it on a mannequin here. You can do it on something flat. So, as you can see better something with like a white background or a light colored background, you can do it on like a counter or something like that, but for viewing purposes I thought that it would be kind of easier to put it on a mannequin head And also it makes it kind of look like a scape a little bit, so what I'm gon na be doing is finding the middle of the closure as close to the middle, as I can considering that this is a free part. So I'm just going to be parting out a precise part in the front. The front part and the starting part, I would think, is the hardest part. Just because the hairs are kind of closer together and a little smaller, so they're a little harder to pluck and pull out, but I'm just gon na be using some lot of body moves. Y'All notice, my favorite moves. I always use this for my closure, so I'm just gon na be doing that and I'm using the tip in two part just because it's easier, but what I did was I parted out the section. Then I parted two lines over and then I pulled the hair out so you're gon na see me do this throughout the whole thing. I'M doing the exact same thing, I'm just I parted apart and then they have lines on the closure and rolls of hair and I'm gon na be plucking out only two rows exactly so that it is very precise, so you're gon na see me part and plucking Out the hair, while pulling out the hair, I'm also going to be using tweezers a little later on. But I really like to use at the end of the c-pen, because it's really sharp and it's really precise and sometimes you can make a mistake using tweezers um. If you use them in the front, so I like to use this because it's really really precise and I'm just gon na keep pulling out the hair. It might not look perfect to y'all right now, but y'all gon na see it's gon na come together when you're pulling out the hair, because there are filler hair. Some of the hair won't get pulled all the way out. So you're gon na have to go back and pull those hairs out, but I'm just parting and then I'm parting two rolls over and pulling out the hair in between and I'm wrapping around my finger and pulling down make sure not to pull too hard. Because you don't want to rip the lace, so be very, very careful and take your time when you're doing this, and also I'm going to be scraping the little knots out, because sometimes even if you pull the hair out, the Black Knight will still stay there. You want to make sure all those knots are gone and that you can't see them at all so that the lace can be transparent all the way through without having any little black markings. So that's what you're gon na see me do a lot. I'M just gon na be basically doing the same thing parting out. The two rolls exactly. I do two rows on every single closure that I do two rows and I pull out those two rows. If you have it closed, that is not a free part. That is a middle part. Usually they come really thin. So then, in order to thicken it up, you would just pull out one row so because this is a free part, I'm gon na be pulling out two rows, but I'm gon na be making sure that I party really really crisp and I parted in about three Sections so I part the first quadrant then I part the middle. Then I part the end and then I pull out in between so now that I'm parting, the second part, I'm gon na, go over two rows and I'm going to pull out that hair in any little hairs. That'S left over after I pull that section out. I'M gon na go back in and pull those pieces out as well, and I'm gon na be plugging those pieces out as well too so pulling in plucking, whichever works best for you, some people don't like the pool some people don't like to plug. So I do both just because it makes it easier for me to pull out majority of the hair, then go back and pluck the smaller ones. Otherwise, it would take me a really long time to pluck and then you take a chance in over pluck him, but I had a lot of little dots knots. They were stuck in the lace and I'm gon na be scraping those out and I'm gon na be pulling out the extra hairs. So there's any hairs or knots in the middle you're. Just gon na want to pluck those out. You don't want any knots left in the little part or the part of the closure at all, so make sure to be very precise, precisely you're doing that and to keep the closure pretty wet. I'M gon na be using a lot of body. If you don't have any mousse, you can use water. If I don't have mousse, I usually use water too. It makes it easier to pull out there. You don't want to pluck dry hair dry hair, can't plucking out the dry hair, can't cause you to rip your clothes you're lazy. You definitely don't want to do that. You do want to use a really good pair of tweezers, but you want to be careful with you using some really sharp tweezers, because you can't also risk ripping your lace so be very, very careful. I hope that this is a the true eye can see this really willing that this helped show. I don't bleach my knots anymore just to let you guys know, because I do precise plucking and there's no point in bleaching. Your knots, if you do precise plucking, and I also think that the precise plucking looks more natural than bleaching your knots on a closure. That is, when I'm doing the front soo. I always bleach my nuts, so yeah just keep that in mind, and I hope this was a good tutorial for y'all, and that is really helpful. Thank you for watching bye and stay tuned for new videos coming up soon. Also make sure that you check in the description bar below for the link to this hair. The hair is really beautiful. The curl pattern is beautiful, so yeah. I should definitely check it out as usual. Everything everything everything will be linked in the description bar below, so damn hot I put in work. If you firmly need your puddle just to kill deal, we all know that they really dependent on me my proud they love in a person. I came always if you can let these know the precise plucking, I'm just going to use some lot of body to flatten my closure down, but it came out really nice and really straight. This is the best way to pluck your closure and make it look as natural as possible. I hope y'all enjoy

Comments
Kyara Robinson: You helped me out a lot this was my worst fear but I did it and it all cause of you I’ve been looking for a informative tutorial for part plucking thank you ❤️
Unified By Dee tv: You talking through these tutorials makes them a lot more easier and understandable
Shamilla Harris: Followed ya steps to the T ! my closure came out soooo good for my first time thankssss kasia !
Pretty Ki: Thank you so much for this, this is perfection and doesn’t seem too complicated.
Alexis Streety: Girl thank you for explaining to pluck two rows you just helped me so much because I was confused about how wide the part needs to be!
LifeWithZinnah: Wow this looks so easy thanks to your demonstration. Ty for this!
STONEY XO: straight to the point and you explained so good!
Sue: This was so helpful, thank you so much!
Asya Jasmire: this was so helpful and informative!! thank you
Clarified Tangles: Slaying closures thanks to you ! Love your videos !
TheKutieK’s: I learned this method and fell in love with it it’s saves so much time without having to bleach my closure wigs now
BeautyByDessie: Thank youuu finally somebody that actually explained this process!
WkUpPeople: This was very helpful. Thank you!
minknae: Omg this was sooo helpful ❤️
NappyHappyDrumMajor: Really great technique. Bless you.
Noelle Sky: I loved this! You are very appreciated!!
BeautybyB !: Great Job! Held me so much!
Kay’s Kreationss: Yesss boo you did a great job!!
Kay Bae: Perfection. Now we need to see this unit on you gorgeous.
THE HAIR FANATIC: Love you for this tutorial ❤️❤️
Shiann Lewis: Thank you this was so helpful
jarvis mcintyre: Yu explained VERY WELL LOVED IT KEEP IT UP
Ronni j: Definitely going to try this ..best method i have seen yet ...very natural better then bleaching yass!
Christina Jackson: You did a good job explaining
Janae Collins: Perfect method!
vinkeyla23: BEAUTIFUL!
Sherelle Liverpool: Thank you so very girl, definitely a new subscriber
Ms. Crown of Beauty: Love it very informative!!
ILuv Me: ❤️ Loved it
BLK Crowned: Wow ! This is like, the best plucking I seen
aniya few: You did that
Kai Fran: i would just like to give you a BIG thanks on this tutorial! ❤️
Nieya B: Best closure video EVER! Everybody shit be lopsided and shit. You pluck just how I’ve been looking to find.
Contents content: Gorgeous !!!!
Yammajesty: Do you have a video up or picture of how the closure looked on you once you installed it ? I wanna see how natural it looked
Boss Nurse Jara: Omg this was soo helpful
Tyonna Daniel: very helpful!!
Lynelle Little: this was the best video i watched on how to pluck a part on a closure
ashton blue: Do you think it’s better to pluck your closure before you make the wig or after?
Dannie: Literally the best method ever
Sue: Best video everrrrrrrr!!! Thanks so much for this technique
anna holness: So helpful!.
C Love Beauty: AMAZING! SMART TO PLUCK TWO LINES ONLY. GLAD I SAW THIS B4 WILLY NILLY PLUCKING MY VERY FIRST NEW 5 × 5 CLOSURE. ALL RANDOM LIKE! #YESSS #LUVYOURVIDS
Courtney Young: You did that
NaywithanI: Thank you I needed this
missjaygh: thanks for this!
Beautiful YAS: Great video
Octavia, Brown: Thanks sis
KenDoll B: Wow sis. I love you for this.
Brianna Ware: What size is your manikin and where did you buy it?
Vendi Cru: I want to work with you, how do I get in touch with you to send you hair? I love the way explained everything in detail !!
Amilleon Mcduffie: Do you put it over a cap?
SlayQueenCO: Thank you so much
KaMilah Wiggins: Nice video❤️
Shanda J.: Okay so you only pull from one side and not both , right ? Trying to get This down pack before my graduation @KasiaMaeBeauty
Thee Tallone: I REALLY liked this .
FayyChristine: Where did you get your tweezers from
Ky Neshay: i really wish i was as good as you omg
Mocha K: So after doing this I won’t need to add foundation right? Cause I don’t like using makeup on wigs and stuff
kiywo: that part is bomb
S B: There’s rows in the closure? This will be my first time making one
Nak Lowe: Love this do you mind me asking the wig head size? Ik they vary
DaylaDoll:
Beautybykyyah: Imma try this
mia wherry: Did you only pluck from one side
Davina J: What the name of the stick you doing ur weave on???????
Kandace Noire: Take a shot every time she says “two rows”
xodiaries Love: Great Job kasia
Jenn ForReal: Danm pre washing the hair woulda made this a lot easier to work with
Trinesha Lashon: Yesssss!
Kasia Washington: How do you pronounce your name? My name is spelled the same way!
Pr1nc3ss Qu1arra: Thank goodness for you
CiCi M: I messed up my closure. I thought you meant 2 rows on each side smh
DeadKey: song playing in the background?
Touchedbynrose: Where did you get your mannequin head from
Nash _: Can you help me I’m having wig problems My wig is too big but elastic bands cause friction around my edges what do I do please
Daniel Warren: whats the song ?