Closure Wig Install * Very Detailed* | Bleaching + Plucking + Bald Cap & Install | Ft. Yolissa Hair
- Posted on 30 March, 2022
- Closure Wig
- By Anonymous
Hey girlies today I'm showing you step by step how to install this beautiful closure wig from Yolissa Hair. From bleaching the knots all the way to the install and styling! I hope this video was helpful and thanks for watching !!
Link to Wig
Products Used
BW2 Bleach Powder https://go.magik.ly/ml/1goa8/
Loreal 40 Vol Developer https://go.magik.ly/ml/1goa9/
Joico Blue Shampoo https://go.magik.ly/ml/1goag/
V05 Shampoo https://go.magik.ly/ml/1goao/
V05 Conditioner https://go.magik.ly/ml/1goas/
Mixing Bowl & Brush https://go.magik.ly/ml/1goaw/
Got2B Spray https://go.magik.ly/ml/1goay/
Got2B Gel https://go.magik.ly/ml/1gob2/
Ghost Bond Glue https://go.magik.ly/ml/1gob6/
Tresemme Mousse https://go.magik.ly/ml/1gobd/
Andis Hot Comb https://go.magik.ly/ml/1gobp/
Flat Iorn https://go.magik.ly/ml/1goc3/
Aunt Jackies Flaxseed Curling Gel https://go.magik.ly/ml/1gobx/
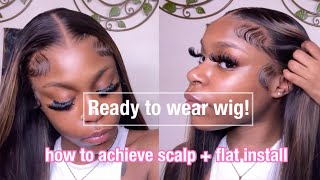
What'S up you guys, it's your girly welcome! Welcome back to my channel, as you guys see from the title, i'm gon na be showing you guys the full process of me installing this hair, i'm giving y'all the bleaching the plucking the ball cap to install it. I'M giving out everything so make sure you guys stay tuned. If you aren't already make sure you subscribe to my channel and turn on the post notification bell to be notified every single time, i post also, everything will be linked down in the description box to make sure you guys check that out. The wig i'll be installing. Today is from your lisa hair and i got a 24 inch closure water wave wig. You guys i've never had water weight before so i was a little bit nervous about this. It is a 5x5 as well. In the back came a wig cap, a silk edge, wrap, i believe, a edge brush and a little silk scarf that you could wear outside. So we're going to start by bleaching these knots, i'm going to be using this bw2 bleach powder, some 40 volume developer from l'oreal, some blue shampoo, this v05 avocado cream shampoo. You guys need to go get it because it is literally only 169 and it makes your hair super soft, along with the conditioner. Some got to be spray and, of course, my mixing bowl and brush. I just want to show you guys what the knots on this wig look like before. I start bleaching, as you guys can see. The knots aren't too bad on this wig, usually a lot of places. The knots are super large in the back, but smaller in the front. This one i feel like they were just regular sized all throughout the closure. So i can really appreciate that, and i'm gon na be trying a new bleaching method that i've done before one time and i'm gon na. Do it again, so basically you're prepping the knots before you actually reach the hair. So, as you guys can see, i just put a little bit of developer in a in the mixing bowl and i'm just rubbing the developer throughout the closure. Basically, i'm not really sure the science behind this. I am no chemist, but i seen somebody do this on tiktok, so i decided to try it. Basically, you are softening the knots before you bleach them. So if you were to have a closure or a frontal that has larger knots, this can help the bleaching process. Don'T ask me how because, like i said, i am not a chemist, but i just left that on there for about five minutes and then i'm gon na print, my actual bleach powder and developer together, i'm just doing one scoop of bleach powder and two scoops of Developer and of course, you want to mix that together until you get a thick paste, you want to make sure that this is not runny or else it will run straight through the lace, and we do not want that. Now i'm gon na go back and rinse out the developer that we just put on the closure and here's the tedious part about this all is that you actually have to blow dry the lace before you continue bleaching, because bleach does not process on wet hair. So you have to make sure that the lace is completely dry before you continue on your bleaching process and i'm just going to bleach the knots as i usually would spray. Some got to be to slick back the hairs and i'm just going to apply the bleach as i normally would, and since we've already prepped these knots, you do not have to leave this on for too long at all. I only left it on for 20 minutes and honestly, i could have probably left it on for 15 minutes or 10 minutes, because, as you guys can see, the lace is already turning orange after letting that set i'm going to thoroughly wash out the bleach you want To make sure that there's no bleach left on your closure and, as you guys can see here, the lace is a very brassy. So i'm gon na go in with my blue shampoo y'all we've been using purple for too long, and it don't work because it just doesn't make any sense. Blue is what cancels out orange according to the color wheel, so yeah we're going to go in with some blue shampoo and get out all that brassiness and then i'm going to shampoo and condition as normal, and this is what the knots are looking like, as you Guys can see they look a lot better than they did before we bleach them now. I'M shampooing the hair using the vl5 shampoo. You guys need to go, get it because this stuff smells so so so good and it makes the hair super soft. I just want to show you guys how much shedding i got from shampooing the hair, and this is not bad at all for curly hair. I have had curly hair that shed so bad here, i'm conditioning and detangling. You want to make sure you detangle this hair. Really really well, because it is curly, hair and curly. Hair cannot very very fast, i'm just rinsing all of that conditioner out and then i'm going to put the wig on my wig head and get ready for plugging so now to start plucking, i'm going to push back all of the hairs with a comb and of Course i'm going to secure the closure to my wig head so that it doesn't move around, and now i am sectioning off my middle part, because you do not want to pluck your middle part. Even if you want a side part, you want to make sure you still section out a middle part. Just in case you just never know you do not want bald spots in your middle part at all. So here i'm sectioning off about one inch of that side of the closure and we're going to be working in sections. So we're going to be going from the back to the front of the hairline. You want to make sure that you're using a good pair of tweezers, i'm not sure what brand mine is from, but they are very sturdy and i'm going to be using the slanted side. So i'm just going to start plucking and, as you guys can see, i am just going side to side. Obviously i am plucking on wet hair, so i'm making sure that i take my time to not create any bald spots when the hair is still wet. The knots easily come out, so you just want to make sure that you're really taking your time and i'm just going to keep parting off sections and plucking. You want to make sure that you're not staying in the same spot for too long or you will create bald spots in your wig. As you guys can see, the hairline is already looking a lot thinner, i'm making sure i'm not plucking too too much, because i can always go back in and pluck whatever i want when the hair is dry and i'm just repeating the same steps for the next Side and honestly, i feel, like this side came out a little bit better, but it's okay. Honestly, some will tell you to not pluck on the hairline, but i personally pluck on the hairline, because i just don't like how the hairline comes. It doesn't look natural to me, so i just pluck a little tiny bit as you guys can see. That is literally all i did and the hairline looks a lot more natural. This is what we're looking like. I love how it looks. I did go back in and pluck a little bit more after, but yeah now we're gon na get into the fun part, which is the ball cap and the install you guys do not come for my braids. I know they are old but they're flat and that's all that matters, so just just let it be just let it be so here i'm just slicking back the hair with some got to be gel and i'm blow drying it just to make sure there are no Hairs in the way i'm going gon na be using the wig cap that the hair came with and i'm just putting this on. As usual, i'm pulling it down to make sure that it's very thin and i'm going in with my got to be spray and i'm only spraying where my lace is going to lay because it is a closure. So i do not need glue all over my forehead. So now that that is dry, i'm going to pull back the wig cap just a little bit just so i can see - and i honestly wasn't going to include this part because it is personal preference, but i like to sew down my wig caps. It just makes me feel like it's going to stay on my head, like i know it's gon na stay on my head, but this just makes me feel secure. You don't have to do this, but it's just something that i do here. I'M taking these tiny eyebrow scissors and i'm going to cut off all of that extra lace, as you guys can see, i'm going to be taking the tip of this scissor and just pushing back the lace just so that i can get a little bit closer to My hairline make sure that this part is perfect and exactly the way that you want it, because it is the foundation of your wig. I always say like if your bald cap is not good. Your install is just not going to be good either so now to melt this wig cap into my skin. I'M going to be using my ghost bond and i'm doing two layers on the wig cap. As you guys can see, i am really pressing that glue in so that this wig cap is melted into my skin. You guys do not want to forget this step, because this actually helps your installs last a lot longer to tint this wig cap. I'M going to be using the ruby, kisses mineral foundation powder in the color 13, and i'm just going to rub this all over the wig cap. This part is very important as well. You want to make sure that you get a paper towel and some alcohol and just rub along your forehead, because the glue will not stick if there are any oils on your skin. Now we're going to get into actually installing this wig, and i don't think that i showed this part, but i used the same powder foundation to tint the lace and, as you can see, this wig is already giving scalp and we haven't even melted it. Yet. So i'm just going to clip away the hairs just so that everything is out of my way and we're gon na cut off those little thick pieces on the side. This will give the closure an even more seamless look almost like a frontal vibe. Now i'm going to push back the lace and get ready to start gluing this thing down and i'm using the same ghost bond glue that i use for my ball cap and, as you guys can see, most of the glue is actually going on the wig cap. I do push the glue just a little bit in front of the wig cap, because it is easier to add glue to where you need it than to remove it. I believe i did about three layers and you want to make sure that each layer is completely clear before you add your next one and when you're smoothing it out, you want to make sure that these layers are very thin. You don't want big clumps of glue because it would just be very messy. So now i have all my layers down. I am going to start to press the lace into the glue and at first i just place it down, make sure that it's where i want and then i take my comb and i start pressing the lace into the glue to melt this lace in even more. I'M going to take my got to be spray and spray it all along the hairline and i've also seen people use spritz. I heard spritz works really really well, so you guys can try that out as well, but for now i'm just going to be using my got to be spray after that, i'm going to take my silk edge scarf and i'm going to tie that down. While i work on this part, i'm just using a rat tail comb to part my hair straight down the middle and we're going to start flattening this hair, i'm gon na, be using my edge booster wax stick. If you guys don't have this, you need to go. Get it because it works wonders, as you guys can see, i'm just putting this all over the top of my hair and i'm also parting it in sections as well, because i want to make sure that this is super super flat. I'M going to be taking my hot comb and i'm going to just run this through the hair, as you guys can see, it is getting super flat. People always ask me about this hot comb, and it's going to be down in the description box. I got it off amazon, so you guys can go check that out down below and yeah look at this. Just look. Do y'all see this come on now, all right, so i'm going to be taking my eyebrow razor and i'm going to start cutting off the lace, as you guys can see. I'M really taking my time with this and i'm making sure that i'm getting as close to the hairs as possible. You guys you really want to take your time with this part, because this can go very wrong. First of all, nobody's telling me that this hair isn't coming out of my head, but anyway, i'm just touching up any parts that didn't get any glue, as you guys can see. I'M just applying some glue in that little area right there and i'm just going to press that down. Next, i'm going to clean up my part and i'm going to be using the l'oreal magic root cover-up spray in the color black and i'm just going to take my rat tool. Comb place it over the part and start spraying. You guys make sure you're very careful with this. Please do not be spraying this black spray all over, because your lace will be black. Now we're going to move on to the baby hairs and i'm just using my rat tail comb again to part out a little section on the side and i'm going to use my hot comb to flatten that down. Just so that it's easier when i start molding and you guys baby hairs are definitely personal preference you can take out as much or as little as you want to. This is just how i decided. I want my baby hairs here, i'm taking my flat iron and i'm just going to curl those little sections. Obviously, you don't have to curl all the way to the bottom and a lot of people use the mini flat irons, but i don't have one so this one is working just fine. You guys will see why i do this. It just makes it so much easier to form the baby hairs. Now, i'm using that same little, eyebrow razor and i'm going to start cutting my baby hairs. You guys do not cut too short. You want to make sure that you're leaving enough hair for if you want to go a little bit shorter, because, obviously you cannot add hair, so just do not cut this too short, i like using an eyebrow razor because i feel like it gives a better look, But now i'm taking a scissor and just cleaning up any little scraggly pieces and i'm going to be using my mousse and got to be spray to form my edges and look at that. Look at how easy it's molding after i've got my baby. Here'S how i like them, i'm going to take my egg scarf and tie that down again and now we're going to move on to styling this hair. Look how big it is like it's giving! So i'm just gon na take my spray bottle with some water and i'm gon na start to spray down the hair. This is water wave. Obviously so you got ta spray it down with some water, and you guys are gon na start to see the natural texture of this hair while the wave of it and it's so pretty it's so pretty like. I need to be on an island as soon as possible, so to define this curl pattern even more i'm going to be using the aunt jackie's flaxseed curling gel, and you guys i love this curling gel for curly hair. It doesn't make your hair flaky or crunchy at all. It'S not going to be stiff, it's going to be very, very soft, but still gives a very nice defined curl and i'm also scrunching up the hair a little bit just to give it even more definition and i'm just going to repeat the same thing to the Other side with the same gel and water - oh my gosh girl. Why is your face like that? It was probably the texture i don't know. I don't know why my face was looking like that, but she stank she got a stink face. I don't like that. All right, so i finished with that and i'm just gon na go back in with my hot comb. One more time, just flatten everything out make sure everything is nice and seamless, and you guys this is the finished look. I hope you guys enjoyed this video. I absolutely love this hair. Like i said, everything is going to be down in the description box, along with all the products that i used in this video make sure you guys are subscribed to my channel and the post notification bell is on to be notified. Every single time i post and thank you guys so much for watching. I will see you guys in my next video
Comments
Yolissa Hair: Great tutorial! Babe you are so pretty!!