How To:Achieve Bouncy Curls With Straightener| 12Inch Wig Install *Detailed Plucking* Iseehair
- Posted on 07 December, 2021
- Closure Wig
- By Anonymous
Hey y’all ❤️ thank you for watching this video don’t forget to like comment subscribe and share THANK YOU FOR 100k❤️ On the Road to 200k
❤️TIME STAMPS ❤️
Intro| 0:00
Plucking | 0:29
Blad cap method | 10:52
Install | 14:14
Curls | 25:40
Final thoughts | 31:02
❤️Product list ❤️
https://www.amazon.com/EBIN-NEW-YORK-A...
https://deninedefined.bigcartel.com/pr...
https://straightrequestproducts.com/pr...
https://www.imaslayyobae.com/collectio...
♡H A I R I N T O D A Y' S V I D E O:
Christmas Pre-Sale , Up To 34% OFF + Extra $30 Free Coupon, Don’t Miss Out!!!
Buy now, pay later! Pay in 4 interest-free payment available now on https://www.iseehair.com/
♡Use My Special Code: Beauty6 Get $6 OFF !!!
The hair I'm wearing in this video is :https://bit.ly/3lynyNb
#ISEEPrincess
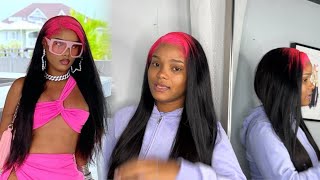
Color: Ombre Honey Brown & Black
Density: 150% Density
Texture: Bob Brazilian Straight
Length: 12inch
Cap Construction:13*4 Lace Front Wig
♡2021 New Arrivals-Colored Wigs :https://bit.ly/3jhEp63
♡Suitable For ALL Skin Tones- HD Lace Wigs: https://bit.ly/3yiEZEM
♡Other Deals:
Bob Brazilian Straight 13*4 Lace Front Wig: https://bit.ly/32LpTh2
Bob Brazilian Straight 4*4 Lace Closure Wig: https://bit.ly/3Gbj4ny
♡ C O N T A C T ♡
IG: @iseehairbeauty--http://bit.ly/2IyNNkJ
Email: [email protected]
Imessage/whatsapp: +8613271220951
SOCIAL MEDIA
Instagram: @Ty.marrah
Twitter: @tymarrah__
Business email: [email protected]
#WATCHIN1080P
#Tymarrahgi
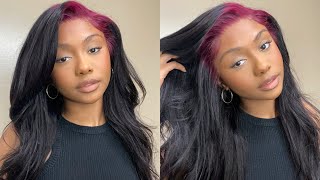
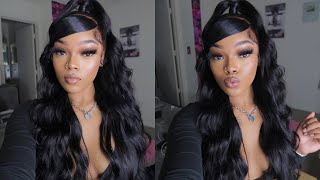
What'S up you guys, it's your girl, tamara gi, and if you want to see how i got this balm look make sure you guys stay tuned and keep watching. So we are jumping straight into this install. We are working with icy hair today, and this is just so many things that came inside the box now. This is a frontal of course, and this is a 12 inch straight unit and this hair was pre-bleached and pre-colored. So everything that has to do with the color with this unit um it was all from icy hair. I didn't do any of it all. I did was bleach my knots now. I did want to kind of get a little bit detailed with the plucking, for you guys every once in a while. I do want to give you guys a little more detail on certain steps just to go in depth in certain steps than i would normally. So we are going straight into this plucking process, you guys and i'm just going to walk you guys straight through it. So first what i did was. I just used my hot comb and i like to spray oil on my hot comb just to get it like. A little bit more hot and then it adds shine to the hair as well. So, first things. First, what we're going to do is pin down our wig to our wig cap with our t-pins, and you can find these champions at target. I will link everything down below, so all of the products that you can purchase online. Everything will be linked down below so make sure you guys check that description box and also there are time steps on this video. So if you guys didn't want to watch the whole thing, you want to go straight to the installing process, just click to which part you want to go to so here i am right now spraying some heat protectant spray on the hair. Normally i like to pluck my hair when it's wet, but i did let this air dry overnight after i bleached it and i did kind of want to get it wet just a little bit, which is why i just sprayed a little bit of heat protectant on It and we are about to go ahead and get started. I feel like plucking to me really isn't hard. It'S really repetitive and it's very easy, but you really have to follow the steps, or else you can go bad a little bit, but so what i like to do is i like to section off my hair. So the first piece of hair that i section off will kind of be like the hair that i will plan on using for my baby hairs and when i start plucking, you want to just go from side to side side to side. As you see me doing in a fast motion, this is all to it. There'S nothing else that i do um just go section for section and you guys will see me later on pull back another section on the same side and just do the same thing. So just keep doing this until you have it to your liking. What i like to do is i don't like to pluck too much on the wig head, because i kind of like to pluck a little bit while it's on my head, because i don't want to pluck too much and then i get it on my head and It looks crazy, so i just pluck just enough to my liking and then, if i need to pluck some more i'll pluck some more while the wig is on my head in between me plucking. I do like to go in with my hot comb now. These are the steps that i do all the time, so it's very repetitive, like i said before, so you just plug in from left to right to your liking, section off some more pieces. If you want to section off some more just like you see me doing right here, i just section off another part, just to kind of get it a little bit more scalp like behind that area, but this wig is actually pretty like the hair. Isn'T too thick on this unit, particularly so i really didn't have to do like so so much plucking, but i did do it. You know to my liking, so i'm gon na do this same thing on the sides of my hair. I do three sections the sides. The two sides, and in the middle, so you guys, are gon na see me just do the same thing and one other tip that i wanted to add was, as you guys can see how my hand is holding like the hair. I like to do that. Just so it can be like sturdy for me so um, i don't know if you guys are going to see me, do it on the other side. Now for this side, like i said about like the sturdiness, i had to kind of hold the wig like kind of on my chest a little bit, so i can get that sturdiness, and this is what i always end up doing all the time. So you guys are going to see me. Do it right here, so we're just you know, taking our hot comb, putting everything back section off the hair and that grip like it's all about how you get the grip. So you can get the good plucking in, like i'm waiting for my part to show up, so i can show you guys exactly what i'm talking about, because i want to be really literal and real specific with this part, because this is something i feel like it Really really helps when you have the positioning on your hair. Okay, so here we go right here, so you see how i'm like trying to get my position. I'M moving the wig cap around like the wig head around a little bit trying to really get my position in, because this is very important. When you're plucking, you got to have a good, a good sturdy part so yeah. So you see how i'm holding the hair back with my other hand, and then i am plucking so and this is how much hair and total came out from me doing the whole plucking process, sometimes when i'm doing units it's more than that. But this unit wasn't that bad, so now we're gon na go ahead and add our makeup. You guys know this is the same makeup that i've been doing with my installs for a minute. This is the rk by kiss cream foundation in the shade 11 and i'm just putting that all over my cap, i'm gon na spray it down with some holding spray and then normally i'll blow dry it. But i let it stick because i did have something to do right after this, so i just let it air dry. With my fan on in my room and then i came back to do my install so now we are doing a wig cap for this unit. In particular, so i'm just using that um loc gel just to put my hair back and yes, you guys my hair is dyed and you guys will be getting that video soon of me getting my hair dyed but um, i'm just putting my hair back, and these Are struggle braids, you guys me braiding, my own hair is like so terrible. So don't don't be discouraged if your braids don't be looking good because mine, surely don't, but it gets the job done and i just sprayed a little bit of oil in my hair just because my hair is dyed. I just wanted to. You know have a little bit of oil in my hair and i'm wiping my perimeter of my hair down with some alcohol, as you guys seen, because i didn't want that grease from the edge control to like mess up the holding of the cap. So when i am doing my wig caps, i like to cut all the way at the top so that the wig cap can stay on my head sturdy and i won't have any problems, and i am going through with my goat glue. All of these products will be listed down below so check that description box for the link to this glue, and this is the glue that we're going to be using for our units as well. I really like this glue, but i know it can be messy at times for a lot of people, so one tip that i would say for using this glue in general is, as you guys can see. What i'm doing right now is. I have the tube still on my head and i'm just sliding it and that's typically, what helps me more with using this glue and helps it be a little bit more less messier when i just slide it through and i'm going back in with my evening. York hold spray. This will be linked down below as well, and i spray that behind the perimeter of where i put the glue at just for extra hold. So now i'm wiping my perimeter of my hair with the alcohol once again and then we're going to go ahead and put our skin protect on you guys know this is the only erica j product that i really use is the skin protect, because i, like the Skin protect and i did cut off that back portion of this wig you guys i love the color on this wig. I see hair really did the thing with the color on this wig because it was just so cute, like i absolutely loved it so much so, as you guys can see, i'm cutting the parts by my ear. Just so i can have my hair laying down flat when you're laying down your frontals. You want to make sure that you know exactly where you're laying your hair, because you lay it back too much or you lay it up too much and after you laid that glue down. It'S like overweight, after that, so just make sure you guys know exactly where you're laying your hair down i'm going through with my hot comb, just to get the hair a little bit more sleek before it's time to add our glue on and for today's install the Method that we are using is like the section by section method, so really what i just put the dots there for is just so i can know where to put the glue on the middle part, and when you are doing section by section, i would suggest that You guys do the middle first and then do your sides. I'Ve did my sides first one time, and it was just so dumb of me to do that because the middle was just not middling like it wasn't working for me, so i would suggest. Do your middle first and then do your sides. I only do one layer of glue when i'm working with this goat glue, because this glue is so strong. I really only need one layer and i was feeling this song you guys so just don't mind me being ghetto at the moment, but i was really feeling that song but um. This right here is really a crucial part right here, because what i do is i put the glue on the perimeter where my cap is just to be safe. Just so, i won't put too much glue and, as you guys see me, lifting up the lace a little bit just to see if all the glue got on there. As you can see, there was still some parts where i needed to add glue, and i just added it on there blow dried it and laid it down now. I would suggest this being the safest option to do, especially for beginners, because i, rather you guys, have to go back and put glue rather than you guys putting glue on places where it doesn't need to be, and now your whole install just messed up. You know so i would say just take your time: lift back your lace a little bit if you need to add some more glue on sections, go ahead and add some as you guys can see, i had to add a little bit more on there and then I was fine and then i went ahead and blow-dried it. I'M going to do the same thing that i did for the middle for both sides. So now we're going to go ahead and wrap this down with our elastic band. I know you guys know before i really like, using like the bands that already had like the clips and stuff on the back, but i kind of reverted to using a regular classic elastic band, because i feel like it really gets that real good hold on there And i would say i would blow dry my hair for about 20 to 30 minutes. I would suggest sitting under the dryer, but sometimes i just don't feel like it like. I have a whole dryer and i don't use it, but i'm gon na start using it again, because it's very useful, i don't know why. I don't use my dryer that i have, but i would suggest if you have a dryer use your dryer, because that's easier, you can get other things done. While your hair is drying and as you guys can see, i did use a kind of different method for cutting off this lace. I did small sections and i feel like that. Helped me a lot more. So, as you guys can see, i'm just cutting little sections in between of the sections that i already had cut and just cutting off my lace like that, and i feel like that. Helped me a little bit more just kind of getting it more precisely cut, and it was way easier for me now that all of our lace is cut off. We'Re going to go in with our lace, tint spray by slayer bay make sure you guys check that description box down below, because this is down below as well um. This is in the shade cappuccino i actually have the whole set, but cappuccino is the only one that i really use because it blends with my skin a little bit more, so i'm just going in and spraying with that. I would suggest spraying it on your unit before you put it on your head, but sometimes i just like spraying it on my head, but if you guys like have makeup and stuff on, i wouldn't suggest spraying on your head like this. Only if you got like a little fresh face going on and you don't mind it dripping out your face - you could just wash it off in. Do it like that, but if you have makeup on just go ahead and spray it on your lace before so i did spray some holding spray over it, and i put my elastic band back down and i just blow dry, my hair for about 20 minutes and It gave me the hold that i needed, and it gave me the look that i was needing so now we are about to go ahead and start getting this styling right doing these baby hairs and curling this hair up for this install - and particularly, i didn't want To do any baby hairs that was like too too too too much. I just wanted like a little cute little something going on, and that's what i did. I also used that same lock, gel that i used for laying down my hair. I used that to do my baby hairs and i kind of followed up with some gossipy glue kind of mix them together a little bit and it gave me the look that i wanted and i also used some spritz on my hair as well as you guys Are going to see a little bit later? Do okay, you guys! So i went in and started blow drying my hair, because i seen this video on instagram and this girl was saying before she curls her hair. She likes to blow dry it because it makes it like a little bit more bouncy, but she had like a circle looking brush and i was just like okay, let's just see what happens so. I just went through and blow dry my hair a little bit before. I started curling it and yeah. That'S the only main reason why i just wanted to try it to see if it was going to actually work and right here i was like hmm, the curler wasn't given what it was supposed to give. So i went ahead and used my cheese straightener to try to get the look. I wanted, and normally i do not curl my hair with a straightener, but the curls were curling. So i was like okay. We gon na use this straightener for this install spray. A little bit of hold spray on it and that's what i did so for my left side. I curled away from my face and from my right side i curled like towards my face, and this is how you get the good grandma curls like i am a sucker for some grandma curls like i love the grandma poofy bouncy curls like if i could wear Grandma curls every day, that's what i would do, but of course you know, your girl got ta experience different styles, but if i was to have like a favorite favorite style like some grandma curls, that's bouncing is my favorite curls, like i call these my sherlock girls, Because i just be feeling like my name - is shirley with these curls, like i love some good grandma curls and, as you guys can see, the curls were curling. I love the way these curls came out. They just made me feel so happy inside because they came out exactly where i wanted to. I changed my outfit. You know i had to you know, get a little bit of pitches in i love the color. I love the blonde. I feel like they put the blonde in the like the most perfect way. You could, you could put it in it's giving me like. I don't even know i don't know why i just went to go put a jacket on like i don't know why. I just did that. All in all, i really really love this hair. This hair is so cute, it's so bomb. I really love the colors in the way that they really set the whole thing up and the hair is very soft, so the rate is a 10 out of 10 for me personally, because everything just went exactly the way i planned it to go like everything just Went exactly right if you guys want more information on this hair, don't forget to check that description box down below all the information for icy hair will be down below, as well as all the links to this unit and everything you need to know about this install If you guys, like this video, don't forget to give your girl a like comment and subscribe to your girls, youtube channel and we'll be back with more videos, soon stay blessed.
Comments
Melanin melll: I feel so confident about installing my hair after watching this video
Bigandfine2: Beautiful im doing this look for my daughter prom
The Life Of Zaria TV: I love yo videos I just did my hair yesterday and its sooo cute!
Delores Jordan: So pretty !
Taylor King: Thank you for sharing your greatest with the rest of the Great girls watching we love u
DeAysha Simmons: I need this!!! I want mine just like this with the dark roots ... do I need to tell them that ? I see the one that says skunk stripe but is that the right one?
Jasmine May:
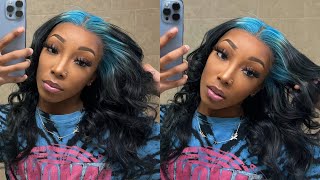
Rayven Slack: Where is the video of you getting your hair dyed I want this color
Mini DIOR:
Jalasha P: Can’t find the wig on the site it doesn’t show when you click the link
Erika B: Ok Grandma curls ❤️
ItsKarryanne: OMG cuteeeeee
iCHXSEN: Hey Beautiful
As Told By Chy: What's the name of that flat iron ?