Easier Wig Making For Beginners With Laflare Closure On Cap!
- Posted on 17 October, 2017
- Closure Wig
- By Anonymous
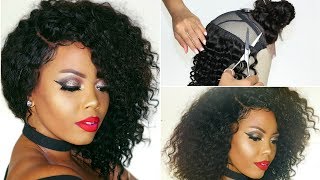
Hey GlamFam! Linwood and Alison here with a hair review, closure review, and tutorial for you to help simplify the wig making process for beginners! SamsBeauty.com sent us this cool closure on a cap made by laflare which is great for beginner wig makers because it cuts out an extra step. There are some slight drawbacks, but the hair is great quality, and I honestly think that the invention is really cool, and probably should have been thought of infinity years ago!
So one of the most daunting things for beginner wig makers is the idea of having to sew on their own closure. They are typically overwhelmed with the thought that they may mess up the closure, or sew it on too tight or too loose, leading them to stress and worry about making a wig themselves. For that reason, I love the idea of this invention! Here are my only drawbacks:
The part on this particular close is not moveable, it's not a free part closure. The knots on the closure are not accessible and thereby cannot be bleached, which means you'll have to emphasize your part line with makeup.
Other than those two things, I really like the product, and I really like the bundles from LaFlare as well! All split ends were already removed which means you get 18" of quality hair, instead of 16" with 2 " worth of split ends.
Here are the links to the hair and the closure:
ITEM NAME
- LAFLARE 4X4 LACE CLOSURE ON CAP STRAIGHT 12"
- LAFLARE WEAVE NATURAL STRAIGHT
LINK TO HAIR
-
http://www.samsbeauty.com/service/prod...
-
http://www.samsbeauty.com/service/prod...
COMPANY STORE LINK
- http://samsbeauty.com/index.beauty
SAMSBEAUTY IG&FB
follow samsbeauty on instagram
https://instagram.com/love_samsbeauty/...
like samsbeauty facebook page
https://www.facebook.com/love.samsbeau...
Here are the tools I used:
Needles: http://amzn.to/2ztZbGD
Thread: http://amzn.to/2xLbCk7
Marcel iron (I couldn't find a chi one like I used in the video, here's another option: http://amzn.to/2ysh8GZ
Love you Glamfam! Stay Glam!
Linwood and Alison!
How to make a wig with a heavy bang
Hey glam family wood here and today, I'm gon na be showing you a wig that I'm making for Allison with some hair that was sent by Sam's Beauty calm. Now this video is gon na be slightly different because it's sent with an invention that I hadn't seen before, but honestly, I think it's pretty smart and it was created by love, Slayer hair. So let me tell you what's so different about this. This is the package for their closure, but instead of it just being a closure, it's already been previously attached to a wig cap, so for beginner wigmaker's. It makes the process quite a bit easier for you to go about making a wig doing your own, weave things like that, because your cap is already attached so in this in this out of the packaging, and that way we can have a look at it because Clearly, I haven't had a chance to look at it close myself. Now they did send the closure on the cap, which is what this is called as a closure on cap, and they also sent me three bundles of brazillian straight remy hair. So I'll show you those here in just a moment as well there, so you've got some lace there in the middle. The rest of it is tracked there on the side. So I would just say, put this part line wherever you want it, and that way you don't have to worry about moving it around a whole lot, so I will make sure to do that when I'm creating the wig. Now, as far as the cap goes, it looks like a mesh cap construction. You guys can see through it here, which is nice for the sake of breathability. It has the elastic straps in there no clips in here, but I think that the eye elastic straps should be enough because it's holding pretty secure - and it does have a bit of felt right here - where the elastic tabs were sewn on also just to kind of Offer a bit of protection from that section there now, of course, if you feel like you need Clips in there, you can't sew clips in or you can simply bobby pin it on. So I'm gon na go ahead and I'm gon na just place this on my way get over here and I'll. Show you guys the bottles alright. So the closure on the cap was 12 inches and then they sent me. Three bundles of hair got a straight 14 inch. I have a straight 16 inch and I have a straight 18 inch, probably working from the longest length in the nape and we'll work our way up now, because I can't really move that part line around on the closure. Instead of just going ahead and creating the cap with a center part line, I'm going to go ahead and create it with the part line where I want it. So I went on the side. I'M gon na go ahead and sew on the cap and then I'll. Just do it according to a side part, and I feel like that, will just make the process a bit easier, especially because I already know how some parts on this side here. So let me go ahead and I'll take this out of the bag. I'Ll take the longest one out because I feel like those are typically the ones where you would feel more imperfection, because the hair is longer, it's been through a lot more alright. So let me show you guys this hair and I'm gon na move out of the shot, because I really don't want it to focus on me as much, because it's fighting with the camera can be a bit much. I want you guys to be able to see, and he shine things like that on there. I do not see any split ends and just to kind of make that obvious, like these are the ends of the hair. They'Ve already been trimmed off, so no split ends on there, which is nice. The hair feels really nice and look at that movement on there like this is pretty good quality. Here I have no complaint about that. It feels lovely. The wefts are nice and flexible. They feel sturdy like they won't be doing a ton of shedding, but they also feel nice and flexible, which is great because I don't plan on cutting I'm going to be doing the flip over method. And let's see here, it's a pretty good density in terms of the amount of hair in there. The thing you want to keep in mind, though, is the longer you go with the hair, usually the shorter, your wefts are this way. So if you're going to do like, let's say three bundles of 18, unless you want more of a normal thickness, you may want to go ahead and add an extra bundle. If that makes sense, hopefully it does so I'm gon na go ahead and get this taken down and then I'll show you guys the full rundown what I'm gon na do over here. Okay, so let's get the full run-through, so I already have the wig cap on the mannequin head and I do have it pinned down with just some t pins. I have made sure to pull the elastic straps out, because I don't want to sew those down by mistake and then I've got the closure part hold now. The reason why I feel like this is much easier for beginners is because the closure is already stitched onto the cap. A lot of people are always concerned about like tearing holes in the closure. Things like that, and this leaves a bit less work for you there to do so. I'M gon na go ahead and start off with this. Like I said, I do have it positioned on a side part, so it would be just over Alison's right eyebrow and I'm gon na go ahead and get position there. Now. I do already have about ten needles threaded over here, which, to be honest, I'll, probably need more than those ten, but we'll start from there and we'll kind of roll along. So I already have the bundle undone I have. Let me see if there's any shipping, I've got one strand. So if you want to count that as shedding then sure go ahead as shed one strand, but it's nothing excessive. So I don't think that that's anything major there and I'm gon na go ahead. Unroll this baby now I'll, probably start off just for the sake of the length going ahead and doubling up these tracks and then from there I'll go ahead as I get closer up to the top and do like single tracks on there and I'll kind of show. You guys what I'm talking about when I say that here in just a moment, alright, so now that I've got this repaired, oftentimes I'll go ahead and toss the hair over my shoulder just so it's out of the way, especially if I'm working on live client. I don't like to have hair all over the place, so I'm gon na go ahead and grab one of my pre threaded needles which, by the way I have a pretty good-sized bag of needles - and I have quite a few already threaded over here. So I'm gon na go ahead and start just by feeding my needle through both of these tracks because, like I said I have it, doubled up and then we're just gon na start off in the nape area. So I'm pulling straight through I'm gon na go ahead and start off and just bottom one. I'M gon na stitch pretty closely right along the edge of this spandex type material, it's elastic material. Just because, honestly, I want to create some stability in the nape, so once I've done that I'm gon na go ahead and pass right on underneath I'm gon na stitch through and pick up hair that I just stitched and continue sewing right on through there. So it'll help to lock that hair down and I'm just going to continue that process as I stitch so there's my needle and then go ahead and stitch there. Now I've got this little loop here, so I'm gon na go ahead and separate. I mean cool there's that loop, okay, now as I'm doing that what I'm doing is notice. I'M gripping this thread between my fingers. The rest of the thread starts there. I'M gon na pass my needle up, underneath and hook through the elastic we're gon na pass, underneath the thread see it and then continue on up and basically what that does is. It causes the thread to hook on itself and it locks that baby in place. This is called a lock stitch, so I'm going to continue that all the way across the bottom, all right, you guys so once I get to the end of stitching that section, like you guys, can see here, I'm gon na go ahead and I'd tie it off. My knot twice, I have my thread coming up and hanging over here. Just so it's not in the way, and then I'm gon na go ahead and bring this section over here. Now. I'Ve already put a tee pin in here, just because what I want to do is I'm going to go ahead and bring that here on over here and wherever it is. I want that hair to reposition, I'm just gon na. Take it and push it through that wig cap. So basically it allows me to secure these wefts directly, where I want them and continue stitching right on across. I have to worry about them flapping and falling all over the place and trying to hold it up, especially since a lot of times the wig heads pretty easily move. We don't want the extra stress that comes along with that, so I'm gon na go ahead and do that off-camera and then I'll continue, stitching and we'll touch bases on a certain parts up. What I want to do is a really heavy sweet bang up here. So I'm gon na show you a technique for that. As we go all right, you guys I've gotten up to the point where I have finished with that first bundle of hair - and it ended right here so I'm gon na go ahead and I'll pick up. That 16 inch and continue along here and then we'll bring it on back as I'm bringing on back, because I want to create a heavy bang. I'M gon na go ahead and begin to bring that track up and around up to where this closure begins. So we're gon na start creating some bulk right in that region there. Well, I'm want to make sure it's gon na have a good degree of stand-up as we're working on it as well. Hopefully, that makes sense you guys have not, hopefully, will be able to tell what I'm talking about as we continue this process. So I'm gon na go ahead and pick up this next bundle, we'll get it unwrapped and I'm just gon na continue with it doubled this process that we're doing all right. So I've got the corner, pin there and then, where the edge of my new bundles meets. I'M just gon na go ahead and start off by pinning right where that last one stopped. So we've got here right on across to the other side and that's just going to make the process a bit easier in terms of sewing and making sure that you know. There'S not a bunch of crazy in the way, so if here I'm just gon na go ahead and continue stitching right on a cross, I prefer to stitch from right to left. It just feels more natural. For me, I can't stitch either way, but usually, if I'm looking to go through this as quickly as possible, I'd do it from right to left, which means I'll cut the thread and start back off on the right hand, side now, of course, if it's easier for You to do from left to right, you know, feel free to go ahead and do that. That'S entirely up to you. No rules here, boo, no rules here now when you're folding on these corners instead just folding straight over, which creates quite a bit of bulk push that hair up thumb up and at a slight angle. But it does. It creates less of a hump here and then it allows you to go ahead and lay it right on across here without a ton of bulk. I know people are always wondering like how you do this fold-over method without all of the bulk and basically that's how you do it. So I'm gon na go ahead and take that and it's gon na pin going somewhat upward. So I help so lay that nice and flat, so you guys, can see there's no rough transition here, it's not like a jump between my finger and the cap, so the flatter you lay that there, the less bulk there is on the sides of the cap. For those of you who may have been wondering alright, so as I get up here and let me go ahead and turn this a bit just so you guys can see all that I hooked my t, pin there I'm gon na go ahead and turn it. I want you guys to see this is where you begin to kind of create some of the the bulk of that bang. So when we're creating the hard swoop, let me turn here instead of flipping it back over and bringing it back around, I'm going to begin to turn it up and we're going to just bring it right up to the edge of that closure, and we can bring It back down and around from there. So what that's gon na do is help create some more bulk right up here and that way I can give that nice, full bang, that everyone likes. You know to one where you can't see anything and you run into people and stop in traffic and driving your car off the road and all that. But you don't character. You still look cute. You know your hair's gon na be late for your funeral. We'Re trying to create one take a look, so let's go ahead and do all it is you now, as you see how I want you guys to see here, it begins to gradually push this hair here up. So that's what we're looking for. I want to gradually create some bulk in that fringe area you. So when I get to this point here, I want to get pretty close to where I laid my last track. So I don't want to create a massive gap there, because I don't want it to look like there's a gap in the finished look, so I'm gon na go ahead and move this closure out of the way I'm gon na go ahead and continue on stitching notice. My last track is here: I'm gon na place this directly over top and we're gon na bring it closer than I even went on the last track there, because I want to make sure we have as little gapping as possible, especially around the face just because that Area does not get covered as easily as hair in the back. You all right, you guys, so what I want to show you is here, I've gotten to the edge of the closure there, and we've got like a little bit of gap there. You guys can see that I'm sure it goes around here. Here'S where we have the corners of each of those that are folded. So what I want to do is I'm gon na go ahead and continue to fold over here and we're going to take this final track. I'M gon na wrap it all the way around here. I'M gon na actually use it to stitch down this level of tracks. I'Ve done they're, nice and tight. So basically, what that's going to do is it's going to help me to create my volume here, but make sure it's nice and smooth along the top, so it easily blends from that into the closure, and it's also gon na make sure there's no gaps between where This hair stops and where the closure begins, so I'm gon na go ahead and stitch this final one and we're just going to start right here on this corner, I'm gon na hook the edge of that closure, just like so and we'll begin stitching. So since I'm doing that - and I want to make sure my track stays pretty much right - where I put it - I'm gon na go ahead and keep in there in the middle I'll, keep in right and this side is wet well. If I can get it through. All it is there we go okay, so we got a pin right through there as well and then from there. I'M gon na go ahead and just move on over here. So I can easily see what's going on pick up my loop and take my needle through it and I'm gon na stitch nice and tight right there. I want to make sure my corner lays down nice and flat. We just begin to stitch all the way around and I'll speed. This part up for you, you all right, you guys now, as I get up here, I don't Stitch the closure, but I want to make sure that I'm kind of tacking the corners of each of those bent tracks as well as the closure. So basically, what that's going to do is help to merge the two into one again, helping to make sure there's no visible demarcation between the two spots. I want there to be a natural bit of body, but I also want it to blend really well, and I want that hair just naturally feel like it flows towards the face, rather than it being like so you're just gon na try to calm that forward. All day, no I'm good and well it don't work. You know, I'm sure some of you have done like a standard, wig or standard sewing and then wondered why it is that, like other people, get this really full thick bang and you're not able to get that. So this is part of that problem. It allows you the privilege of being able to create a full thick thing without the bulk that typically would come along with a full, thick bang. I hope that that makes plenty of sense, so here I'm hooking through the traq underneath and then I'm gon na hook through that closure and stitch down. Now I've got a straight, not my threads, a bit and hold on here. We go okay and see how it lays that nice and flat, and no bumps no lumps it's all about those details, and I'm just gon na continue that process right on up here. So we still got the corners of these two. I'M just gon na go ahead and do the same thing. What forgive me the corners of three, so I'm gon na go ahead and lift so I can see exactly where that corner is that I want to stitch down feed it right on through there and stitch, say anything along here. Okay, I already got that corner got a little space in between, so I'm just gon na stitch to the closure, lifting it up. I'Ve got the corner here on this track and right now it's trying to lift. So basically, what this is doing is helping me to ensure that none of these tracks are lifting it lays them down nice and tight, get right in between, and here let's see, if what I can do to help. You guys see that better right there we've got one more corner, so I'm just gon na stitch through that corner like so one good time and use that to lay it down. I'M from there, I'm just gon na stitch it again on this corner. When I make sure my tracks are laid nice and flat, we're gon na double stitch there. I know a lot of people would just tie this off. What I'm going to do is I'm actually going to tie just once not twice like I usually would and then I'm gon na feed, my needle underneath a couple of these tracks, move this hair out of the way and find out right where that needle came from So you guys, since you and it's gon na hold it up, I'm gon na move all that hair out of the way and wherever it came from, I'm gon na go ahead and stitch right in that region. What this is gon na do so, as I move all that, I can then see the space in between my tracks and I can stitch right in that space. But that's gon na do it's gon na make it to where am I not? It doesn't make a bump either see if I can get you guys to see a bit better here hold on. They don't want to be able to see exactly where that needle is coming out and then from there I'm just gon na hook. One of these tracks, not the mesh hook the tracks underneath there stitch a couple times and that's what we're gon na knot off in that way, any bulk that's created is hidden by the bulk of the bangs, we'll go ahead and cut that and then I'm just Gon na nip the corner of this track. Nice and close, I don't want any bulk sticking out, so I'm gon na go ahead and drop this closure just like so okay, so you guys can see there and see how, despite the fact that we've done that this hair here wants to flow towards the front. So that allows us to if we wanted to curl this to the back. It still has that nice loop type fall here and it allows you to just easily kind of cover and of course your part line is right there. So I'm gon na go ahead and get this baby on Alison will get it cut and then, from there I'll show you guys a final rundown, we'll probably put a little bit of foundation on that part as well. Alison is here being extra and, of course I am here as well, so we're going to start by slide. Cutting the bangs - and I just want to do this - to blend together the layers that are there in the hair right around the face and to create a little bit more of a shorter bang in that area. So I'm gon na go ahead with my Marcel style. Curling iron, which is a professional quality iron by Qi and we're going to curl everything away from the face, because, even though the bangs fall into the face, I don't need Alison getting in any traffic accidents. So we're just gon na go ahead and curl everything away from the face and, of course, I'll do the exact same thing on the opposite side here in just a moment, by the way, if I can find a link to his iron I'll link it down in Description box below, if you're interested so once I have done that on that side, we'll go ahead and begin to finger comb through this hair, and I just want to do this to displace these curls some and give it a nice softness and flow. Now I love this finished, look that it gives and obviously so does Alison. So, of course, let us know what you think in the comment box down below. As always like comment subscribe, share and stay glam. You know we love you. Boo, bye, bye,

Comments
Ruth Foxe: If my grandmother was still alive I would definitely want you to make her a wig or two. She loved wearing wigs and I loved her natural hair. Your wife is definitely loving her hair. She is absolutely adorable and beautiful. You definitely keep the women in your life looking fabulous and I love that. Have a blessed day. Much love from here in South Carolina.
Miss Kitty: Aww Alison looks beautiful. Love that dress on her and the wig looks so natural. She must have quite the collection now ^_^. Wish I had a partner to curl my hair :P!!
HoniBear64: Sir, you are so very talented and your wife is very lucky and blessed to have you. I've never made a wig before (I tried once before YouTube..it was a mess). But now with instructions like yours and having a video to watch as I go along, I'm willing to try again. Thanks for your video.
Michelle Vereen: I just saw this closure on cap today in person. I LOVE IT. I want to make my 1st wig soon
Beauty by Jay Morris: Love how you show your work, it was very easy to follow, and Allison looks beautiful #glamtober #glamfam
Munah_boss: My hairly God father!!! Love & appreciate your work! Shout out to you & the FAM for sharing your knowledge with us. So here for it.
Princessa G: This is awesome! I’ve been so intimidated by the process of wig making. This makes it so much easier!
Sexy Wina: So cute so glamorous it looks excellent so flawless I love ❤️ it
Eloise Green: Gorgeous! I love it. wish I could do this , but I can't even braid, but Great Job. TFS
Confineness: Allison you are so lucky your own wig maker at hope...I know he's lucky and you're a blessing to each other... thanks love the video, answered questions I had, showed me where to make some corrections to my techniques. Love the wig
Fay Samuel: First, I love your cornrows! Second, you make things so easy to follow by giving very clear instructions and lastly, Alison is such a blessed woman to have an equally blessed husband like you! Blessings as always x
Jomi Bleau: Linwood, this was excellent!! I can't do it, but I now know what to expect from others,and of course wifey looks gorgeous !
Norma Collins: I just bought a Full lace Wig from Laflare today And I was scared to do something with it You made me feel a lot better when you did that so I am going to try to where it thank you so much
ShiSha Rainbow: Thank you for sharing this because I'm doing tutorials myself for wigstyling and may you and your followers could want to take a look as well ☺
Purple Reign: Wow, that wig is gorgeous! Ali there slaying as always . Love you both and stay blessed.
Monebyrd: Thank y’all Soo much for sharing! Real pretty! Luv how the hair flows. Soo detailed
Arniessie Owens: You're welcome. I love your videos. You know what you're doing and I'm learning about how to maintain my hair the right way. Keep up the excellent work!
Empress ulanda Sigmon: I love it as well awesome job love ❤️ it
FAB AND GOOD VIBES: Hello GlamFam. I'm a licensed stylist from Fort Worth and I live in Dallas. Allison, you are a beautiful woman of God, Linwood, you are hilarious and the girls are just too cute. Keep allowing the Lord to use you and work through you, continue to bless others and be blessed.
blkstang46: Slayed for the funeral Oh my gosh you are too funny. I decree and declare a tv show in the name of Jesus. Excellent work as usual and your hair yaaaas. Glam Fam 4 life.
Be Weaver: Thank you sooo much for taking out the time to help us. So many people just rush through steps, but this was such a clear and easy to follow video! Gosh I wish I had a husband who does hair! haha
Charlotte Lewis: It really came out beautiful for your gorgeous wife! Love it very much!
Tiffany Dixon: Great for beginners! U nailed it!
Sincere Presence: Ah! I can see the lock stitch much better in this one and going right to left, being right handed will keep me from constantly moving the rest of the track. This Man knows his craft, yessss!! Thx Linwood. Ok I'm confident now
Shawn C.: Love this video and the work you all do...thank you !!! Btw...that houndstooth though!
Shauntise: Thank you Linwood i finally learned the lock method. Always wondered how the stylists on ig did that.
Najiba Al-Taqi: Have you ever thought about making custom wigs for other people? I would definitely buy one! I can't cut lace fronts for anything!
Ms Brit: Very beautiful but I know I couldn't get mine to look that perfect on the best day.
Ruthye Mcmillan: Love the braids cute cool hair on cap
Della Jones: I knew if I watched this video you would answer all my questions AND some other gems. Thank You Fam!
Diane Thurmond: Linwood and Alison thank you so much for this video you made it look so easy.Alison you are so pretty.I will try.Blessings..
iamBabyGirl Franklin: You know you bad when u can slay wearing a bow tie and jacket baby. #teamlinwood
Tanya Flemon: The thumbnail of Alison is so pretty! Gorgeous smile
Geek Shique: They're making it so much easier to make wigs these days. Thank God because otherwise I'd be looking a hot mess. Lol!! Great work. You and your wife are relationship goals!!
Jamie Smith: Definitely will be looking for this product. I’m currently practicing sewing closures on wigs and it is sort of difficult as a beginner to see the closure down flat. I am able to see down the sides and the back of the closure flat but the front of the closure does not lay down flat. I think I might be seeing it down too tight.
CECE HARRIS: We love you 2!! Always great videos :-)
Ann Crane: Your wife to happy with the new hair.Round of applause Linwood
KeeKee Simms: I ran across your channel !!!! Love your work Congrats you've ganged a new subbie
Deborah Tisdale: Allison and her mini-me, Zalina, are so adorable and yes extra, but life would be sooo boring without them!
Kate Taggart: Alison could slay any wig! She's gorgeous. You both are inside and out. Your wig making is inspiring and informative and I'm currently working on one for my Halloween costume.
Gemini Mom: Looking mighty spiffy there lol and as always she looks beautiful. Great video. TFS
elaine Nelson: GORGEOUS as usual! tfs
Thandi M: Looking dapper! Lovely wig. Your bride is beautiful.
Queen Tea: Lovely and gorgeous!!!!! Love your channel. Any chance you might do same style with machine stitching, PLEASE?
Genise Dever: Love your work!
Jo Drysdale: beautiful, i have made crotchet braid wigs for myself using a net cap would this closure work on that? I haven't mastered a straight wig yet but looking at that makes me want to experiment, need a good teacher like you in the uk. thank you
Cathy Paulk: Beautiful!! I want one, I have a small head. How much would you charge to make one?
Very KinkyCurl: That wig looks very pretty on her
Angela Hart: I love your colorful play on words, I do have a question about making a wig on a foam head. The cap always seems to shrink after the hair has been installed. What type of advice can you offer? And can you do a tutorial on transition hair with two types of textures, so far as protective styles without weaves or braiding hair.
THE Connie Lee: I luv this on Alison. I think a hint of honey blond, or wine colored streaks would be even better. Great job.
Debra Washington: Beautiful job!!!
Angela Dogan: You are a great teacher
HealthyGemini: I really want to do this but the way my non sewing skills and slowness are set I am just not sure Can you explain why a double wefting while sewing is better then single wefting technique? How did this hair hold up after time? Thank you again for showing us how to do this on our own
TONY & ASIA'S MOM: O, Alison! U have an awesome hair stylist & husband! A man that can style your hair is better than a man that cooks(my opinion), Linwood probably does both though!
Boneta Jones: Great tutorial and your wife is so pretty!!!
Dildred Suttles: Hello I am New to Channel and have a interest in Learning how to make Wigs has never worn one but will start very soon. Thank you for Dedication of teaching others.
Calisia Kelley: I love it!
Erzulie Hills: Omg I love your wife's spunk she is to cute watch out thanks for sharing #glamfam #educationalanfunny thanks for making easier for me
lynn chaney: You explain very well
HoniBear64: Allison you are gorgeous!
Justina Onyeama: Am not a wig person but this right here is beautiful.
Rack shorts: This is beautiful
Calisia Kelley: I need that wig Linwood!
Sunlight Shore: You are awesome. Love the outfit. Did your wife braid your hair. My husband would never let me braid his? Too late now, its almost gone. My sons wont let me either.
Kayonamurtine: Very pretty!
Ja-Nee Reviews: Awesome job.
Marva Davis: You Slayed this wig
Kersha Beaver: Very nice job as always
Princessa G: “ You know your hairs gonna be slayed for your funeral”
platttl: When will you start selling wigs???? I would love to buy your products.
fuzzysnapdragon1: Beautiful
BmoreButterfly🦋: Love you guys!
Eclipsed: ❤️❤️❤️
ToriZee: Hmm I like the concept and probably would have purchased it to save time. But I just can't do that "closure" but no parting thing. It threw me all the way off. Of course you worked your magic and it looks great.
Arniessie Owens: Wow I really like that!
hottmom_2kidz: Would it take too long to do a real step by step pf how to make a wig for true beginners? When I say true beginners I mean ME and anyone else that doesn't know NATHAN about how to create a wig. From the proper tools all the way down to figuring out what style to do the wig an even further down to styling/cutting/curling/flat ironing YOU NAME IT! Thank you for this vid and all of the other vids. God Bless you all :)
Keiandra Mil: Every time I look at your wife I see those beautiful babies... you are so blessed
Gloria Jackson: Fabulous
Regina Moore: great video...looking rather dapper...love the hounds tooth
Leslie Dawkins: I love it maybe I can do that?
TheJazzie6: Some one was thinking i maybe able to do it i will just look at your video as i do it LOL!! how many bundle did you use again?
Tony Drayton: ❤❤❤
Anita Romero: Your wife looks so beautiful and you look so handsome and I love your suit.
Danielle Gray: You are both so terrific!
Roqibat Idris: Lovely
vamp357: I had to come back and watch the video, because when I watched it the first time. I click on samsbeauty and started shopping and buying things. This was my first time shopping on samsbeauty. Thanks
Sincere Presence: Up n at an angle. Boom!!
Calisia Kelley: Your wife is soooo beautiful and is working that wig
Queen M Tarot: yes hair god this makes sense where were you 2009 when i was in high school taking cosmo
Hope Hellens: love the jacket link it for me
Shermeka G.1983: very pretty.
Michelle Anderson: Hi Linwood what is your wife name on youtube
Rize Wey: He looks like he's dressed like a woman going to Church on Sunday, (minus the bow tie) Manicure and all!