How I Customize My Lace Wig! | Plucking, Baby Hairs & Fixing Lace!! (Very Detailed) | Klaiyi Hair
- Posted on 22 February, 2019
- Closure Wig
- By Anonymous
HOW I CUSTOMIZE MY LACE WIG! | Plucking, Baby Hairs & Fixing Lace!! (VERY DETAILED) | Kaliyi Hair
TURN ON POST NOTIFICATIONS SO YOU WON'T MISS ANY NEW VIDEOS!
Thank you so much for watching..
Subscribe for more videos from me & be apart of the Kposey ❤️❤️ #Klaiyihair
~~~~~~~~~~~~~~~~~~~~~~~~~~~~~~~
College Videos You’ll Enjoy
Dorm Room Tour!! | Fall Semester 2016
✅ https://m.youtube.com/watch?v=wJwNbVjU... (14k views, 114 likes & 32 comments!!)
Tennessee State University Campus Tour!!!!
✅ https://m.youtube.com/watch?v=nS2zDba0... (1k views, 42 likes & 13 comments)
Daily Vlogs You Don’t Wanna Miss!! ♀️
❌ Getting my nose pierced for the first time!!
https://m.youtube.com/watch?v=y5WiVQgp...
❌ Krissy’s 20th B-day Trip Special!!
https://m.youtube.com/watch?v=NawlSL4l...
❌ I went Black Friday shopping for the first time!!!
https://m.youtube.com/watch?v=oQa5Kf3O...
Hilarious Pranks you have to watch!!
Butt-Dial Prank On Bestfriend!! https://m.youtube.com/watch?v=QU5nkRFS...
****************************************
~ YouTube since 2016 ~
Camera I use: Canon Powershot SX 420 IS **Comment down below for these A1 quality**
Editing software: iMovie
Editing w/iPad mini 4
Videos Produced: college videos, vlogs, beauty, pranks, story times, social/public interviews, & others...
—————
About Me!
Age: 20
From: Tennessee
College Info: University Tennessee Chattanooga! Mass Communication Major, (production concentration)
—————
Business inquiries? Contact me!!! @... [email protected]
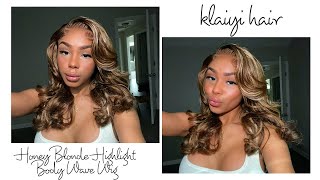
Hi guys welcome back to another video of Chrissy's bro duck shins, alright guys. So, as you can tell by the title today, I will be customizing my wig. I just got this hair from kawaii hair company and today I'll be showing you how I pluck it. How I make baby hairs and how I just fixed my lace closure. So if you're interested go ahead and keep watching and enjoy the video so right here, I'm just showing you guys to end up the hair, because you know some hair at the ends. They all thin, but this hair doesn't look too bad and I'm satisfied. Obviously so. Okay, now I'm gon na place my wig back on the mannequin head and begin my customizing, so I had to start by first brushing the hair and I'm gon na. Tell you guys, as I'm brushing through this hair, this hair feels so soft, and I mean that, like it's so silky as you can see, it's brushing right through, like oh, my gosh, so I'm going to cut the lace before I begin plucking in my closure, but I want you guys to see how this closure is looking. Then I'm gon na go ahead and put the hair up in a ponytail, so I can get the hair enclosure out of the way and then I'm gon na begin cutting off the lake. So usually, I cut off all the lace but, as you can see here, I love some on because I see how some people leave some part of the lace there to make it look natural. I cut it to where I want. I left a little bit of lace and now I'm gon na go ahead and add some concealer on it and go ahead and blend that out now I'm getting ready to go ahead and pluck the parts and the closure. I'M part in this very concise, which means I'm trying to go ahead and part it straight as possible and show you guys at the same time, so I'm gon na be turning the hair around. So y'all can see as well as me, seeing it was hard to adjust. I'M part in this hair, so I can go ahead and begin. My plucking and I am parting, three or four different ways, because this is a four by four closure and I really don't wear it to many different places, but either the middle or the two sides. Well, I decided to do the baby hairs before I actually do. The part so now I parted it straight across the very front by my closure and I'm just slowly pulling out some hairs and I'm gon na go in with my razor here that I got at my local beauty store and begin shaving off hairs, because you want To make sure it's being for the baby hairs, so here's the up-close few of the baby hairs. You probably can't really tell as much because they're so thin, but this is how it looks. So I kind of just go with the flow when I'm parting each part. The closure - I noticed it's very silky and straight, but it was hard to part it, but that's not really anything to complain about I'm just fine, a part where I want to start it, and once I start then I can begin my plucking. This is more of a Sheldon tale, so you guys would have to watch to see how I pluck my closure. Everybody parts different. I have seen some people part their closure from the side, so you will need tweezers to pluck your parts. I'M going to begin now. Plucking my part with my tweezers now the point of plucking is to make the part look more natural because you want to widen the parts, because sometimes we come with the closures, all skinny looking, so you want to widen your parts. So that's true when plucking comes in because you want it's a little more natural like you're, a natural part. This is how the closure looks after it's done being plucked. So now I'm gon na go ahead and add some foundation. Concealer on it Foundation is better because it's powder and it doesn't get on the hair, it's better to apply, and I really didn't even have to use any of these, because I have a cap underneath that is this color and it shows up under it to make It like a snap but yeah, I use both and it both works. So now, I'm just repeating that same process throughout the other parts, I'm gon na tweet it at my concealer and then go from there. So this is how the closure looks when I'm done with all of that plucking and adding concealer and foundation, and now I'm showing you guys all the hair after I plucked it, do expect a lot of hair because you just plucking the hair. So it's gon na shed, but there's nothing to worry about, because you're, obviously taking away hairs. So now I'm gon na go ahead and try on the League now that all of that is done and see how it looked. But before I put it on, I do want to show you guys how the wig looks the inside of the cap, the closure, the perimeter of the hair and just how long it is y'all probably didn't realize how long this hair is. But look it's almost down to my fine. This is the moments here I ever had, but as you can see, it flows good and I got some inches fighting. So now I'm just testing out the part, I'm doing a part like on the middle ish side and I'm just testing it out to see how it looks so far. So from this point on clearly you see that I'm filling myself um putting the hair in the front see how it looks, putting it in the back, see how it looks and I'm just in love. So now I'm going to lay down my baby hairs with my edge control. It did take me a while to find my baby hairs because they're so thin, but yeah that's one doing now. So this is how my baby hairs are looking thus far after I'm done. If you have not seen my video before there's a kawaii hair unboxing, this review, please check it out. That is the lashes that I'm wearing right here in this video. They are beautiful idea to put them on before I put on this wig, but the lashes are pretty good so far, and these are the lashes that they sent me with this hair. They were um free, so um shout out to you Kauai. Forgive me those that is very appreciative. On my end, the lashes actually apply very well. This point, I'm just playing around with that part and seeing how the hair looks different ways. The hair literally flows y'all, and I say it flows. It flows like it makes you want to char it styles with this hair, so this is the up-close view of the eyelashes. I hope you enjoyed this field be sure to give me a light coming down below and subscribe. If you're new, to put on that notification barrel so you'll miss in the videos and I'll see you guys in the next video bye


Comments
ALL ABOUT GLAM Sophie: I absolutely love it! So talented.
Klaiyi Hair: Great work, my girl