How To Install A Closure Wig W/ Ghost Bond Glue (Bald Cap Method) ! Diy
- Posted on 07 May, 2020
- Closure Wig
- By Anonymous
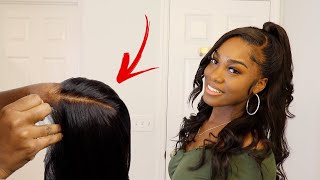
What'S up y'all, I'm back back back, I'm a teacher and style enclosure. We this is the week. I just made my previous video that I turned a slice, a middle part. I turned it into what I turned them into the middle part and it was once a sad part of Christy rusty, dusty old, sad part. I'M gon na thank y'all for turn it up the fashion of the try on home video. It'S now at around, like 400, something views. Thank you for today. I want to say it so on to subscribers, so please keep supporting you're doing with ever, because all my birthday is coming up in a one in five days June 11, one in the 818 legal and now, let's get to the fun yeah. I already know the deal. I got my hair braided damn and I'm going to. Are you mind scalp with my hair, you that I made it's grown, my hair y'all. It really is that little braids in the back, so I'm gon na, do dance, make sure my hair and scalp is much dressed while being under this hartwig. Oh yes, but sergeant if you're good at donate this big. Oh, I just come out of shirt, so this is a pretty step. I'M going in with my ass control. Don'T matter what us control just make sure it's some type of intro or you don't need s control, but I really use this control, so this can hold down easier. So I'm putting this onto my edges in my hairline, I'm not putting them much. I made like. I am, but I'm literally taking like a tiny, thin piece of it and I'm gon na put that into my hair and then once I do that I'm going to call me and come to product into my hair as I'm doing right now, making sure everything is Smoothing out into my hair, and once I do that, I'm gon na take my spirit as you're about to see me do now and what I spray it on my hair make sure not to eat it on your face. So this is the trick. You want to make sure your hair line, the edges are laid back and then you're gon na take your blow dryer and put it on the cool setting and let your edges dry. You want your edges to be slicked back just like that, because once you put your cap on and you get to glowing the cap down in the lace down, you want your edges to be out of the way you do not want your edges to be peeking From under your legs from under your cap, whatever the situation is - and this is very vital if you do in front - and this is just a closure - and I still make sure I take these precautions and go along with these steps - so I'm gon na repeat the Same thing on this side of my head and we're gon na get to the next step. Okay, so I'm sure y'all are, are we that's the scalp effect look ahead and just catch on courtesy in the previous video, because my mannequin hair has rear dial on it, but I'm putting my wig cap on just so. I can see how it looks without me. Even putting a cap on the right here, that's how good it looks and also the reason I put it on is to measure where the lace stops, and so I can have an idea of where I want my cap, so be it. So I only do this. So that I won't be gluing down unnecessary spaces of the cat or whatever, but you could definitely wear the wig. So if you so dependence, you could definitely pop it on just like this and go about your day and look how I look don't look like you didn't, have a glued down next you're gon na take a stocking cap. I strike at closest to your skin complexion. This is what I had a baby at the moment, but it still works. It'S still too, like a scalp, you want it to be close to looking like a scalp right like you anything too dark, don't get anything too light. It just throws out to look so again. I'M gon na put the wig back over my head and measure once again whether they stop saying so. I can have a idea of where I would be spraying. Oh, my god to be free spray, and I realized that it stops at my temple, so I know where to stop and where to start. Basically, so you see me spraying this one, my hairline as carefully as possible and smoothing it back and to my hair. Now you do not want to go overboard with this free spray, because if you do, you could potentially burn your scalp you'll get a sword or your skin to be really irritants a week. I know mine is so. I tend not to go overboard with it or overuse it. While I have the lace and started to my hair cuz, I know some people you look goes to God's, will be priests, pray and spread on in here when it lays begins to live. All I'm saying is be careful because that's a strong product gets mixed with alcohol, so it will affect you. Now. You take a pair of scissors to coat straight down the middle. What not straight down down the middle of your in cap and you just basically trim around the perimeter of your hairline - makes you an extra cup door you're, not cutting too much, and once you do that you go in with a foundation and you let it into The cap, so you could get a more scalp like natural look and then she starts to begin to look like that and then once you do, that you could yeah. You could do that too, but yeah make sure that's evenly distributed and then I'm going to go ahead and put some of my wig. This is not necessary, but you can, if you want sue to give it a more scalp like look. I really didn't need to. I just decided to go in and do it just to give it a better. Oh hey, if you bleach her nage, we definitely have to worry about that step. But so basically I did this Dharma plan on my skin earlier and my skin was still fresh from. Like me, you know, look their skin off. So when I put the alcohol on my face, it started burning, but anyway she go around your hairline and you take that qahal pad and you get all the dirt oil and extra makeup off of your hairline. So you can make sure that your glue is sticking to your hair properly, so make the gluing down process more easier. I put the wig on my head and I'm gon na measure to make sure I had my measurements correct. So then I go where my goes by lay school and I dyed it around my hairline. While I didn't do it this first time, but it still works, you just put a thin coat, a small light. It don't need a lot. It does not take a lot of their glue, so you need a little bit 92. It'S a lot or you're just a real sticky lace anyway, so you dyed it on. Then you take a toothpick, a popsicle. Stick, anything to smooth it out. I wouldn't recommend your hands because things get a little messy, but you just do that as I'm doing so. The first layer is specifically for the cap. You want to make sure that you have the glue on your cap so that your let's go stakes of this cap is will so then, when you do your second layer, the second layer where we wan na see your skin not all over your skin. But you know like some of it won't touch your skin, so the list could look more natural and look more scalp like and everything and then third layer, you just do it again and make sure that's done. But I did two layers because I don't intend on having this weird one for that long and I'm not doing any type of activities where I'm required to sweat. Wear anything. So it will not live as fast as it would normally do so. And then, once you do that you take your blow dryer and going a cool setting, and you know not cool setting a warm setting. You take it on warm setting. You blow dry so come out, see that's the first thing, that's clear, but you can still see you can still see how tacky it is, and so the warmness on the blow dryer that melts the glue so that you can continue with your process. If you don't feel like waiting for it so sitting Airdrie, this just feeds the processor, especially if you don't once I was here, you got clients and everything or you're, just in a rush to go somewhere either or the blow dryer works just as fine. So we're almost at the end now we bout to lay this lace down, so I'm carefully going in making sure that the lace is aligned correctly. On my scope and with the cap, I'm gon na go in and do the middle part first and make sure the middle is down, and I'm gon na take the bottom of my tail comb or you can take the two so Tacoma, whatever you delete something. So just press gently on to the lay so it could just melt and stick to the glue make sure everything gets secured. And then I'm gon na go to my other side and place that down make sure that's in and then I'm gon na repeat that with the same side, it's just a little quick five-second step for each side. So now you'll go back in with your blow. Dryer put it on the warm setting, make sure the intensity is low, and you are going to melt there for like about 10 to 15 seconds and make sure that everything is getting l2n and then to top it all off the scarf. You just see me lift up and go to wrap there and brown. The hairline of the lace that will ensure that trim base is definitely laid and melted into that scalp skin cap. Whatever you want to call it, it's gon na be melted in that's how it looks so cute, not sure you still do this thing title why he cuz my ass by doing small, the Chinese affair, that lady Jesus, how you do a nice and tall, I'm Billy Deck sister time,


Comments
Ravennn: Personality came throughhhhh