Very Detailed 5X5 Hd Lace Closure Wig Install With Bangs!! Ft. Unice
- Posted on 15 October, 2021
- Closure Wig
- By Anonymous
Within 30 Days NO Reason Free Return Only for My subscribers Place Order
●▬▬▬▬▬▬▬▬▬♛ #UNiceHair ♛ ▬▬▬▬▬▬▬▬▬ ●
I am wearing straight HD wig in video: https://bit.ly/3ADbZch
https://www.unice.com/ ➤HOT SALE wigs: https://bit.ly/3aGpWLL
Can Not Miss!! Invisible HD lace Wigs available : https://bit.ly/3AIgiTD
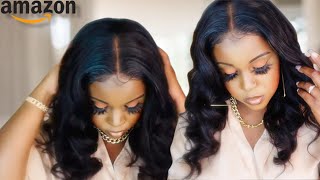
hair information:26inch straight invibible HD wig 5*5 180%
Using Special Code To Get 10% OFF:myunice
Quadpay & Sezzle Now. PAY 4 Equal payment Within 6 weeks!
New Trending Affordable head band wig: https://bit.ly/3p4SqHM
Recommend human hair bundles with closure: https://bit.ly/3lEiNC6
Want To Save More??? Download “UNice” App on your phone➤
https://link.unice.com/appdownload-you...
Bargain Now! To Get FREE HAIR on “UNice” App➤
https://link.unice.com/bargain-ytb
Exclusive Price Hair ONLY for “UNice” App Users ➤
https://link.unice.com/exclusive-youtu...
Aliexpress UNice Hair Store ➤ https://s.click.aliexpress.com/e/_pvse...
Amazon UNice Hair Store ➤ https://amzn.to/2zxP2gm
Instagram @unicehair: https://www.instagram.com/unicehair/
YouTube @UNice: https://www.youtube.com/c/UniceHair
Facebook @UNiceMall: https://business.facebook.com/UNiceMal...
Want To Promote? Order Problem Contact: [email protected]
#UNicehairstyles #UNicebacktoschool #UNicehair
P R O D U C T S U S E D
Bleach with Toner
Conair MiniPRO 1/2-inch Ceramic Flat Iron
BaBylissPRO Nano Titanium 1" Ultra-Thin Straightening Iron
C O N N E C T W I T H M E:
My Website
Hair Appointment Booking
https://wynnejean.com/pages/hairtour
Instagram @WynneJean
https://www.instagram.com/wynnejean/
Facebook @WynneJean
https://m.facebook.com/WynneJean/?ref...
Twitter @WynneJeann
https://twitter.com/WynneJeann?s=09
For business inquiries [email protected]
F A Q:
Ethnicity: African American
Height: 5'7
Age: 23
Measurements: Bust 36'' Waist 26'' Hip 38''
Shoe Size: 8
F A V C A M E R A G E A R:
Camera - https://amzn.to/2NJcPPs
Camera remote - https://amzn.to/2CDAsm2
SD card - https://amzn.to/2Qim76w
Umbrella lights - https://amzn.to/351lJxv
Soft Box Lights - https://amzn.to/2O9zzXF
Full size ring light - https://amzn.to/2XcmDo4
Traveling ring light - https://amzn.to/2XaDLdQ
Traveling Tabletop Ring Light - https://amzn.to/2NJbisG
Lighting & Backdrop Kit - https://amzn.to/2OgmTP4
Backdrop - https://amzn.to/2CHxA7W
Mic - https://amzn.to/2KlQrcJ
*This video may include affiliate links / paid promotional content & product placements. However, all opinions are my own*
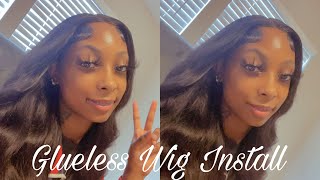
Not the bae yang um, but yeah you want a super model, pose hey loves. Welcome to my channel and today i'm going to show you guys how i got that gorgeous bang from the intro. I know you've seen it. Today'S video is sponsored by you, nice. They sent me this really pretty 26 inch, 180 density, 5x5 hd lace, body, wave, wig emphasis on the hd, because i'm about to show y'all how to get this baby melted. All the details about this wig will be down below in the description bar as well as a coupon code. You nice make some incredible wigs and they are really affordably priced and i really like to work with hair brands from all different price points. To give everybody some options, honey so definitely go ahead and check them out. They have really really great quality. Wigs and again, the information will be down below in the description bar today we're going to get into some real detailed things. As you can see, i'm taking you through this entire process, where you can visually see every single thing. I did to get this style a lot of wig videos. I feel like be skipping all over the place, and that is confusing for me, and i know what i'm doing so. I can only imagine how confusing it could be for beginners. So, even though this video is a little long, she a little lengthy. She is very thorough and very detailed. I may not explain every single step, but i am showing you everything. So if you get a chance to just watch it through a couple of times, it should truly help you with your glueless installs. I hope that you guys learned something from it or at least get a few tips and tricks that you can incorporate into what you already do. So, as you can see, i've already bleached the knots on this unit. I went in with some kaleidoscope bleach it actually like tones it as it bleaches, because i don't like to go in and tone it afterwards, who has time. Okay, who has the design? I just went ahead and blow-dried the wig out. Nothing too crazy. I just wanted to dry it. I wasn't really trying to style it much with the blow dryer, and this is what it looks like after i like to do as much on the wig head as i can, because once you put that wig on your hair honey, it's a little hard to see Everything and i'm scary, i'm scared of heat i'll be jumping even when i'm doing it. So i wanted to go ahead and press the part out before we apply the wig, i'm pressing out the middle part, which is where the bang will come from, of course, and i'm also pressing the edges backward. That just makes it easier for me to install my wigs when i first started wearing wigs. I would always have hair stuck like on the hairline in my glue or in like whatever gel i used it just wasn't neat i'm also hot combing, the bangs forward. Just to make sure that they lay properly so yeah, you just want to press out those roots, honey, get it nice and laid, and i'm going in with my little eyebrow razor and i'm just trimming the lace in the front. If it was a frontal, i would do this on my head, but because it's a closure um, it's a lot easier to just go ahead and take care of this now. For me, for me, it's a lot easier to just take care of it right out. The back and then, where the tracks and the closure meet. Sometimes it can be a little bit of excess lace. So i like to trim that as well once you trim it, everything looks a bit more flush and there's also a bit of lace on the back. That i just go ahead and trim off now my hair honey. She is clean and moisturized, but baby is a little tangly, so i'm go ahead and blow dry her out and now it should be a little bit easier to braid and now. The first thing i want to do is go ahead and part my hair straight down the middle from the front to the back, and it just makes it a lot easier for me to braid my hair into even braids when i pre-section it so yeah, i'm starting Off by sectioning my hair into two sections, so i'm partnering down the middle all the way from the front to the back, and then i just put that in the ponytail, get it out the way honey. As you can see, i have quite a bit of hair and it began a little stressful. So then, i'm going to take my comb and i'm going to part half of my hair in half starting a little bit above my temple. Now i have two sections out of that half section now, depending on how thick your hair is. You can part these sections into two to four braids. I have really thick hair and i'm going to be wearing wigs all week, so i wanted to go ahead and get a really secure base. So i'm breaking each of these sections into four braids and they'll, be really really small, but it'll have my wigs laying flat, especially since i have such thick hair. If you have thinner hair, you can get away with just putting your hair in a ponytail in the back. You can braid it back into four braids. I wouldn't suggest anything less than eight braids, depending on the thickness of your hair. You can get away with anything between eight to sixteen braids i've already braided half of my hair. So this is eight braids. I braided both of those sections into four. As you can see, i connected them in the back and then i just went ahead and fast forward it for you guys, because watching myself braid my hair is like not fun, and this is what my braid pattern looks like when everything's done to go ahead and Start with the install i'm going to spray a little bit of the freeze, blast spray onto my edges and then brush my baby hairs back, and this is just to keep them out the way i prefer to use a gel or a spray for this step. Just because anything oil based may interfere with how your wig holds. So i try to stay away from like the edge control for that step nowadays and it's time to put our wig cap on regular deluxe, regular, i'm going in and cutting the ears out and then i'm using the freeze blast spray to hold it down something i Like to do is take my rat tail comb and make sure that i push the product to the very edge of my hair. Before i go in with my blow dryer on a cool setting just to dry everything - and i don't know what the hell happened to the next clip - but i cut off most of the additional cap and now i'm just cutting off this side, because the wig we're Using today is a 5x5 closure wig. I could care less about my ear straps for a frontal i'd, be caring, don't get me wrong. Four frontal is very important before closure: wig literally you're not going to be able to see it and if anything, the ear tabs are going to get in your way. So i actually trim a little extra off the ear tabs just to avoid that problem all together. When i'm installing the closure wig now you can leave your ball cap here, but nae nae, i'm going to go in and spray a little bit of hairspray on the back of my rat tail comb and i'm going to use that little bit of product and my Blow dryer to go in and blend in those edges of the wig cap, and it really really makes a big difference in your install now, i'm just taking a little bit of my bronzer and i'm applying that to my wig cap, just to change the color of It your girl got a tan okay, and i wanted it to blend in nicely and, as you can see, my wig cap is laid. I ended up taking it too far back at that spot, but listen it's as good as it gon na get. So i tighten my adjustable straps and i'm gon na go ahead and try her on it's the moment of truth. Let'S see what she looking like so far, so good the wig is laying really really nicely, but this little piece of cap is gon. Na drive me crazy, so i'm gon na go ahead and just trim that off, because she is in my way. Okay, there we go: that's given scalp, okay, so now that everything is laid, we can start to move to the next step. So i'm going to go ahead and with my freeze, blast spray again, i'm doing a glueless install this time. I really don't glue my hair down unless i'm going on vacation and i know i'm not taking my hair off, but i switch my hair up a lot, so i prefer glueless. So i'm just going to take my got2b spray and i'm going to spray that all along my hairline and i'm going a little od just because this is literally the only thing holding my wig down your girl got to go in, so i am applying that spray. All along the hairline and then i'm taking my brush and just brushing any flyaways out of the way and then i'm taking a little bitty scarf or you can use elastic whatever you feel comfortable with, and then i'm going to just tie that on my edges. So that they can melt into place, i left my scarf on for about 30 minutes until i felt like everything was dry and then this is what it looks like it's really real blended to me. I think it looks really really good the knots look good, but to blend the lace in with my complexion a bit better, i'm going in with a little bit more of my bronzer and i'm just going to apply that along the lace and along my part. Now the install is complete. You can go ahead and style the wig. However, you want, but i wanted some bangs okay, i really wanted some bangs. I'Ve been seeing some really cute ones and i've combed everything out towards the front so that i can start to cut my bangs and i need to go ahead and part out the sections of hair that i'm going to start to cut first. So i'm parting from the crown of my head to just in front of my ear, and this is where i'm going to begin cutting my bangs, i'm parting from the crown to the tip of my eyebrow. And this is where i want the shortest part of my bangs to be so, i'm putting those little side pieces to the side we're going to work on those later, but i'm going to comb through this hair right in front really. Well, because you don't want, you know your bangs to be crooked and then i'm going to cut my bangs right at the bridge of my nose - and i know it looks a bit long now, but once we curled it and everything they'll look a lot shorter. So i like to cut my bangs a bit longer and then leave a little bit of wiggle room, because i am not a fan of the betty page bangs, not on my face shape. Some people can pull it off. I am not that girl, so i'm taking the side pieces and i'm combing them forward towards my bangs and then i'm cutting diagonally from where my bangs ended all the way to the end of that section of hair, and this just creates a really pretty gradient on The sides and gives the bangs a little bit more of a rounded look and it really fits my face super cute. I loved it if you're a fan of like the 2007 like nicki minaj bangs. You may really like this, like the bun with the pieces on the side. That'S the vibe that we're going for. I got hair all over my face, but so far so good. I like how everything's turning out and we got to do the same thing on the other side, so i'm just combing through it redirecting it towards my face and then i'm cutting from the length of where the bangs start to the end. Now this side was a little bit harder for me, so i had to start from the bottom and go up, but make it work do what you got to do? Okay, so this is what it looks like so far, i'm going to go ahead and trim the ends as well. Just for a bit more of a blunt cut. Y'All know i like my ends, looking healthy, so i'm just combing everything through and i'm gon na trim off about a half an inch to an inch from the bottom. Nothing crazy. I just want it to look very even and healthy, and now this is what is giving i'm going in with my razor comb for any like fine detailing that i want to do for the hair, and i think i cut way more on one side than the Other so i really did have to go in and do some correcting with the razor comb, and i think that the razor comb works a little bit better than scissors, because it gives a less harsh look to the haircut. So it's one of my favorite tools for finishing up a style, but this is what it is giving and now all i have to do is just straighten it, so i'm taking my first section and clipping the rest out of the way and then i'm just straightening. My hair, with my one inch babyliss flat irons, i'll, put a link to these down below in the description bar. If you guys are looking for some really good irons. These flat irons are amazing. They get really really hot and the plates are good quality. So they don't damage your hair very much. I like them a lot and they really get my wigs, nice and silky. Since the hair is already straight. I don't have to take super small sections, so i'm kind of moving through the back really quickly and i'm leaving the bangs alone for now, because those i have to flat iron a certain way. So i'm literally just going through the back and flat ironing like the longer hair first, it took me about 10 minutes to get the whole side straight and now for the bangs, i'm taking them section by section clipping the rest out of the way and as i Flat iron, these sections i'm putting a slight bend in my flat iron so that the hair has a bit of a bump to it in the front, and it just looks so pretty and so soft. I love the way. Bangs look with a slight bump. I don't want them to be too curly and now for this last little bang section again, i'm going to take my flat iron and just give it a slight bump, and that really brings the haircut to life. So one side is given nicki, minaj, okay and one side is given a miss. I don't even know what to say: it's just not right, so let me go ahead and get that side together and then i'll be back to show you guys what everything looks like completed, not the bay yang um but yeah. I went ahead and straightened everything and this is the finished. Look. It'S super cute. I ended up bumping the ends for like a super, even look and it came out really cute. It'S given what it's supposed to have gave. I hope that you guys really enjoyed this video like this video, if you like this video. Thank you again for units for working with me. All of the details of the wig will be down below the description bar. They are very affordably priced for the quality of the wig. The hair is bomb, it's like really silky. My babyliss iron did what it was supposed to do, and i hope that you guys really enjoyed this video. I love you guys and i'll see you in my next one bye, babes
Comments
peace 777: Great tutorial, very easy to follow, the hair looks amazing, and I love how the fringe, looks very chic! You have great hairdressing, skills
Palesa Zulu: Please someone tell me I'm not the only one who thinks our good sis Wynne looks like Gabrielle Union Just gorg. God bless ❤️
KK the only one ! Stephens: I had to see how u did that Bay-Yang!!! U slayed! Thanks gorgeous!!
Candice Lee: U never miss love it ❤
AmoreAmore: Girl if you ever sale this unit pls let me know
Reaper Ky: Watching this from beginning to end was oddly satisfying
Dee Luther: Love Your Video Kute thumbnail tho U Did a Good Job You Looking Hella Pretty Makeup on Point Bomb Ass Dress Have A Fabulous Weekend Too Stay Bless N Be Safe Always
Gabby loves: In the thumbnail she looks like summer walker a lil bit love the hairstyle tho❤️
zenobia teague: so cuuuuuuuute
Harold Compton: MISS JEAN YOU HAVE BEAUTIFUL HAIR SOME WISH THEY HAD YOUR NATURAL MY EXPERIENCE NATURAL HAIR IS MY TURN ON HOWEVER WHATEVER YOU DECIDE WILL BE FINE ALWAYS YOURS HAROLD RAY COMPTON
Nolen T: gwurl... u got density.. even that wig parting is thinner than your natural hair parting. u noticed?
Nora Okoro: Can you just make mine?!!! Ughh
randy Blithe: w25zh0 #von.ong
gabbie Leontine: 92bbqr #von.ong