Watch Me Install This 5X5 Closure Wig Over Locs ✨
- Posted on 15 June, 2021
- Closure Wig
- By Anonymous
Hi beauties!!! I am finally back from maternity leave and have gained the energy to get back into the swing of being a YouTuber!❤️
My new posting schedule will be every Monday, Wednesday, and Friday at 8 pm.
You guys let me know what y’all want to see next and don’t forget to like, comment, and subscribe
Instagram and Twitter : beautyXavi
TikTok : 1beautyXavi
Facebook : Avionna Elizabeth
#closurewig #locs #frontaltutorial #closuretutotial
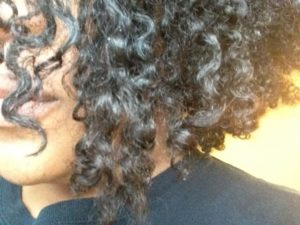
What'S up guys, your girl is officially off maternity leave and i'm going to be showing you guys today how to install a closure wig over locks, but before we get started guys, don't forget to like comment and subscribe okay. So the first thing i'm gon na do is go ahead and braid her down um. So all i'm doing is taking every three locks and braiding it as i normally would. Luckily, her hair was really easy to braid down because her hair was really soft and her locks were really small, but this also will work for any regular sized locks as well. So this is how you want your braids to look after that you're going to go ahead and connect all of the braids together. So i know you guys see prints, jumping up and down in my client's face she's. Actually, one of me and my husband's friends and she loves dogs, so that's the only reason why he was out and normally he's put up him and bella are normally put up. So that's not normally how i do things, but anyway, now i'm just finishing up connecting all the braids together and after that, i'm going to tuck it and i'm going to go ahead and sew everything together. So now that that's tucked i'm going to go ahead and sew it together, you want to get it as flat as possible. Now we're going to start our wig application process right now. I am just cleaning off her forehead, making sure that it's, you know clear of any oils or anything like that, so that we have a seamless install so now that our hairline is cleaned up. I'M going to take my got to be gel the yellow one and i'm gon na go ahead and put that on there and smooth her hairs back so after i finished molding her hairs back with the gotchui gel. I take the spray and i go over it. Just a little bit just to make sure that everything is completely down and secure and of course we are going to be doing the ball cap method today. So i went on ahead and grabbed the cap, and now i'm just gluing down where the closure is going to be, and when i do this part, i normally just guesstimate, because i mean i've been doing it for a while. So i already know the size or whatever. This is a 5x5 closure wig. So that's what i'm doing now now, i'm just sewing around where i just glued now, i'm just taking some makeup that matches her skin tone and i'm putting it all over the cap. So now that the glue is dry - and i got the makeup on - i'm just going to go ahead and cut the rest of the cap off now - i'm just adding a little bit more makeup to the cap, so it can blend better. After that, i went on ahead and put the wig on her head, and now i'm just going to go ahead and customize her hairline. As you guys can see, the lace is blending perfectly with her skin. I use lace tint off camera. I forgot to record myself using the lace tint, but um. I will put the brand in the description for you guys. So if this isn't your first video of mine, you guys know that i like to hot comb the lace off of the client's head. That way, i don't have to worry about burning the client um and i just feel like it gets flatter because i'm not like, i said, i'm not worrying about burning the client, so i went on ahead and did that off camera. Now, i'm just taking some light. Color makeup and i'm drawing a dotted line, so that will be my guide on where to put the glue. So i've taken off the wig. Now i'm just cleaning her hairline one more time making sure that there's no leftover makeup, because we want this install to stick and now we're just going to apply four layers of the um bold hold lace. Glue do do do after that. Fourth layer is almost dry. We'Re going to go ahead and grab the wig and we're going to go ahead and press it into the glue, and now i'm just going to go ahead and pull out the hairs that i'm going to be using for the baby hair. So now i'm just going to go ahead and pin all her hair up and i'm going to take my honor luxe edge scarf and i'm going to tie her hair down and let it dry. So while i'm letting her lace dry, i'm going to get my spray bottle with a little bit of conditioner and just wet the hair so that her curls can be popping by the end of the install. So now that that's dry, i'm going to go ahead and cut off the excess lace and then we're going to go ahead and cut those baby hairs. I normally cut the baby hairs about an inch long. The next thing i did was take the got to be gel the yellow one again, and i just used a little bit and i just dabbed it on there very gently and i just started molding. The baby hairs do so now that i'm finished with that. I'M just going to take my got to be spray and go ahead and spray it down. Now that that's done, i'm going to go ahead and pin her hair one more time and i'm going to take my honor look scarf and tie her edges down for one lash dry. Do so i dried her hair for about five to seven minutes and now that that's done, i'm going to go ahead and take the satin scarf off and we are going to finish up the rest of this install so now that this lace is given what it's Supposed to give, i am going to take this blow dryer and just blow dry, her curls just a little bit, so her hair isn't dripping wet, and so it can have a little bit more volume to it. So now i'm just outlining the part with a little bit of concealer and after that, i'm going to take some mascara and go ahead and fix some of those areas where the knots were over bleached, alright guys so there's nothing else left to do but to wipe Her forehead off a little bit and go ahead and start taking some pictures, so i hope you guys enjoyed this video. If you did, please don't forget to leave a thumbs up. Also, leave me a comment asking me questions anything you guys want to know. I'M here to inform you um and if you're new, thank you for watching me if you're returning, thank you for watching me and don't forget to hit that subscribe button um. I have a new posting schedule. It'S going to be monday, wednesday, friday at 8 pm. So you guys stay tuned and i will see you guys on wednesday bye. You


Comments
shanii37:
FME Production: she don’t miss