5X5 Amazon Closure Wig Install| Aaliweya Hair
- Posted on 03 March, 2022
- Closure Wig
- By Anonymous
Link to wig: https://www.amazon.com/Aaliweya-Closur...
HEY DOPE CREW ,
Thanks for watching. Don’t forget to LIKE , COMMENT, & SUBSCRIBE
⚠️BECOME A PART OF The DC Family & Subscribe ⬇️⬇️⬇️⬇️⬇️⬇️⬇️⬇️
https://youtube.com/c/OhSoDope
Let’s connect:
Email: [email protected]
*Business Inquiries ONLY*
IG: _OhSoDope_
https://www.instagram.com/_ohsodope_/
Twitter:
https://mobile.twitter.com/_Ohsodope_
Snapchat: Tfreakyyyy
FAQ’s
Age: 25
Camera: iPhone 11 Pro Max
Editing Software: iMovie
Location: Chicago
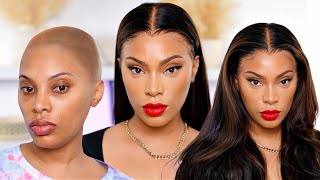
If you guys are interested in seeing how i got this install with this 5x5 closure, wig stay tuned, so y'all see my hair is still flat from the ponytail i had so i'm gon na go ahead and use this ponytail that i have to install this wig By ali waya, i think i'm saying it right, um they're on amazon and they sent me these clips and the wig cap and here's the wig right here. It'S a 5x5 28 inch closure. As you can see, that's the curl pattern or what's left of it after it was straightened. This is the construction, my friend customized it for me um and now i'm going to take this hicks edges to stick my edges back. I normally use that to be gel, but i couldn't find it and i was in a rush because i was trying to get ready for um something i was going out to and i didn't have time to find it. But i'm taking the blow dryer and i'm just hitting that making sure that it's all dry and then i'm gon na cut my ear tabs in this wig cap y'all. This wig cap was like giving extra small. I don't know why it was so tight. They'Re usually way way more stretchy, so i don't know what was going on child, but i made it work so now i am taking this even lace bond spray and i'm going ahead and spraying that across my hairline to lay this cap and i'm hitting it with The blow dryer just to make sure everything is good to go. Then i'm going in with this icy fantasia, spritz and firm hold and i'm spraying it across the hairline and then i'm gon na go ahead and spray the hairline again with the even just a little bit, and this is going to ensure that the wig does not Roll up the wig cap, i'm sorry, doesn't roll up or anything. When i get ready to cut everything and i'm hitting it with that blow dryer, then i'm taking this airbrush legs by sally henson. I think it's in the color 10 glow and i'm using that to go over my wig cap, um and kind of make everything blend like as far as the color, because i feel like using powder. It only lasts for so long, but this lasts a bit longer and i'm just making sure i cover all of the lace so that it will match and look more scalp like um and i'm just hitting it with a blow dryer to kind of dry everything. Now you guys see me putting the wig on, as you guys can see. Literally that looks so good. It'S giving very much scalp sciss, i'm just lining up this wig to see where i want to place the glue before i go ahead and cut everything. I usually do a little test to see how much of the cap i need to cut if any. So that is what you guys see me doing here. The only thing i did off camera was cut the cap um down to what you guys see it as now. So now i'm taking the clips that they sent me and i am kind of clipping that back so that way i can work freely without hair all in my face and i'm doing this install today with the even um spray, because i was out of glue y'all, My my ghost bond is running low, so i'm like okay. I'Ve installed a wig before with this. So let me try to do a quote-unquote glueless install um, so you just see me taking the blow dryer and combing that through just to make sure everything is bonded and as you can see, it's already looking pretty good. She did pluck a little bit in the front like around where the baby hairs were parted, which you guys will see me re-part in that same area later, but i think i'm going to go in and just customize it just a little bit more. But at this point i did not have time to do anything further. So you just see me melting that in with my scarf and i'm taking this icy fantasia heat, protectant, serum and i'm taking just a little bit of it and prepping the hair for styling and today, all i have time for is to do it bone straight y'all And even with the time i had, i couldn't get it completely like i wanted to, but i did manage to get it pretty straight um. I think at this point my flat irons, weren't hot enough um. I was just in a rush like i said: y'all um, but literally that's all i'm doing in this clip is just straightening. Now i'm cutting off that lace. First i'll take the scissors to cut that really big part off, and then i split it in the middle and then use my eyebrow razor to kind of cut the rest kind of pulling the lace back and forth to kind of create a zigzag motion. So it's not so straight across um, like i said, i'm going to go in later on and pluck a little bit more just to not have the time and then i'm taking my lace spray and i'm kind of spraying that perimeter and kind of laying everything down Again and you'll notice that if you have lace that still looks like light once you spray it again and lay it, it will blend perfectly as you guys can see and y'all. I really cannot stand closure. Wigs y'all, i can't um, but this is what i had to work with for what i was doing: um and yeah. So you see me parting out that same little section that was parted in the very beginning of the video. When i told you guys that she did a little bit of customization, so i'm just re-pardoning that and trying to play around with it to see if everything is to my liking and i'm just matching up on that other side and doing the exact same thing pulling Out those baby hairs around where she plucked and just trying to make sure everything is somewhat even or as close as possible, because i know i think i did one side a little bit more than the other, but very slightly nothing too major um. Now i'm taking this elastic band that is so annoying because it's all messed up now and i cannot find my one with the velcro on it. So i need to order me another one, because that one is so much easier um to tie, but i'm just tying that down and once i tie that down, i'm taking that same scarf from earlier to tie that down just to melt everything a little bit more And to set those baby hairs in place. Well, what's going to be our baby hairs, then i'm taking my hot comb and i'm combing that everything back combing everything down just trying to get everything out of my way now i'm untwisting those and i'm going to go in and pluck them a little bit um At this point i was completely dressed and i was like okay, it's time for me to go like i need to hurry up, so you see me kind of just rushing through it um. I did cut them a little bit longer, just so i can have room to play with because once you cut them too short y'all know there's no going back. So if you're unsure it's always best to cut a little bit at a time or to just cut a little more um as you go like little by little um, you see me swooping this with the guys to be glued and my edge gel edge brush. I'M sorry, i cannot talk you, oh my god, um after i curled them, because it makes it so much easier to do. But you just see me playing around with that and i'm taking some powder to make the part a little bit more natural and yeah. That'S it for this video. It was a rush job, but i hope y'all like how it turned out and i'll see you guys in my next one

Comments
Ndyah Dickson: so cute , what’s the link ?
Jasmine Hall: Did the hair take heat good ? How was the lace long term
Amir Savage: So u didnt bleach your knots?