Start To Finish Wig Install *Beginner Friendly* 99J Straight Hd Lace Wig Ft. Klaiyi Hair
- Posted on 18 September, 2021
- Closure Wig
- By Anonymous
Using Special Code To Get Extra 15% OFF: KlaiyiYTB
●▬▬▬▬▬▬▬▬▬♛#KlaiyiHair ♛ ▬▬▬▬▬▬▬▬▬●
I'm wearing 24"HD13*4 Lace Front Straight 99J Wig :➤https://bit.ly/3BASkut
https://www.klaiyihair.com/ ➤Hot Sale Wigs:https://bit.ly/3zF4mlO
Must-Have 13*4 Lace Frontal Transparent wigs:➤https://bit.ly/3mUB1jI
Sezzle Klaiyi Hair Now. Less than 15 Bucks 1 week!
New Trendy Lace Part Wigs:➤https://bit.ly/3BvjFOC
Affordable New Fashion Headband Wigs:➤https://bit.ly/3Bmy0ga
Big Sale!!! Affordable Youth Series Hair:➤https://bit.ly/3mQY5jp
Klaiyi Hair Official Website:➤https://bit.ly/3jysUaH
Aliexpress Klaiyi Hair Store:➤https://bit.ly/3tcfV1y
Amazon Klaiyi Hair Store:➤ https://amzn.to/3jeMnug
YouTube "Klaiyi Hair": http://bit.ly/2zpjQhu
Instagram "@Klaiyihair_no1": https://www.instagram.com/klaiyihair_n...
Facebook "@NO1KLAIYIHAIR": https://www.facebook.com/NO1KLAIYIHAIR...
Contact for Wholesale: +86 18864600633 Email: [email protected]
#klaiyiwig #lacefrontwig
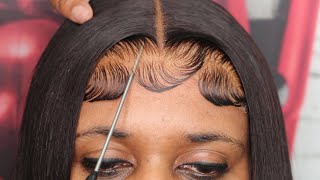
Hey guys welcome back to my channel, so today's video i'm going to be doing a start to finish wig install um, so the details on this hair will be down below in the description box, so be sure to read that so we're going to start off by Putting on the wig um the wig on your head and i'm wiping my hairline off with 91 alcohol, this is hd lace, so i did not have to tint the weight tint the lace, but if you have um transparent lace, you could tint the lace with makeup Or a lace tint spray, so this is the even new york wonderbond spray, so this is like got to be sprayed, but it's very, very strong and compared to got to be um spray. So this has a very strong hold. So i just do one layer and then i blow dry it on cool heat, as the instructions say until it's tacky and then i put another layer on and then i'll repeat with the cool heat, and i only did two layers and then after it's tacky, you Could touch with your finger to see if it's tacky, as you just saw me, do um when you feel it's tacky just put the lace over it um and yeah we're gon na start pressing this in. I use the comb as you see right now. This is how i make sure it's pressed in so it's easier to get a melt with the hd lace, so i don't have to try extra hard to do extra things, but honestly, it's easy to get them a good melt with transparent lace. If you just do everything correctly, it's fairly simple um, but it could be hard if you're a beginner, it could be a little bit harder um but yeah. So that's what i'm gon na do right now. I'M gon na focus on pressing this in with the um comb, and sometimes, if i feel like it's not dry enough, i will go back in with the blow dryer just to make sure it's like all pressing in so you wan na. Do you know everything just put together um and that's how you you know get it melted? You just really want to make sure the lace is pressed in as much as possible into your skin and then you'll be fine. So then i'm going to start cutting um. The lace, so, as you may know, you don't cut straight across um, you just do a little. You try to make it as rough as possible, so you do like little tiny, zigzags, um, just don't cut in a straight line. This will help you get the illusion of a scalp type. Look instead of it just being a straight line across, and i know you guys can still see the outline, but we'll fix that later after i cut the rest of the lace off. So all i do when i have a outline that you can still see with the lace i just go on with got to be a freeze spray and i spray it over the white cast parts that you see and then i go with warm to cool heat. I go back and forth from warm and cool heat when i use got to be spray um, and i just press that in with my finger just to you, know, get rid of that line of demarcation and then, as you'll see later um, it disappears so yeah. Okay, so when everything's dry we're gon na go for the edges, so i do my edges differently every time, especially depending on, if i'm doing a side, part or middle part. So today i'm doing a middle part. So i'll just do two swoops of baby hairs on each side and then i'll do the sideburns. So i just get a little section. I put some edge control on there. You can use any edge control, i'm just using the uh, not even um edge booster, because that's what i have so i'm using edge booster um just get a little section. You don't have to worry too much about um like you, don't have to overthink it. It'S not that hard just get a little piece of hair okay and then i cut going up and down, as you see right there, because i just feel like baby hairs. Look better when you don't cut straight across you kind of want the hairs to be uneven. Um, at least that's what i do and that's what i think looks good on me. But honestly, if you already have a way, you like your baby hairs, then go ahead and do that um. I see some people, you know they curl their baby hairs with the flat iron so do whatever you want to do. I just do this. It'S very simple, um, so yeah, i'm just gon na. Let you guys watch me. Do this um and i used to use mousse on my baby hairs, but i ran out so i'm just using edge control today, but i usually use the alcohol-free mousse mixed with edge control, um, so yeah, okay, now i'm going to do the middle part and then I'M going to focus on molding the top of the wig down, because you don't want it to be as bulky as it looks right now, because it's going to give very much helmet head. So i'm going in with the she's bomb wax stick it'll be linked down below um, and i'm just going ham with that. I honestly did a little bit too much. You do not need that much on it. I just i just got a little happy with putting it on um but yeah. This is going to help mold it down, and then i go over it with this fantasia spritz. I got it from the beauty, supply, store, i'll, try and find a link for it and leave it down below, but i just do a little bit of that spritz because it's very strong um and then i go with my electric hot comb that i also got From the beauty supply i'll also leave it linked down below, because i think i found one on amazon for you guys and we're really just gon na keep pressing it down until it is as flat as possible. So this process honestly takes me a minute. I don't rush this process because i like the nice flat install, even though i didn't do my braids too flat um. I still try to get it as fast as possible and then after i get the around the edges, i use my elastic band to lay my edges and then i will continue with pressing the top of my wig down and, as you'll see later, you'll see the Difference, but i feel like, if you want it to be really flat, you'll need a wax, stick or use at least a mousse or something. If you can't find a wax stick, i will use um, hair mousse and just put it on top and then press it down so yeah, okay. So this is what it's looking like, as you can tell it's so much more flatter than it was in the beginning. Now i'm just gon na go in with some concealer and a brush, and i'm gon na try and um hide my wig cap under there, even though in the clip that i'm showing right now it. I didn't really conceal the cap underneath it, but i did end up fixing it off camera later. So don't worry about it. Okay, but yeah. You want to just do that, get a concealer that you use um a little lighter than your actual foundation. Color. Just like one shade lighter not nothing too bright, okay, um and then what you see me doing now is i'm just using some red eyeshadow to put over the um concealer that i got on the actual hair. So that's that's a little hack to get a nice clean part, and then i um before i take the elastic band off. I just blow dry my edges to make sure everything is dry and then i'll end up taking it off and then you'll see how the edges look and how everything looks okay. So this is what she's, looking like looking flawless, like lace, wear getting very much scalp, giving very much i'm a natural redhead, a natural burgundy redhead, but yeah as you see this looks very very nice. The lace did phenomenal with melting. It is hd lace. So, as i said, it melts easier than transparent, but you can still get that liquid, transparent. That'S how long the wig was on me and then this was the finished look. I did slight layers and i just straightened it and then did like like loose curls at the ends of the hair, but this wig is big head friendly, as you can tell, it fits me fully um and, as you may be able to see, it's a little Greasy on the top, because i put way too much of that wax stick. So that's why i tell you don't want to put too much of the wax stick on um. I was going ham with that. Okay, but um i'll just have to wash it out but yeah. That'S all for this video guys! If you enjoyed this video, be sure to give it a big thumbs up, comment and subscribe, and i will catch you guys in my next video bye guys you
Comments
Maria George: I love this colour. It fits your skin tone well
Danbury: This was one of the realest reviews great job
Love Reesie: You did a bombbb jobbb
Dayosola Aje: Will you say this wig is big head friendly?
onya: youre so pretty omg
Ni: Jesus loves y’all
Pii oh hhh Hhhj: What’s her Instagram
Nancy Nivillac: i have a question, like how do you take care of a wig like when you have it on, can you take a shower in it? do you have to be in a bonet? etc