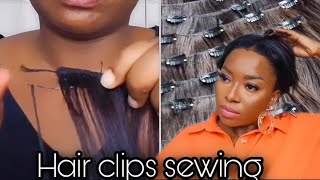
How To Make A Wig | 6X6 Closure
- Posted on 15 April, 2020
- Closure Wig
- By Anonymous
HOW TO MAKE A WIG | 6x6 CLOSURE
Heyyy everyone , this video is about how to make a wig. I am going to walk you through the steps to successfully make your own wig at home. A detailed step-by-step video coming soon! Thanks for watching
Info about hair:
Bundles : 14”, 16”, & 18”
Closure : 6x6 14”
Products Used In Video:
• BW 2 Powder
• 30 volume developer
• African Essence Neutralizing Shampoo Plus
• Got2Be Glued Freeze Spray
• Luster’s Renutrients Slick Stick
• Nairobi Foaming Lotion
• Needle (C hook)
• Thread
• Wig Cap
• Tweezers
TURN ON YOUR NOTIFICATIONS !
New Videos posted weekly : every Wednesday
Have you watched my previous videos ? Check 'em out !
- Everyday Slay | GRWM : CORONAcation
https://www.youtube.com/watch?v=vh38r0...
- GET TO KNOW ME TAG | First Video
https://www.youtube.com/watch?v=27JJQc...
———————————————————————
Socials:
Instagram / just.gabrielle
Snapchat / gvbrielle_life
Twitter / _kdfg_
Hair page IG / styledbygabs_
———————————————————————
Intro song : Shawty Wassup - SoloGtf
_____________________________________________________
INFO ABOUT LITTLE OL' ME:
AGE: 19
BIRTHDAY: 09/01
ZODIAC SIGN: Virgo
Beero, but I see you looking at me like what you see so we can skate off I'll, just live and go somewhere a little more private. Like back to my career, hey guys, it's your girl, Gabrielle be back with another video, but before we get into anything, make sure you like comment and subscribe now we're gon na be making awake today, okay, I'm just showing you the bundles in the closure. I had 14 16 18 inch bundles with a 14 inch closure 6x6. So first we're gon na start off with dyeing the lace or tinting the lace kinda. So I got one scoop of BW to powder and are poor as needed. The 30 volume developer you want to you want a thick consistency, not a drippy consistency. So just pour as you go down, pour a lot in the beginning, cuz I'll just be bad. So I'm going to show you like it's not dripping. It'S really hard to really get off the brush anyway, but that's what it is now for this part we're gon na start, applying the paste to the lease I like that paste, Elise, okay, so I use got to be glue free spray. Basically, this allows the pace to not seep through the lace. I don't know where I learned that from but yeah. I just do it now, so you want to apply the pace, light and gentle do not press into the lace. Be very gentle, don't be harsh. Okay - and we are going to leave this paste on for 30 minutes, so get you some aluminum foil and wrap the lace up and leave it on for 30 minutes so cases starting minutes. You can find something to do for 30 minutes. Okay, trap it real nice. Okay, now we're gon na use our neutralizing shampoo to wash the lace everything so first, just wash it one time just to remove the dye, and then I wash it two more times with the neutralizing shampoo just to stop the process of the dark. Stop the dyeing process, basically such as what we doing now we're going to go. Put the wig cap. I found these wig caps at Walmart because we're in quarantine the hair store, wasn't open. When I went to buy these, so I have to use two uh-huh but yeah, so we're gon na line up the lace, so I'm gon na show you the scalp of this lady focus. You know you deal with you don't feel me feel me. Okay, I got my tea pans and all you gon na line up this lace on the wig cap. That'S basically what you're doing just making sure it stays flat and in place before you sew it down, so that just helps you sew it down better and seamlessly. Basically, but yeah that's what that is. Okay, now we are going to sew on the closure. So what I usually do is I go through the lace part of it and through the wake at basically and I go through the loop of the thread that I not like making a loop, I really can't explain that I just I just go through the loop Of the 3/2 like secure and then I just start sewing underhandedly basically around the closure and I usually do like split it up in half so I'll sew one side up into the middle top part and I'll get another needle and sew onto the other side. This just makes it like needed to me and flatter you can fix the other side kind of if you have any mistakes. That'S just how I do it, but basically that's what you're gon na do he's gon na sew all the way up to the half part and then go to the other side getting another needle and sew over to the half part and y'all gon na meet in The middle, just like my fingers, just showed you so at the top. This is I'm on the other side of this, so this is the other thread and needle and you see I'm moving towards the middle of it, and basically you just keep doing that to meet in the middle you're. Gon na see shown that I kind of like when I was lining it up before I even started sewing. I didn't do it all those buddy correctly like making it flat, so I have a little like humph you'll, see son, but what I did to fix it really it's hard to explain, but I kind of like pull the lace a little bit back to let it Like have room to like expand and still be flat, but that's the best way. I can explain it so don't kill me, but I will do it like some more videos to my more detailed videos. This is just like my first week how to make a week, video so don't kill me, but I'm gon na help y'all out cause like I do here, but yeah. Now I made the night. So I guess people I don't know people really know. I make the night, I hope you do, but basically I loop the thread around the needle three times and then I pull the needle through and it just makes a loop knot. I'M gon na show you again just to help or give you a visual of what I just did. Basically so stick the needle through so boom. Stick it through and then one Mississippi, two Mississippi and three Mississippi. Now you pull that bad boy through pull it through. My hand in the way now and butt out that goes tonight and then you kind of like press it or pull it if there's any problems, but that is how you sew down: Z, closure. Okay, everybody look at that. Look at this. Look at that. I'M about to show you yes, sir she's on now. You feel that you see that. Do you see that I'm getting good at this girl yeah, I shoulda seen you when I first started up: hey, there's some problems but yeah. This is how you sew down a closure. Now, let's get into these bundles baby, let's get it happen. Okay, so you're gon na study, the bundles down. So I did. I double left it. The first bundle, which was the 18 my jaw, I'm short, so I'm gon na, be doing bundles, but what I meant when I said I went through the loop of the thread. This is what I mean like I go through the loop before I even like. Attach it to the we, I didn't do that for the closure at the front part, but I should I usually do that want to actually do an actual closure, so in but yeah it helps keep it like intact. So, for this part, this is the part that everybody like, even when I first started, making wigs it's like they mess up. Please please, please do not actually sew through the elastic band. That is why we're not stretch on your head, if you have like these type of wig caps. Now, if you have like the adjustable shot one with the holes, you should be good, but still, please do not sew through the elastic band cuz. It'S not gon na. Allow it to stretch on your head and then you're gon na be mad cuz. You got to redo the whole thing and it's it's annoying. I know, but you're gon na go underneath the weft and make a little like loop and everything. But I didn't do a good long, video showing that so yeah catch me in a next one. When I show you out a full detail, part of it now we are going to start doing the customization of the week. So basically, I usually like party back a little bit and not too far back and I grab some tweezers just start plucking now for this week or this closure specifically, it was already played a little bit pre plucked. So I didn't really pluck that much, but when it comes to plugging, I believe is based on preference cuz I mean you could do the full life. You know going crazy with it and everything, but some people don't actually need that and then, depending on how you like lay the wig you're, not even gon na see that part that much of it, especially if you don't be trying to do at your stuff. You just slapped it on, so you really got to plug that much but yeah. It'S basing your preference, I would say just put as you see fit, but yeah just keep clicking. Don'T pluck too rough, though, because you can't end up putting holes in the lace and that's just not okay, we don't need that says. We don't need that. Okay, we trying to be seamless. Thank you. You only holes, you know just be not be gentle with it. It will take time and just go with the flow and calm as you go. Cuz you're going to keep cooking and you got here she's sucking away, let's just plug it, plug and call them plug in come. That'S how you got to do so. Grab you somewhere to me, it's, I think, that's how you say. Select state grab yourself grab you uh return is slick. Stick, and this just helps lay it flat. You would go in with a hot comb, curling right, Flatiron, something just to heat up the wax on. So wax it basically and it will help lay the part now and the flyaway sort of look real sleep you're feeling me, but I didn't do that because I wasn't that big on my team yeah but um. I am going to start working on my baby Ares. I already pulling out beforehand so just grab them and cut them with some scissors to the link you want them to be, or if you have a razor you can do that. But I feel like everybody else is just so few scissors and then I grab my Nairobi phone and I started to mold my baby hairs. This also, you can like see how long they really are. We asked you to cut them. I'M probably gon na cut them. Even more just because I don't deal with long baby hairs but yeah, so it's all ending and that's it. You have created a wig, everybody


Comments
Gabrielle B.: HEYYYYYY, corona really sucks and I'm glad you watched my video ! How are y'all surviving this quarantine? COMMENT BELOW !
Tay Simone: Can you do one wig a U-Part wig ??
Tameka Smith: Dope!!