Installing 6X6 Closure Unit Feat. Cdb London | Deboe Studios
- Posted on 18 March, 2021
- Closure Wig
- By Anonymous
Installing a 6x6 closure wig - CDB London
Wig details
2 x 22inch bundles
1 x 20inch bundle
18inch 6x6 closure wig
The Courtney wig is the same style as the one I’m wearing in the video.
Use code:DEBOE10 to get 10% off your order!
Link to bundles: https://www.cdblondon.com/collections/...
Link to closure: https://www.cdblondon.com/collections/...
Link to the Courtney wig: https://www.cdblondon.com/collections/...
Product list
Bleach powder - https://amzn.to/3qV5QmV
Developer - https://amzn.to/3qZjh5k
Mixing Bowl and Brush - https://amzn.to/38RsmHa
Got2be spray - https://amzn.to/2P9WYML
Purple shampoo and Conditioner - https://amzn.to/2OLYAfZ
Lotta Body Mousse - https://amzn.to/3cKLWWC
Eyebrow shaper to cut the lace - https://amzn.to/3vB7uNY
Barber strips - https://amzn.to/3cKOi7U
----------
Foundation shade reference
-----
Toofaced born this way foundation - Shade Cocoa
Fenty Beauty Foundation - 460
Estee Lauder - 7WL
------
Instagram: @deboestudios
Snapchat: @debbiee.o
Facebook: DeboeStudios
*Affiliate links have been used in this video*
#6x6closurewig #curlyhair #bleachingclosure
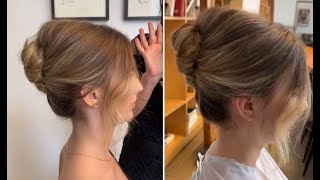
Hi guys welcome back to my page, it's deborah here, okay um! I today i am doing some hair now i don't normally do hair on my page or even like just anywhere, because, quite frankly, i find hair videos like reviews like boring. So this is not going to be a hair review. However, i already know this hair slaps because it is from cdb london courtney, daniela's brand um, it's gon na. I just know that this hair's gon na slap. So today i'm really excited. She gave me some of their um water wave hair. It'S a new curl pattern in their brand um. She gave me a 6x6 closure, 18 inch um and you know some bundles. Eighty, two twenty twos and a 20 inch bundle um. Let me just show you what we're working with today: i've not done curly hair i've never done long, curly hair before so. This isn't, like you know, stripper length long, but it's long enough, okay, honey and i'm really excited it feels so good already and that's! Oh, you know what's so funny, because the smell is worn off, but when i opened the box it smelled like fragrance, and i think that that is a purposeful thing, because if that's, how completely smells my goodness wow, it's not amazing. I'M never gon na lie. This hair is so soft, just from touching it running my hands through, i'm so excited to try it out. So i'm going to show you how i bleach my knots on my closure and yeah we'll get back to well like just to show you the whole process. Basically and then i'm going to show you like how i install it and that kind of thing and that'll be the video like this is the 6x6 closure that i have um, i'm really excited. I don't really like frontals, i'm really happy to use a big closure because frontals they give me stress, oh by the way, this closure comes pre-plucked um, because the whole essence of the brand is like hair made easy. That is like the slogan of the brand. So you don't have to do anything basically and they do have like wig making services. I just chose to um get my hair quickly because i was leaving the countries i literally had to like pick it up and go, but they do have wig making services. So you don't have to make a wig yourself, but i can make wigs it's not a problem um but yeah. I am super excited to try this out. So let's go ahead and get into the video of showing you how i bleach my knots. Okay. So i'm just going to show you guys like how i bleach my knots. I'Ve not done this in a long time and i'm not a professional. So please don't come and shout at me i'm just showing you what i like to do um. So i'm using a bleaching powder, so the one i'm using is the clairol bw2. It'S a white powder, extra strength. Um you can use the white powder or the blue powder, whichever you want. The blue powder has a natural toner in it, so i would suggest using that one, but this is all they had in the hair shop. So that's why i'm using this one and i'm using a 40 volume developer, because i don't have time to be sitting here. Waiting for things to process, so i always just go for the highest. One - probably isn't the best option, but here we are so i'm going to put that in there and i'm going to show you the consistency you want to get you don't want it to be. Liquidy so thankfully it comes with a scoop, so i can scoop it out. So what you want to do is, i think, i'm getting for one two and then i think one and a half of these. I was definitely two, but here we are. This is why you can't just like listen to me like. I will lead you astray, i'm telling you, but i do find these helpful sometimes so you can get a similar result, so this is way too liquidy. So i think i'm going to apply some more powder, but let me just stir it all in and see what we get. I don't have a whisk, otherwise i would have whisked it um, but this is close to this consistency. You want, but it's not thick enough, because that could seep through just a little bit thicker than this is what you want to get. So i'm going to apply just a little bit more powder. You want to get a consistency that is thick. That is not going to seep through, as you can see, that is not dropping anytime soon, and that is good to bleach your knots because you don't want it to seep through and bleach the hair. So that is a good consistency i think in cooking. They will call this one stiff peakabee. What do people call it? No. This is not a stiff peak because it's not blending up, but it is good for me and you want to gently. Just gently apply it onto the lace. I said the hair, but you're definitely bleaching the lace, so you just want to gently apply that to the lace: try not to press down too much. That'S very important and yeah just going to cover this whole thing with bleach. Now you just want to leave this to work and set for the next like 10 to 15 minutes. If it takes longer, that's fine but yeah just leave it and yeah. I have successfully bleached my knots as you can see. There is now an orange hue on the lace which i want to get rid of. My knots look amazing. I don't know if you can really see that, but they look so good um and you know like when you get some parts that bleach in the hair. Like this bleached so fast, and it got so light like - i low-key - want to bleach my hair, but i'm not going to i'm going to get some more bundles and i'm going to bleach my hair, because what this is giving goldilocks, okay yeah. So what i'm going to do now is i'm going to tone the knots so in england you would normally have like a purple toner shampoo toner. They did have it here as well, but i wasn't prepared to pay like 17 for one bottle, so i got a weller toner. Instead, i'm not sure if this is going to work, but i'm just going to give it a try and we'll see it is a cooling violet toner, it's well a tone of 50 and i'm going to use this to cover up my hair. So i've got a bowl of water um, so normally you would have to mix this up with developer so because i don't want to do that um. I just want to you know kind of use this to tone it down. So i'm just going to put some in a bowl of water and pour in some of the wela toner. I'M just gon na pour some of that in i'm gon na do two cup fours i'm going to just dip that inside and i'm going to. Let it sit hi, you guys, so i'm back, i have so far progressed with the hair. Almost finished with the wig just need to put on the final closure and final bundle. So i have you know, you know i was toning, the bundle before so i it did work kind of, but not really um but yeah, like i'm happy with the way that the hair's turned out. I also washed it so it smells great um, but it also feels so soft, like wow um, but i have finally finished making the wig wow. I actually this look for me today is really it's one off struggle. I keep on just throwing on my wig, but it is what it is. It is what it is um but yeah. I finally finished making the wig. It is beautiful, full voluminous. We love to see it um and yes, i've got the closure on it's a six by six, so it's nice and spacious. So before i apply a wig, is i like to apply some foundation or powder today, i'm going to use powder um because it doesn't need because i've bleached or not. It is quite like it's all right. You know so i'm just going to take some powder and i'm just going to apply that on the center portion, make sure to get the front as well with the lace um, because you want to make sure that it is the same color as your skin tone And yeah just keep on doing that all over the lace and then we can move into applying the lace onto your head. Okay, so you guys i've got my wig head on my head and i'm just going to apply my wig. So this is what she's looking like you know she cute or whatever i made the wig a little bit too small for my hair um, but i think that is just a wig cap. I'Ve been having this issue with this particular wig cap, but i completely forgot. I'M not made a wig in such a long time. I think i want a big hair look today, so i'm just going to apply some. You know i'm going to make sure that it's just mousse that i apply in my hair. So first things. First, i'm going to define my parting because i do want a nice side parting. So, to finish off this look i'm just going to use, got to be spray. Um, barber strips and some mousse to lay down my hair and also cut off my lace as well. It'S not going to be anything too fancy fancy, because it is just some. You know basic, it's not basic place, but it's just like a basic look that i'm going for today. Okay, so i've attached a band - and i have put this back on my head - i've plucked it a little bit more. I am just going for like a kind of like sweat, back look with a big puffy and i might do like a one two one, two kind of baby hair, something something. So let me just take out some. Let me just take out some hair for the baby hair dem. Get me um yeah. I'M really excited now see when i get new hair yeah the process of even getting to this point i get so stressed out because i don't like making wigs um, but i also had a lot to record today. So there was just a lot going on, but yeah i'm going to first of all glue this down and cut the lace, so my very simple process of putting the hair on my head. Normally, i wouldn't even do it down, but because i want to have a good good melt. I am just going to spray literally one layer of got to be spray across my forehead and i'm going to stick it down yeah. So i'm going to stick that down and then i'm going to lay it with a barber strip, i'm just applying some mousse, i'm using the lotto body mousse. Just basically you can get from amazon. Get from your hair shop doesn't really matter where you get it from just get it i'm going to take the barber strip, i'm just going to lay that across the front of my hair. You have to be kind of gentle with these things, so it doesn't rip on you. Whilst this is marinating, i'm just gon na go ahead and do my parting as well. So my parting has already been parted, but i need to lay it down a bit. More. Remember i'm going for like big hair today, so i don't want to make it too flat. You know, but just enough and i'm not using any hot tools on the top of my hair, because i actually like it when hair is curly from like when it's curly from the root like not all of this is straight, and then it gets curly like what Is that, but it is going to be a little bit straight because of how the hair was made. Um yeah just applying a little bit of mousse everywhere, so that it can be flat on the parting side. I'M not going to do my face in this video because it'll be an extremely long video that i don't want it to be so i'm gon na do my face. This is gon na, be on instagram, so you'll be able to see on instagram, um and yeah. I'M really excited okay, so my face is basically almost done. I'Ve literally got to apply my lips and spray my face, so i just thought: i'd come on here and show you guys how i trim off the lace and how i put apply mousse into the hair and then we're done basically so um. I want to make sure that i don't lose these two bits, because these are going to be my baby hair bits, i'm going to be using the brow, shaper thing um, you know the thing that you just normally have like you just have it around, like i've, Been seeing a lot of the babes using this to like cut their legs so literally, i said, let me give it a shot right, um, so i've seen them like they'd be like cut and cutting like. I see the babes just like go in and they just cut away. Really. You just want to make sure that you don't cut off the parts that you do want and you want to make sure not to cut your head as well, because the blade is sharp and you kind of just want to like. I think you want to like shed it almost like you don't want to cut a straight line. You just kind of want to make it rough, and you know something like this got to be on the parts that i see that are already lifting and make sure that it's laying down all right. It'S better to do this on the hair that on a clean face, so that you can make all the mess you want to make and then clean up after this part, i'm going to take away. It'S not necessarily good. Okay, it's not necessary for the overall look. So i'm just going to take that away and then apply that um. So you get the gist right, so you basically just cut away re-stick any parts that have not been laid down properly and then redefine your parting. If need be same process, as you can see, it's all been cut away. The hair is swooped back where it needs to be swooped back and forward where it needs to be forward and yeah we're getting a look. He'S gon na look cute. Okay, you guys so there we have the final leg - oh my god, um yeah, so i kind of snapped on this one. I'M not even gon na lie um. I definitely did like bold bodacious. You know bold bodacious and because i've always loved the way that big, curly hair looks and my hair just isn't big and curly yet so well like this anyways. So i just wanted to get that. You know beautiful, brushed out, look with a little bit of a wet something something you know absolutely smashed it in my personal, unbiased opinion. Thank you um, but what you guys think what you guys think i'm absolutely loving this look, i'm loving the hair. It is from cbb london on instagram, make sure and, unlike on their website like www.cdb london, i think dot, co, dot. Uk i'm gon na put in the links the link in the descript description box anyways, and i have a discount code for y'all. I think my discount code is double ten. If it's not i'm going to write it on the screen and i'll also put it in description, description box, so you can get 10 off all of your orders. Okay, i would definitely recommend the water wave hair. It is soft, it's luscious, it's big, it's! It can also be silky, i'm going to do another look, but it's like nice and silky and all that wet and stuff, but for right now, hello, hello. I need the puff. I need the mountain on top of my head. Thank you, it's giving is it diana ross is giving diana ross, but yeah make sure you like comment and subscribe, and let me know what i should do next. What kind of hairstyle you guys want to see me? Do next um, i would definitely love to you, know, come and show the girl some more tips um but yeah. I'M gon na like close this out because i'm hungry and i don't want - i want to eat like right now, but it's okay! I'M talking a lot! I'M tired: this is what happens when i'm tired, anyways bye. That'S what i'm trying to say bye! You guys i'll catch you all in the next one! Bye,

Comments
Eunice Asiedu: I was so nervous when you were cutting the lace girl. I was like “don’t cut yourself. Don’t cut yourself “
Eunice Asiedu: Liking before watching the video because you know it’s gonna be good REGARDLESS bbyyy