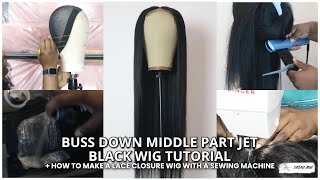
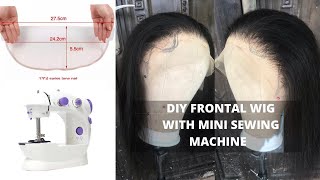
Beginner Friendly Wig Making With A Sewing Machine Ft Beaufox Hair
- Posted on 16 December, 2021
- Closure Wig
- By Anonymous
▬▬▬▬▬▬▬▬♛Beaufox Hair♛▬▬▬▬▬▬▬▬
★hair in the video:
Loose Wave 4 Bundles With 4X4 Closure Natural Black➤https://bit.ly/3IMA9Gz
★Christmas Promotion:
Headband Wig➤https://bit.ly/3oQzSdM
Blonde Lace Wig➤https://bit.ly/33u2u4l
4×4 Lace Wig➤https://bit.ly/31PIkRH
150% 13×4 Lace Front Wig ➤https://bit.ly/3pKfvy0
180% 13×4 Lace Front Wig ➤https://bit.ly/31VAdD3
Blonde Bundles With Closure➤https://bit.ly/33f6Pbc
Blonde Bundles With Frontal➤https://bit.ly/3dKa4t8
Natural Black Bundles With Closure/Frontal➤https://bit.ly/3oMk3om
★Christmas PRO Code 【Expiration Date :12/25/2021】
$10 OFF Over $10 Code:BF10
$20 OFF Over $159 Code:BF20
★Beaufox Hair official store➤https://beaufoxhair.com/
Instagram:@beaufoxhair01
Facebook:https://www.facebook.com/beaufoxhair/
Beaufox email:[email protected]
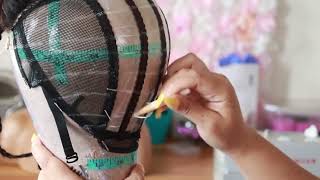
Hi guys welcome back to my channel in today's video i'm going to be doing a beginner friendly how to make a closure wig a flat closure wig using a sewing machine. So first things first. So this is my canvas head that i'm going to be using to line the wig cap before we begin sewing. So this is the wig cap that i'm going to be using the dome cap. This one is the mesh one. The one you can see through this is the type that i would highly recommend. That'S the one you can see through like this. I usually like to put the smaller end in front these markings on the dummy head. The covers head they're, not for fancy. They actually do serve purples, so this is supposed to be the middle line. So i'm going to put half of this part in the center kind of like you're doing the middle part, so you're going to need t paint lots of them, so i'm gon na put one t-pin here in the middle, then i'm gon na put more here. You should know all right so now we have our wig cap, nice and steady, so the hair we're going to be working with today is from bill fox hair. I'M not sure i got the pronunciation right, but i'm going to write it on the screen. So i'm just going to quickly show you guys how many bundles we're working with. So it came with a wig cap. A 20 inch closure, one bundle of 28, 28, 26, 22 and 24., so this is loose wave. So i'm going to start off with the closure. Another thing that you're going to need is sharpie. You need a very good sharpie. Most of this sharpies are rubbish. So when you get a good one, we are very lucky. So the first thing i like to do is divide my closure into two, so that will give me the center. Then i'm going to take my sharpie and measure it and mark it. Sorry, so i know where to place it in the middle always cover your sharpie. Very important otherwise you're going to dry it out. So when you are putting your closure, just bring it down a bit just a tiny bit like this. My one thing that you should be very mindful of when you're aligning your closure. You need to make sure it's very flat, like you see how i'm pulling it's removing the pins, putting the pins back in i'm doing that, so that my closure is as flat as possible. So now our closure is nice and flat all right, so we're going to start by lining the closure, so the exact line where you placed it where you pinned it down, is where you're going to put your line like this me all right. So i'm done lining the closure. Now i'm going to move on to the rest of the cap and you're going to need is a measuring tape, not necessarily but i like to use a measuring tube so that i can have precise lines. So i'm going to put a t pin at one and start one right here right here like so then i'm going to bring it all the way down. So i have it pinned down here. So this is going to be our guide. I'M going to use one inch so 12, 11. 10.. All right so now we're just going to extend the lines that we have created that you really want is, i don't know about other people, but for me i like to do these parts before i finish off. I like to do the last lining, there's this very last one here, the one that goes around the closure i like to do it before. I continue like the last two lines, so that in case i make any mistakes. These lines are the most important lines, the ones the one going around the closure is so important, all right guys, there you have it. Our lines are ready. My lines are rubbish. I know my hand's not really straight, but yeah so now about to start sewing all right. So now it's time to get down to work, and this is the sewing machine that i used to make my wigs. This is the singer sewing machine. So the first thing we're going to do is take this villa. It usually comes with the machine, so you're gon na need thread. So this is a thread that i normally use. We'Re gon na put the thread through the hole after putting the thread through the hole. I'M going to take it around round it just a little bit like this, so i'm gon na put it around like this, then place it here. So when you place it here, you move it to the side. I'M going to put my thread here. This is like the thread holder, i'll just put it there. This thing right here usually comes with a sewing machine, so it's going to be on the floor, and this is where you're going to step on when you're sewing. Another thing you need when you're sewing is a pair of scissors, so i'm going to cut off the excess strips here and i'm going to hold on to this part of the thread and start matching the whole coat. I don't know what it's called the thing under my leg: anyways, i'm just going to leave this thread on tape. It'S usually easier for me like that. So, while i'm stepping on that thing on the floor, i'm going to be taking the thread up down up down up down until it's filled up just closer for you guys to see. So so it's full when you slide it, take it out. So there you have it: your wheel is filled up with tread so now we're going to take the thread that we already threaded. Oh, we are going to open this place right here, so we're going to open this place, open this up and bring it out. So you take the thread in the bobbin. Put it in here like so then put it in the hole then take it around the second hole. Until you hear that sound, then you're good to go and you open it up like this and push it back in there make sure this hook is facing up there like that, so it's nice and firm in there. Then you close this up. Then you take your thread. I usually like to keep my thread on the floor. You guys need a smaller tray. You can put it here where i already showed you before, but for me i like to use this bigger thread. So now i'm going to show you guys how to thread the upper part of the sewing machine all right. So the first step is you put your thread around this place like so you can't even see the directions on the sewing machine showing you which way to go so like this. So this is one you can see the arrow going down. So this is two: you can see another area showing you what direction to go. This is three go around. If this thing is not all the way here, you come here and push it up. It'S off, so take it around. There'S a small thingy by the side make sure you put it inside. Then you bring it down. So four, now we're going to five when you get to five, you bring it down and put it around this place right here. Then you thread your needle make sure you raise it all the way up like this from the side, so you can easily see your needle to tread it after threading, the needle i'm going to put it in between here like so i'm taking all the way to The back i'm going to twist this until it joins the thread under that thread under has come out. Yes, so now we have two threads one from the top and one from the bottom. So now that we've threaded it it's time to start sewing, i'm going to start with the longest length, which is between 8 inches, all right guys. So i put the camera at a different angle. I hope that this is a better angle, for you guys, so the first thing we're going to do is to double weft the hair, so when you're sewing it, it should be on top of each other like this, not on top of each other like this. So this is how it should be when you place it so now we're gon na start sewing. So you back stitch, you always back stitch at the beginning and at the end. So this is where you you click on to backstitch, so you backstitch a couple of times then stitch. So i have four bundles: i'm going to double wefts two and single weft, the other string. So when you want to start sewing, you literally just put your wefts on the lines that you already made. But one thing to note when you are sewing: don't pull your cup if you pull your cap you're going to have bumpy wigs, your wigs are going to be bunky, just smoothing it out. So it's flat see i'm not pulling i'm just smoothing it just flattening it. Rather so that this so that i can sew flat on the cap, so now i'm going to begin sewing. Remember backstage i'll, be all right, so i'm done with the first bundle to join. The second bundle, just put it side by side with the one that just finished, make sure it's on the same line. It can be quite tricky. You have to be patient with it, so you start to sew and backstitch so yeah, that's it izzy peasy. So make sure you always cut off very close to the wig cap. So it's not sticking out back stitch. I don't know if i mentioned this, but when you are sewing, you want to make sure you are sewing on the first part of your double weave. You'Re not sewing here, you're sewing here so that i can lap flat with the cap yeah, and then you always want to go in and cut off any excess threads inside so that your cup, your hairs, your wig, is neat on the inside, like this straight, like This, let's try it like this all right, so i'm done with two bundles, i'm about to start using the third bundle and i'm not going to double the wefts so how i usually calculate it to be sure. Like i don't finish my hair before i'm done, is i just go around because i was thinking of double wefting. This third bundle, but i decided to just go around it to make sure to see how many lines one bones you can give me, and this one can only give me three lines and i still have about one two, three, four, five, six six lines to go. So i'm not going to double the last two bundles at all. We break up and you slam the door. I messed up on the bedroom door. What the hell do we do this? For i push you out. You come back that attraction all right. So now it's time to put the closure. I just finished bleaching the knots on the closure all right, so i'm going to proceed to sew the closure on uh, so i'm done sewing on the closure. Now i'm going to proceed to sew two more tracks and we are done alright, so i'm done sewing the last track, so i'm about to sew the track that is going to lap around the closure. So you want to sew it as close together as possible want to make sure that two of them are side by side. So this is how close together you want the bundle and the closure to be be careful not to put the bundle on top of the closure. It should be side by side hi guys, so this is the wig all done. I just wanted to show you guys what the inside looks like. I already cut off the lace. I actually already wore it just now, but i was like. Let me actually show you guys what the inside looks like. So now i'm going to proceed to put the wig back on. We, we watch the sun go down over the same old town like so many times before. We look at the same old stars battles, the same old wars like so many times before, and i know that we're not perfect, but i'm gon na miss all that we had yeah. I know that we're okay, we were never meant to last, but all the fun times we had all right guys. So that is it. I hope you were able to grab one or two things on how to make a flat close. Your wig, like this unit, is flat, and it's so funny that i learned how to make wigs here on youtube, and here i am teaching you guys how to make wigs on youtube like it literally came full circle, so i hope you are able to learn athena Too, do let me know in the comment section below if you have any questions for me, like i said before this hair is from billfox hair, i'm going to leave all the details in my description box below so yeah. Thank you guys so much for watching this. Video please like comment and subscribe. I love you so much and i'll see you in my next video bye guys will always

Comments
Sharon Rutendo: Love love! your tutorials, you just taught me a new skill. Thank you
Bliss: Perfect timing, I've spent a lot of money on other people making my wigs for me, THIS WAS NECESSARY!
Eva U: The fact that you have a hairline but still do AD for other hair company blows my mind! You’re such a sweet human♥️
Blewillsmakeup: Very detailed tutorial, plus its so neat and beautiful. I love every bit of it. Thank you for this
Amanda Herix: Thank you so much for this video Layefa. It came at the exact right time for me. I was just thinking of who to give my wig to refix cos the first person did rubbish with my frontal. And I just knew this was something I could do myself, I just needed the right tutor, and you just dropped this gift. Thank you When is your next QnA by the way, I have questionssssss☺
Lise Lewis: Look at me getting more tips from my Queen! Thanks for this hun now I was double wefting the wrong way..ughhh. That back stitch helps to prevents shedding. I find when I sew through the band it makes my wig too tight so I sew by hand to ensure I dont go through the cap #bigheadproblems
Chrissy Nicole: So detailed! Thanks for sharing ❤️
Ciera Evette: Great detailed video beautiful. Thanks for all the tips.
Assumptah. C. Anyait. Buyinza: Can some one appreciate the fact that she has not only taught us how to make a wig,but to also thread a singer sewing machine Well done Layefa, You have out done urself
Angela Huguley: Awesome job, it’s beautiful
Olamide Antonio: Very detailed love it
NELLY OSAS: Thank you so much for this tutorial. Wow thanks for teaching us how to use sewing machine.
Neora Addy: Thanks so much for this video. I've learnt a lot. God bless you
Jennifer alloysius: So so beautifully well done
temitope Obolo: Very educative . Really enjoyed it . Is it possible to make a video with full frontal closure
Confidence Nwaeze: You are a good teacher and that is why you don't lack students in your studio. Thanks for sharing
crimkay_t14: Your video clip was really helpful Thank you
Ncobile Ginindza: Please make a ear to ear tutorial thank you ❤️
Y_O_U A_R_E S_T_R_O_N_G (YASSS!!!): I love it, but do you cut the hair when you are done with a line before going to another line
Chinoi Baba: I am from Cameroon n to be honest ur someone I look up to especially your makeup. Ur so detailed may God continue to bless you
Tonna Chris: May God continue to increase your coast . This has really been helpful Please how do you fold the hair when going to the next line
Peace Loyinmi: What sewing machine is that and where did you get it
Lea Tietie: Very beautifully ❤️❤️❤️❤️
Favour Elechi: Thank you for this video. Please did you cut the weft at the end of each track or you flipped it?
Life of a goddess 🌸: Can you put the link to the sewing machine down in the description box please
Jumoke Hadassah: Do you cut it after sewing it one after the other , then start at the other end or you sew it joined ??.
Maria Garba: That's soooo nice. I love love
Tioluwani Oluwabanke: I was so happy when I saw this video❤️ Love you
Annette Anadoo: What does double and single weft mean?
Eruanga Omua Sarah: This video was really nice. Pls i like to know if the machine has a peddler? Or how is it operated?
Martina Atsuelime: Wowwww thank you so much
Odiase Vivian: Good job beautiful
Fioyinsiolami: The boss herself . Rushed to watch❤️❤️❤️
Jennifer Mekwunye: Thank you so much babe, work made easy....love you like kilode.
Lilian Ukoh: God bless u thanks for the teaching
: U r such a sweet soul and a gud teacher.
Albert Odunayo: Love you Layefa.... thanks for this God bless you
DebZ Eleta: Watching this video and realising I need a new hair in my life
Kemi Okereke: Thanks honey
Emaediong Ebong: Please where can I buy the machine and like how much? Thanks
Ezzy Mike: Love ❤️
A.M. Khali: I have the same machine although I see cloth.
Magdaline Quarcoo noum: So nice
Mwaka Kashinka: I have the heavy duty one and I’m having a hard time threading it, I did exactly what them YouTube videos are saying but when I try to see, there’s no stitches at all, omg I’m stressed
Kasisi Isakz: I love you oooI am not even really into hair but honey imma be glued on the screen coz it’s Layefa —love All the way from Cuba
Lebz Love: Your hands are blessed. I always wish one of my kids has blessed hands. As for me. I can watch this 100 times it will be a mess
Shunaya Riley: Thanks so much your video
Pretty Gold: How much is the sewing machine please
Adaora Chidiobi: Pls dear ma, which trusted vendor can i get the machine from, i have been searching & I'm scared not to buy fake ....pls help ma
Catherine Whedeh: You are perfect,I am new subscribers to you channel and I am enjoying every bit of your teaching
Nma Maryann: Please ma, do a headband wig
chizii obi: ❤❤
Faithful Alokpesi: ❤️❤️❤️❤️
Beulah ogbogbo: Loveeeeee
Herty Smith: Please can i use the soft net
Jennifer Onyenemere: Pls did you turn around to sew or u just cut at the end of the each line?
Joyce B: ❤
Jamila Mustapha: ♥️♥️
joycelyn dzidzor: Can someone help me with the name of the pen/marker she used to mark on the net? How is it called please
AFRICAN FIRST BARBIE MOM (SANDRINE SANDRINE): Wow so nice but I lost patience when you were threading the machine. Jor that's the hard pert
Faith Emefiele: I really loved dis video layefa
Mayglow TV: Please your location will like to come learn more from you and your makeup
Mercy Ogbenna: Hi layefa,,,I will love you gift me this hair this Christmas ..thanks in advance
TY: What can she not do? super woman
Faith Dominic: Beautiful please I really want to ask a question and please anybody can reply me I love to relocate my business to Lagos but I don’t know if a small furniture can get Cutomer in Lagos and the area that I can look up to please God will bless anyone that reply me ..sweetheart I’m sorry I ask this question in your video I really need real answer badly that why but I love you baby girl and thanks for the video
Angie Nwigwe: please what kind of camera do you have? the quality blows me away
Immaculate: I love you Layefa♥️♥️♥️♥️♥️
Phee: Can i buy that hair off you pls madam
Raifu Omotola: Very detailed ma’am ❤️But my questions is ,on the machine there are different stitches dere,but please which stitches are we going to use for doubling the weft Nd which one are we going to use to sew on the cap
Sandra Chris: Baby girl do give away.. I love the wig
Ruffina Daniels: I love you