Buss Down Middle Part Jet Black Wig Tutorial + Make A Closure Wig On A Sewing Machine |Barbara Atewe
- Posted on 12 July, 2022
- Closure Wig
- By Anonymous
BE SURE TO LIKE, COMMENT, SHARE & SUBSCRIBE!!!
Wassup y'all! In today's video, I'm showing y'all how to make a buss down middle part jet black wig! I’m also showing y’all how to make a lace closure wig on a sewing machine! This tutorial is super easy, quick & beginner-friendly! This wig tutorial starts from the wig construction to the jet black watercolor method to getting the best sleek straight hair. So I hope y'all find this video helpful to make your lace wigs using the sewing machine method! Enjoy!
#wigtutorial #wigs #sewingmachine
⇣ P R O D U C T S U S E D ⇣
Sewing Machine ⇢ https://go.magik.ly/ml/1ik9x/
Sewing Machine Needles ⇢ https://go.magik.ly/ml/1ika1/
Wig Caps ⇢ https://go.magik.ly/ml/1jr85/
Black Thread ⇢ https://go.magik.ly/ml/1jr80/
Babyliss Flat Iron ⇢ https://go.magik.ly/ml/1jr7y/
Heat Protectant ⇢ https://go.magik.ly/ml/1jr7v/
Hairspray ⇢ https://go.magik.ly/ml/1jr7u/
Canvas Block Head in 24” ⇢
Ion Blackest Black Semi Permanent Hair Color ⇢ https://go.magik.ly/ml/1jr7q
Ion Midnight Blue Black Semi Permanent Hair Color ⇢ https://go.magik.ly/ml/1jr7s/
_____________________________________________
FOR ANY BUSINESS INQUIRIES (NO PERSONAL EMAILS PLEASE): [email protected]
CONNECT WITH ME!! ⇣
Subscribe http://bit.ly/subscribebarbara
Instagram ⇢ @BarbaraAtewe
Twitter ⇢ @BarbaraAtewe
Snapchat ⇢ @BarbaraAtewe
My Copyright Free Playlist ⇢ https://go.magik.ly/ml/1iktq/
_____________________________________________
MY HAIR JOURNEY:
MY RELAXER TOUCH-UP TUTORIAL ⇢ http://bit.ly/2DWE82Y
MY BIG CHOP ⇢ http://bit.ly/2RvGuh8
I LEFT A RELAXER IN MY HAIR FOR 3 HOURS ⇢ http://bit.ly/355kPAi
I RELAXED MY HAIR TWICE IN ONE WEEK ⇢ http://bit.ly/2LASASu
MY LACE WIG SERIES ⇢ http://bit.ly/33uaWME
MY FLAWLESS LACE WIG INSTALL ROUTINE ⇢ https://bit.ly/3r0A1ue
HOW TO MAKE A CLOSURE WIG ON A SEWING MACHINE ⇢ https://bit.ly/2ITjNSm
HOW TO MAKE A FRONTAL WIG ON A SEWING MACHINE ⇢ https://bit.ly/3mjSiyX
_____________________________________________
Barbara Atewe,Buss down middle part wig,How to make a lace closure wig on a sewing machine,Jet black,Jet black wig,Sewing machine wig,Sleek straight hair,Watercolor method,Wig making,Wig tutorial,how to make a closure wig on sewing machine,how to make a lace closure wig with sewing machine,jet black closure wig,jet black hair,jet black wig tutorial,sewing machine wig tutorial,sleek straight hair tutorial,wig tutorial with sewing machine
_____________________________________________
FTC Disclosure: This post or video contains affiliate links, which means I may receive a commission for purchases made through my links
Location⇢ Austin, TX (Toronto, Canada)
Camera⇢ Canon m100
Lenses: Canon EF-M 55-200mm Lens & Canon EF-M 15-45mm Lens
Age & Ethnicity⇢ 26 & Nigerian
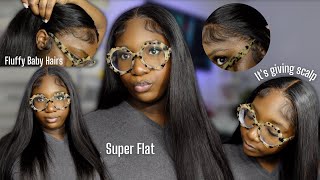
What'S up y'all, my name is barbara atway welcome back to my channel. So today's video, we are doing a bust down middle part, jet plaque wig tutorial and i'm also going to show y'all an updated tutorial of how to make a closure wig on a sewing machine. So i really hope you guys enjoyed this video, please, like comment share and subscribe and let's begin all right, so i got three bundles of 28 inch straight bundles and then um. I think this was a by five by one closure. If i'm not mistaken yeah it got sent to me and i didn't want it and then they were so i shipped it back to them and then um they refused the package. So i got it back a year later. So whatever i don't even remember what company it was, but um anyways, what we're going to be doing is um double wefting, the tracks. Okay, this is how you get your wigs to be full, and then you don't have to keep adding lots and lots of rows because more rows on the wig cap make it look more bulky, and this is how it ends up. Looking we're using the zigzag stitch, i i included a picture of like my sewing machine setting, so y'all could see what i'm doing now i am putting on the cap on the the canvas block head. I like to use size 24, because this is the size i use for my head, and i also use this for wig orders as well um. This allows it for like, if you have a big head one and then two, i always add an adjustable band at the end, so that uh people who have smaller heads can um, you know, have the same weight now. I do have smaller sizes available, but i typically just like to use a size 24 just to be safe. Okay, so i'm uh pinning the closure onto the wig cap and then i'm going to make sure that is flat all over it's a very tedious process. I think this along with actually sewing the closure onto the wig, is like the the most detailed you have to be, because you have to make sure that that closure is flat all the way around um, so that it's not like wonky, when you put it on Your head, okay and then, once you get your closure to be flat, you're going to take a colored pencil colored marker anything available that will show up on that black wig wig cap and you're going to outline the closure um. This is where the closure will lay you're not going to sew the closure down first, because i feel like that will make it more difficult to sew on the tracks. You know so i'm just outlining the closure to see where it's going to lay and then um you're going to start making your rows for where you're going to sew the tracks. Okay. So when i um to map out how i like to lay my tracks, i do about like a middle finger with width apart um. I eyeball it now because i've been doing this for so for so long, but typically you you can either go between like a thumb or a middle finger, either or depending on how thick you want your your wigs to be like. I know for myself. Personally, i like to use four bundles. I don't use anything less to be honest with you, but um, since i only have three bundles on me. Um, i'm gon na have to make it work with those so um, i'm just lining up the wig cap. All the way around and then we're going to do straight across and then once we reach once the line, the straight lines reach like the the corner of the closure, you're going to start creating lines that curve around the closure. So it's not like bulky, so it kind of like helps the wig lay properly okay and then, once you have all your lines drawn out. You'Re going to start sewing the wefts onto the wig cap using the same settings throughout the entire process. We are going to line up the wig cap under the presser foot, along with the tracks and then you're going to hold the two pieces of thread along with a little piece of the weft so that you're able to drag it through under the presser foot. So nothing gets caught. You'Re gon na run the um. I think it's the back pedal to make it go backwards so that you're reinforcing the weapon. It doesn't unravel and you're just gon na drag it through on the line and you're not gon na pull the wig cap too tightly, because you don't want it to um when you stretch the elastic for some reason it makes the wig cap smaller. I don't know, but yeah so you're just going to keep doing that throughout row after row after row and then um making sure that you're cutting your the excess thread each time that you're running um, when you finish, sewing the track onto the weft by row. Alrighty and then here's another angle, um, i'm showing y'all the point where i finished the first bundle and then i'm also going to show y'all how i connect the second bundle onto the wig cap to um beside the bundle i just finished. So once i reach the end of the bundle, what i like to do is i'll lift the presser foot and then slide the next bundle under the presser foot and then like cl, uh, lower it and then i'll reverse i'll sew over it. The second bundle and then um reverse stitch between the two bundles to make sure that they, like the ends, are stuck onto the wig cap and they don't slip through to reinforce it, and then i just continue sewing and that's literally it okay. So i just keep doing that going all the way up until um, just yeah, just basically just continuing to sew the tracks on to the weft, making sure that i'm not like straying away from the lines um and then also making sure that i'm holding the um. The track steady, so it doesn't keep like so it doesn't waver throughout the wig cap and then um yeah. That'S basically it you're not pulling the wig caps, uh, taut or anything because that makes the wig cap shrink a bit um. It'S weird. I don't know like it's already, there's already elasticity to the wig cap, but if you pull it it'll shrink the wig cap. I don't know it's it's very weird, but anyways just keep watching me um. So these tracks on and finish this wig passion, okay and then this is how it looks halfway through we're, brushing it through it. These bundles are actually very, very thick, typically um, the longer the bundle, the thinner, the weft, which is weird but um yeah. It'S actually very, very thick, you know, but anyways we're continuing to sell we're we're doing the curve around the closure. Now um, this part is annoying, but it's okay. I don't know how to describe it. It'S like, i could do without it, but you can't do without it. You know what i mean like you have to curve around the closure, or else your wig is gon na look crazy, okay and then now it is time to sew the closure um. I like to sew the last track on the line or like right up into the line where the layout of the closure is so that i know so that um the closure and the the track meet in one when i sew it down, but anyways we're going To pin down the closure and then now i like to hand sew it first, just like wide gaps between each stitch, um, just so that the closure doesn't budge as i'm running it through the sewing machine. It depends on my move, sometimes i'll just go and sew it right under the sewing machine without hand sewing it. That'S if i'm feeling froggy, you know what i mean, but um most of the time i like to um hand sew it so that i don't have to worry about it string or moving about when i'm uh sewing it under this sewing machine, so yeah, i'm just Um i like to start from the middle the back of the the mid, the back middle middle back of the closure and then go around towards the left and then go around towards the right. So i know the closure is flat on the wig cap, okay and then using the same settings. The settings do not change as i make this wig, i keep it the same, because i don't have time. Okay, i don't have time for threads getting caught or the stitch length, not being okay or the tension being one. I don't have time for that. Okay, so i just keep it the same in between three and four and then the the spaced out zig, the biggest and spaced out zigzag stitch. Okay, so i run it under the presser foot and then um reverse stitch a little bit and then that's basically it you're done. That is it's so easy. Now, when i first started making wigs with a sewing machine, it took me about like two hours, but now i can finish away within 30 to 45 minutes very simple, very easy, very efficient. Nobody has time to be standing all day. Hand sewing a wig track by track, trying to do the fold over method girl. It'S effort, it's about working, smart, smarter, not harder. You know what i mean, that's how it is. Okay and your wig is complete. We'Re going to cut around the so the with something called the closure there we go, remove the the remaining the excess cap and then now it is time to dye it. Okay, to protect the lace, we're going to take the eben wonderlace bond spray. That is the go. I use the i switch between the black or the red bottom. I don't care because that it creates like a very hard cast to where nothing can penetrate it. Okay and then the two colors i like to use for a jet black sickening wig is the midnight blue black and black is black. By ion, it's semi-permanent we're doing the watercolor method because again working efficiently, okay, we're going to um, put the two colors into this bowl here and then i'm going to add hot water to um, make it watery and then i'll be able to mix it properly and Get rid of any chunks, because if there's chunks um it will stick to the lace. I don't know. Even if you put like a hard cast, or whatever i mean you could put vaseline girl, that's effort trying to rinse vaseline from a wig. Oh my god. It is the most annoying thing in the entire world, so um yeah we're just adding the two colors in and then we're gon na. Add the hot water and then whisk it around. So it becomes watery and then um you'll be able to start on your watercolor method. Okay, so for added protection i like to add um conditioner onto the lace as well um - i don't know it just it helps. Sometimes it helps so um. Now we are going to start with filling up my bucket. This is the bucket i use for all watercolors, all bleachings or all bleach baths, all of them. It'S that specific, bucket, okay, we're in the laundry room, because that sink gets the hottest to where like. If i put my hand under for like 10 seconds, i will burn my hand. I don't know it. I feel like the kitchen sink should have the hottest water, because you know you're, boiling water and all this stuff. But it's okay school is calm. Um anyways we're gon na, add our water, and then we also used um water from the kettle as well, just to make sure it gets like really really hot. You get me and then we're going to pour our color mixture into the water mix it around and then uh make sure, there's no chunks and then we're just going to dump the wig inside literally just dump the wig inside. You know we're going to give it a few, a few baptisms you know up and down up and down up and down and then uh we're gon na brush it through to make sure that the wig gets throughout the entire. The color gesture uh gets into throughout the entire wig. I don't know why i'm stumbling over my words, it's very annoying um and then i let it sit in the the bleach. I mean the watercolor for about 10 to 15 minutes yeah about 10 to 15 minutes, and then i rinsed it with cool water and then um. I didn't show this part on camera, but y'all know every single color tutorial i'll do i'll use the ion color sealer. Okay, so and i let that sit for 20 minutes and then now we are at the point where um it's towel dried and it's on the wick wig stand and then i like to spray the any thermal spray heat protectant. I like to spray that while um, what's it called it's wet, you know, because i don't have time to be reapplying. It okay and i don't reapply because that's gon na make it look greasy. So i spray i spray it while it's wet and then i brush it through and i let it over dry overnight. I let it dry overnight. Okay and then this is how you get the sleekest humidity proof straight: hair. Okay, you get a light hold holding spray. Um tresemme, what other ones are there got to be? The flex hold is really good too. You spray it all over the wig or or your hair, and then um you brush it through. You don't want to add too much just enough to where it like touches. The hair, where it's not like you're, trying to hold on to like, like like a curl or something no, you just want to run the straightener through it and then once it's run through that sounded weird. Once you pass the flat iron through your hair will not frizz, there will be no flyaways, there will also be no humidity, causing it to um puff up or whatever you know what i mean so um yeah you just spray. The hair all over then run it through and then, since we already added the heat protectant, while it was drying like from uh air drying overnight, you don't have to add any extra heat, protectant and it'll, give it a greasy look or whatever so anyways um. I'M just doing the chase method for this um. That'S how you get that's another tip as to how to get um the sleekest straight hair pro possible. So i i parted the wig um every two rows and then just ran the straight iron. The flat iron through um - i don't really care about, passes like that, because girl does hair good. This hair is actually good, even though i really don't remember what the company is or who the company is um, but yeah, i'm using my babyliss um flatiron. I will have everything linked down below um, with all the products that i used: um and yeah. That'S basically it i'm just running the thing through all the way down and um passionate passion. This is a quick comparison of how the bundles look compared. Um, when you just let it air dry and then when you pass the flat iron through, you see that there's no like sporadic hair sticking out or any um straight straight hairs poking out or flyaways. Everything is silky, smooth, okay, yeah. So i'm just continuing to run the flat iron through all the way up to the top. This um closure was actually very, very easy to flat iron. I'Ve never worked with this kind of closure before um, because that was the initial reason as to why i sent the hair back to them, because i didn't want it, but they sent they refused a package so girl, i guess whatever i don't know, but um so Um i like i, don't like it for me simply because i don't like i don't. I i'm a i'm a deep side, part girl, okay, and i want to be able to do like a curved part, because i like how that looks. But you can't really do that with this, because tracks are sewn onto the lace, but i guess if you're strictly one a one part girl like a middle part and you don't really move or customize your part like that. I guess it's good. It'S all right! It'S not that bad, but um. I do like that. It'S easy parting like and i don't have to use a flat iron for this i mean um. A hot comb either like i didn't have to use a hot comb for flyaways didn't have to use wax. Stick. I never use a wax. I feel like that. Just adds product buildup and wax when you put heat on wax it doesn't. It just looks weird to me so um i just um again since we sprayed it beforehand, i don't have to add any extra product. I just pass it through doing the chase method and then we are good to go uh, and this is how she ended up. Turning out, i really like it. I don't know if i want to do a giveaway or, if i just want to like, sell it to my dad or just have it on hand, for when somebody places an order. I don't know, but i really hope you guys enjoyed this video. Please, like comment share and subscribe, and i will see y'all next time. Alright, bye, you


Comments
Izolene Netta: Very pretty. I've said it before, but you are talented!