How To Make A Faux Loc Wig
- Posted on 07 August, 2021
- Closure Wig
- By Anonymous
Butterfly Loc Tutorial: https://youtu.be/rhthq_rTLwk
How To Make A Wig Tutorial: https://youtu.be/lQunrja6DQ4
P.O. Box Info:
Instagram: JSlay_ https://www.instagram.com/jslay_/
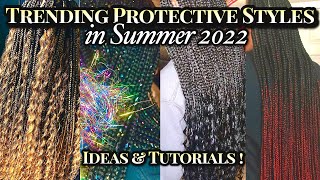
Hey y'all, it's your girl, j slay and i am finally back with another video so today we're going to be using these items in order to create a faux loc wig, let's get into it alright. So i'm going to take my mesh style, dome cap here and t pin that down and make the t-pins make the wig cap mimic the nape of the neck, see how that is all right. So next things next we have the nala tress butterfly locks. I bought them in bob style, but i actually didn't end up liking how it layered out. So i ended up cutting them anyway, but that's neither here nor there um, i'm gon na. Take these individual crochet butterfly locks. Stick my needle through the dome cap, like so flip back the flap of my crochet needle insert the actual crochet lock onto the needle flip, the flap back and pull it through the dome cap. Once you pull it through you're, going to take the loop of the crochet and pull the lock through the loop and then continue like so pulling that needle through flipping the flap back, putting the crochet on and pulling it through the hole, pull and you're done now. The what i did notice with these nala dress butterfly locks is the loops were very um very different in size like sometimes they would hang and i would have to go back and fix it. So yeah one thing i did notice with the nala dress, but yes continue pulling the loops through by using your crochet needle to make those holes. So what you're gon na do i'm creating a pattern, so i'm not putting the locks right on top of each other. I'M putting them in the in between of two locks that are already at the bottom. That way is not like bulked up right on top of each other right and then it's just all over the place, and then it just looks crazy. So i did create a little bit of a pattern here. Um i started off with four on the bottom and i'm going to end up with five going across here: try to space them out a bit because you don't want your wig to be bulky, so try to use a pattern. But sometimes i did honestly deviate away from the pattern, so it wouldn't look so bulky, so i've put in my first bit of locks at the bottom. This is the closure that i'm using and i'm going to go ahead and place that on my dome cap, just a little probably about a half inch to an inch over the dome cap just to create that space needed when you actually cut the dome cap from Underneath the closure, so i did bleach my knots on this closer and you can definitely tell i did do a little show, tease on my hand and i've started sewing that closure down. So what i'm gon na do is just continue sewing the side here. All right not really much to show. I was very quick with this because i'm sure you guys know how to sew down your wigs and if you don't, i do have a more thorough video on my um channel as well and i'll link it below alright. So i've gotten that closure sewn down, so i'm just going to continue adding in my locks and now what you see me here doing that i've added some more locks in is i'm actually parting out my closure and putting in the plaques. So i can start to connect the butterfly locks to the closure. Now i'm going to take my needle and right at the edge of the closure, i'm going to put a lock there, i'm not going to put them like immediately side by side, because i don't want it to be bulky. But i am going to create um a transition between the closure and the dome cap, so to speak. So that's what you see me doing here, all right just going to fill in the gap right there, but you're just going to continue this same pattern. Poke through the hole of the dome cap on both sides attach a crochet lock and pull it right on through loop. It up and make sure it's tight, fair enough and easy enough right. All right. So there's two ways to add the locks to the closure. You can either use the expressions hair that i had there as well as the freetress that you see here, fluffing out or you can just use the freetress and the crochet lock and wrap the freetress around that, which is the method that i'm gon na show you Here so i'm gon na attach the crochet lock by going underneath the flat and pushing the needle through adding the crochet lock through the loop of the needle close that flap and pull it through underneath the plait. Once you do that, you pull the lock through the loop and you make it tight around the braid, so you're going to take your free trash, hair and fluff it out. You want to make sure that you do it lightly, because you don't want to tangle the hair. That'S the last thing that we want just want to fluff it out and try to pull it apart from each other. Try to pull it apart at the ends. First and then make your way up to the middle. Now, after fluffing that out you're going to take your crochet needle underneath the plait again put the freetress hair around the loop of the needle and then pull it through the other side, then you're going to take the free trash hair while holding the plait and the Crochet at the same time and wrap that water wave hair around both the plait and the crochet lock now with the butterfly locks that i have it's more of a free hand, fluff fluffier lock. So when you're twisting that freetress hair around the lock, you want to make your loops, but you don't want to pull the freetress hair so tight around. You see how i push some of that hair back to kind of create more of a fluffier bump right there. So you're just going to continue that all the way down by making your loops with your thumb and go for doing that method throughout now, i'm going to show it again here and i am going to slow it down. I have um a in-depth, butterfly, lock, video and i'll link that down below um. So you guys can see it more in depth and a little bit slower so pulling that crochet needle through add your free trash hair through the loop of the needle and pull it through the other side of that flat. You want to hold the plait and the crochet and start looping your freetress hair around the plait and the crochet. Now, while you're pulling it around, you want to make your loops by pulling putting your thumb underneath the freetress hair and making a bump and pulling it around and going underneath so slowing it down here, pull it up with your two fingers or your thumb, pull it Around underneath make sure that pulled out part stays sticked out and continue to wrap around now to fluff it out. You can always loosen your grip with the free stress hair. Make sure you don't pull it too tight and you see how i just did it with my thumb. There pull it out around twist it around the lock, and then you have these beautiful, butterfly loops on the locks. Okay, thumb through loop. It around make sure it's still pulled out and you can just continue down now to disguise the hair, i'm going to wrap that uh plait around the loop of the crochet and then i'm going to loop, the freetress hair around into the bottom of that. And then i'm going to start to loop that freetress hair back up and then bring it back down to make it stick and stay without having to use any glue or a lighter okay loop up loop down and loop up again make it stick rub it in Between your hands, no glue, no lighter all right and we're just going to continue this on and, like i said guys, i do have a more in-depth video of how to make the butterfly lock to themselves, but for the purpose of this video it was more so Of how to make the wig and of course i still showed you how to do the the butterfly part of it, but i do have a more in depth video if you are interested, it will be linked below and i'll also have it uh trailed. On the end of this video, where you can just click on it to go, watch it as well so either way um that video will be linked below, for you guys, um, very easy, and that video was very popular with my audience um. So, thank you guys for coming back and watching again of how i made this wig um. We'Re just gon na continue on doing this method. Until you finish your closure honey and then you have a fabulous faux loc wig with your beautiful butterfly locks, and you can just slip that wig on honey and go to work when you got ta have bad hair day who got time who got time to flat On some hair who said that, but first of all do y'all see that closure over there. Looking like scalp, that's all i got to say so after you finish these steps, your wig will look like this. Isn'T she beautiful guys now don't forget to like comment, subscribe and share this video? This is your girl, j, slay and i'll, be back with another video bye.


Comments
J Slay: Hey all my Slay Babies!!! The SlayLife website is up & running! Go get your hair, bonnets, edge wraps and lashes at www.slaylifehairco.com Thank you for all your support!!
laurensimonee: This deserves way more views !!! Love it, thank you !!
Beatitude Bree: How do you prevent the cap from becoming too small from the reduced elasticity once you crochet the faux loc in?
Viva’s Glamm Life: Very good video I would’ve like to see the finish results if the actual wig you were making and possibly a install to make sure it’s not to bulgy
Destiny Sheftall: I can't believe people were charging $500 plus for this thanks for teaching me
Joshalane Myree: Nice technique! Love
TheRealVivia: Girl thank you so much.
Beatrice Thomas: Awesome!!
Curly 4 Life: Do you have a video of this being installed?
sonja marie: You used 10 12 14 inches and its that long?
Lyntia Dawson: How many packs