How To: Make A Lace Closure Wig On A Sewing Machine, Measure Ventilated Wig Cap, Curls, Layers! 2021
- Posted on 27 October, 2021
- Closure Wig
- By Anonymous
How to make a super flat 6x6 22 inch lace closure wig on a sewing machine like a pro in 2021. Step By Step, very beginner friendly, detailed tutorial, from start to finish. Ventilated wig caps, raw Indian hair, Singer sewing machine. How to mark your ventilated wig cap. How to flat iron a 22 inch raw Indian curly human hair wig.
______________________________
IMPORTANT LINKS!
Website - https://qbwigcollections.com/ (Purchase Your Wigs & Luxury Hair Extensions Here!)
Social Media Links - https://beacons.ai/qbwigcollections (Follow Me On IG Here!)
MyStore - https://www.amazon.com/shop/qbwigcolle... (Shop Everything I Used In This Video!)
Email - [email protected] (Business Inquiries, Custom Hair/Wig Orders)
______________________________
#HowToMakeAWig #howtomakeawigonasewingmachine #WigMaking
keywords: wig, wigs, sewing machine, singer, tutorial, step by step, very detailed, beginner friendly, how to, how to make a wig, lace closure, how to make a wig on a sewing machine, like a pro, for beginners, lace frontal, quick weave, hand sewn, sewing machine, method, ventilated wig cap, marking wig cap, styling, wig business, raw hair, raw indian hair, raw indan curly, flat iron wig, by hand, diy, custom wig, how to make a wig with a sewing machine #YouTubeBlack
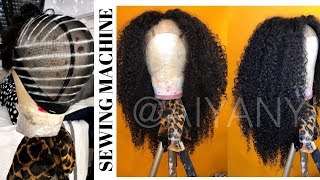
Hey guys welcome back to my channel, so we are going to make a wig today all right bear with me. I got ta. Take you guys kind of step by step as much as i could show you on how i'm going to be making this wig. So, first things: first, what hair am i going to use? Of course i am going to be using raw indian hair from my website. I have two bundles of 22 inches and one bundle of 20 inches and i am going to get this wig together. So let's get the cap size that we're going to use. We already got our canvas block head and we can get started. Okay, you guys, so i have two different wig caps here i have the wig caps with the adjustable straps all right and i have the ventilated, dome, wig caps as well, no adjustable strap, but it does have stretchable elastic all the way around. So this is the cap that i'm going to be using. You can purchase both styles of caps from my website, but this is the one that i'm going to be using for this lace: closure wig today, all right. So first things. First, i have a medium size. Dome cap and i have a medium-sized canvas head size 22 that i'm going to be using today. So i'm going to put this wig cap on here, and this is just going to be a ready-to-ship wig. So i am not making any adjustments to this wig cap on here today. I am just going to line her up pull her down properly. I have my t-pins already ready. So then i can pin my lace. Closure lace, frontal whatever i have down, and so that's pretty much it let's go ahead and get the closure and get started. So the first thing that i do is take my closure that i have. This is actually a six by six wavy raw indian closure. So i am going to take this closure that i have and i'm going to pin it to the top of this head. Let me move my camera, so you guys can see a little better all right. So i have the head. I mean the wig cap on there laid flat, so i am going to be using my 6x6 lace closure, very, very big, as you can see, and the first thing i'm gon na do is place it in the front of the hairline. Slightly, i mean like one centimeter in front of the hairline okay, you guys so i line it up in the middle of the closure. Pull her down place it right in front of the hairline and then i'm gon na place that first pin right there. Second, pin i'm gon na place, i'm gon na stretch this. Let me move this hair, so you guys can see. I am going to stretch this cap. I mean the lace all the way back as far as it can go, pull it a little taut, because you don't want any bumps in your lace, and that is where my back pin is gon na go now. What i do is go back to the front and i will pin down my right and left side pulling it, so it lays flush to the head, and now i can draw an outline. Actually, i'm gon na put two more pins in here. Okay, so i am going to take this back corner here and i'm going to pull it a little taut and pin it right there right there. So then, now all of this lays flat against the cap and i'm going to do the exact same thing to the other side. Take it pin it back so then everything is flat. Now i am going to outline where the cap goes so all right. So the cap is outlined now i can go ahead and take off the closure and do the lines that i need for my bundles okay, so i unpinned my closure and i'm just going to leave it hanging right here. Keep it out of the way - and i am actually going to make these white lines right here, a little bit darker. So then i can see it when i'm sewing and then you can also see it in the camera. So that's where the black lines right here, where my closure came to six by six all right now, when doing my outline - and i have another video on my channel on how i kind of do it - i've been making wigs for a long time. So i kind of know how far apart i like my tracks to be but, like i said it's just a guideline when you're making your tracks, you can always adjust it a little bit as you go. It'S just a guideline. So my first track. Well, i should say my second track because i do put my first track on the band, but my first track can go. My first line can go here, and so we all can see. I'M gon na use the white marker on the black part of the cap and i kind of tilt this one going down because i want it to curve with the head when i am doing my lines, so i am going to make them pretty much all evenly Apart going up the entire head, now you can set what you want your tracks to be whether you want them doubled from here down and single from here up or if you want to make your tracks doubled all the way through, depending on how much hair you Have to sew into the wig, so i'm just gon na continue these lines. Okay, this one is probably going to go right on the edge of the closure same with that one, and i am just going to continue with these lines all the way through and i am going to continue with the white, so you guys can see it alright. So i'll go ahead and come back once i'm done with all these lines, all right, so my lines are completely drawn all over my wig cap now i can take my wig cap off of here and get started with adding my hair, which are these two bundles Of 22 that i have here, i am actually going to double my wefts, so i'm gon na put these two bundles together before i put them on the track. So let's get started with that. Okay, so hopefully the camera angle is good enough for you guys to see i'm at a weird angle, but i wanted you guys to kind of see what i was doing. So i have my machine threaded and ready to go and i am going to be doubling these tracks here using a zigzag stitch, so i'm gon na put this down and then go ahead and get started. I'M gon na completely double stitch or um double my both of my 22 inch bundles together and then i'm going to double and single stitch. My 20 inch bundle to the wig cap so first, let's double these wefts, so foreign all right, so we're on this. Last little part and we're just gon na finish up, there was more of one track than the other, but that's fine. We'Re still gon na use that so now we can start stitching it onto the cap. Okay. So this is the very bottom of my cap and i am going to put a track on the elastic band from the bottom of this track to the bottom of the other side of that track right there, and that is where my first track is actually going To go alright, so i just take the cap and the left i put it there. I am going to change out of my double stitch to a single stitch and get started so so all right, so i just cut off the excess stream, and my first track is on to my wig cap here. Sorry guys, i'm at a weird angle, so i can't really see what you guys are seeing right now, but that's what it looks like now that that first track is on at the bottom. I am going to follow the guidelines that we made and continue stitching these tracks onto the wig. So i'm not going to really talk through this part, i'm just gon na, let it roll - and hopefully you guys can see what you need to see and how i make my wigs at qb wig collections, so okay, so i have done at least six tracks on This wig here and you can see what it looks like from the inside. All of my tracks are sewn in there nice and neat straight lines following my guideline with the curves, so you can also um if you don't want to mess up or anything like that, you can keep checking to make sure that your wig is laying flat to The dome head, which mine definitely is you, can check every track as you go or you can just follow. The guidelines make sure the tracks are really flat. Really tight really neat onto your head here and you know complete your wig all the way to the top and then sew on your lace closure. Whichever works for you, i normally will put it on the wig head and maybe check it every four to five tracks that i do um. If i'm feeling uncomfortable at all always check every single track sew a track on the sewing machine. Put it back on the head, make sure it's flat make sure it's a neat, make sure it lays right and flat. So let me continue, and i will finish up this 22 inches i'll, show you how high it goes on the head doubled and then we can start on the 20.. All right, you guys, so i have completed the whole 22 inch bundle. Let me just put that on there all right, so you just make sure it is completely flat all the way around the head. So i have a way bigger closure here. So now i am going to put my 20 inch bundles very close together. I am gon na double the weft on my 20 inches and i am going to place the doubled wefts very close to each other. So what i'll probably do, because i'm very close to this closure, i'm probably going to put a doubled weft here - doubled weft. Here a double weft here and then i'm going to do single two single wefts when i get very very close to the top, where the closure is supposed to go so i'll, go ahead and finish that and then come back when that's done all right. So now that i have finished my tracks before i add my very last track, i will sew my lace clip. I mean yeah, i'm going to sew my lace closure on here, so i'm going to line it up right where i had it before. Pin it down in the front, pin it down in the back all of your lines and stuff should measure up exactly where you need the pins. So obviously right here is where my last track is going to be. So let me put my other pins in all right, so i'm going to sew this down with my thread and needle and then i am going to go in and machine sew my lash track onto this wig. Okay. So because i have to go in with my thread and needle for this part, sorry guys, i'm at my suite. So everybody is super loud walking up and down the hallways. But i am gon na go in with my threaded needle for this part and i'm actually going to take it all the way through. But i'm not going to sew through the plastic. I'M just gon na sew through the closure and then when i go in and i sew my track, i'm gon na make sure that the track is right on the closure and the cap. So then it kind of seals, the end of the wig and it becomes seamless so these little black parts here i am sewing into so i'm just going to continue this all the way around this closure making sure i sew nice and tight close together. So i'm going to continue this and do the other side as well, and then i am going to do my last track of this wig and i will show you guys the finished product. Okay, you guys. So hopefully you guys can see this okay, but i'm going to sew my very last track onto this wig and i'm going to actually use a zigzag stitch. For this reason being i want to stitch the track and the lace together at the very last track. Okay, so here is i'm gon na go from the very edge and i'm going to sew this onto the lace right on the very edge. So let me put this on there line up the weft. Sorry, if i keep hitting the tripod trying to just get this lace and the track lined up nicely all right, so i'm gon na go forward and backward and finish off the beginning and the end of this track go forward backwards again to seal off the edges. You don't want these tracks loosing it loosening up at all. Now i will continue follow through make sure none of this hair is getting stuck in here. Sorry, you guys, if you can't see okay so because the track comes very, very close to the other one. I'M gon na show you what i'm talking about. I'M gon na cut the track here. All this hair is getting caught all right so because this track comes very close to this one and i don't like any lumps or bumps or anything in my wig. I am actually going to finish this track right here and i'm going to continue it on the back side right here. Okay, so let me finish this off. Let me show you guys the double. Let me take these hairs out. I got caught. This is how the double stitching looks all right, so this it's how it's gon na look when i go all the way around to seal in the closure and the last track together all right. So this is how the final track, as you can see, it's right here lines up exactly with the lace. Now i'm gon na put this onto the head right here. It looks, oh so crazy, right now, but it won't in a minute. So if i lift that up, you can see the tracks where it lines up. Sorry, if it wasn't focused you guys, you can see the tracks where it lines up with the lace sealing in the very last bit of the hair that i had left now. I am going to take off i've done this several times on my channel as well. I am going to remove the plastic and remove this netting. That is underneath the closure and that's pretty much it. We are going to be finished, making this wig so i'll. Show you guys what i end up doing with this wig. This is two bundles of 22 inches, a bundle of 20 inches and a 20 inch long lace, closure, so i'll show some video and some pictures of what it looks like styled and ready to go. Seeing as i haven't bleached the knots or anything on this lace. Yet so, let's get into that okay, so this is what the wig looks like in its natural state. I believe it's the knots and i am just going to go in and cut the hair a little bit. I just wanted a little bit of layers in the front. I wanted to create some bangs and i just wanted the hair to flow naturally from side parts and middle part, and things like that. So it is a 6x6 lace, closure wig, so i can part it in the middle and i can part it on either side and it looks very natural and flat. So i'm gon na comb out these curls that i did with the t3 curling iron and set her up. I am going to have to make 6x6 lace closures my standard size for lace, closure wigs. I love the versatility of this wig so so much and it is just absolutely amazing, so this wig is currently on my website. If it's not, you can definitely custom order her and i thank you guys so much for watching this video. Please leave your comments below you.
Comments
Tanya Wallace: You delivered......Great job. Extremely neat.....I love it.
NeekTheSupreme: This video was right on time. I love using these caps I was just nervous about using a larger closure.
TWS BABY: Loved it ! Really want to try these wig caps, but was wondering if closure & frontal replacement on these type of wig caps are any different to like the mesh dome caps etc
Carol Hancock: Amazing
J. Dollhousehairextensions: Got my subscription, I also look forward to doing wholesale with you love ❤️
LaShae Pharram: Can you tell us what settings you have your sewing machine on?
Princess Naomi: Do you take clients head size to make their wig & if so how do you do it ?
BIG CHRIS SKITS: