2 Closures 1 Wig Tutorial (Highly Requested) Ft Etoile Hair
- Posted on 24 January, 2017
- Closure Wig
- By Anonymous
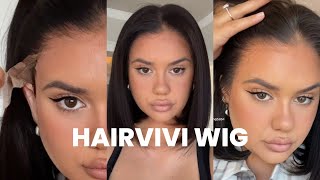
I am wearing the "Glam Collection" My lengths are 14' closure and 4 bundles of 20 22 24 24! Hair is super thick so you'll only need 3!
Love this hair!!!
HAIR STORE LINK : WWW.ETOILEBLUE.COM
IG: ETOILEBLUEHAIR
COUPON CODE: SOPHIACARES
Follow me on Social Media
Snapchat: Sophiaschoicee
Twitter: SOPHIOLOGY
Instagram: Sophiaschoicee
Comment down below if you are in favor of the RELATIONSHIP PANEL
She has a middle part, a top bun, a side part a top bun part two. How is she able to do all this? Okay, let me stop playing with you guys. If you are watching this video. That means you have two closures. You don't got time for a frontal and you are trying to display and your girl is ready to spill the tea. So with this method, I am able to wear the hair anyhow. I want style it anyhow. I please and also slay those fake edges that everybody seems to love to wear, so I'm not the best teacher, but I hope the video helps and I'll see you guys in the next clip. If you have questions just comment down below Romans, 1214 bless those who persecute you don't curse them, pray that God will bless them so before getting started. You'Ll need a brush in a bowl, bleach and developer scissors needles, pins and your wig cap. I use this wig cap, the dome style wig cap spandex - and this is my mannequin - don't make fun of her. She has been through a lot, I mean honestly and you will need this table stands it's optional to helps me anyway. We'Re going to start off by bleaching the closures which is so vital when it comes to making my wigs I'm going to pour the entire contents of the powder packet and I'm going to go measure by measure with a developer. I'M trying to achieve a consistency. That is so thick how thick is just like bigger than me, I'm just playing I'm a joke. Anyway, I'm going to make a consistency. That'S so thick that when you pick up the brush, it will be very difficult to like. Have the liquid fall off the brush. Like you can literally stick the brush in there and it will stay, I'm not discussing T. So when it comes to bleaching my closures, I hate when people's edges are highlighted or they let it leak through at the front part. So what you want to do is pull all the hair back and make sure there's no hair on the lace part so that when you bleach it it doesn't get on those front hairs or like leak through now, even though the mixture is thick, it doesn't stop. It from bleeding through you, want to gently, spread it like butter on toast, like peanut butter. All braided, like I, don't know, frosting on a cup of 13 minutes later I tried it should look like this excuse me, and it should look like this. Where the bleach do not, we see what did not go through and it looks like scalp when you wash it out with some conditioner to get rid of the orange tones. I'M going to take my shimmer light shampoo and scrub it into the lace and make sure it penetrates through, so that the roots can turn purple and it can cancel out all of that yellow dust. So right here, I'm just parting the hair. The best way that I can so that when I cut it right down the middle, yes, you are going to cut your lace, closure right down the middle, just one of them just one of them. Okay - and you want to choose the one that you don't favor that much, but I'm going to cut my least-favorite closure in half and the goal is to sew it on the wig like this. As you can see, it's about 9 inches long, so uh taking the cap, I'm going to cut the lace off of the middle part that is not cut in half and I'm going to pin it like so so it can help me know what directions are. So in now we're not going to sit on the sides, we're only going to sew down the back part. Okay, so right here, I'm just putting the needle through normal sewing method. Nothing special about me! I'M just going down the back part! Now you're going to be tempted to keep sewing, but don't take those scissors cut that thread and stop right dead. Anyway, when you get to this point, the sides should still be open. The back should be sewn down you're, going to take one half of the closure with the lace part forward and you're going to take pins and pin it so that it overlaps quite a bit like a tiny little bit and that it can be in place. So when you're sewing, it will be easy to sew down so now, you're going to sew down the side of the piece you just added, I sew pretty close together, so I recommend that you do the same and you're going to sew all the way down to The front of the cap, so now I'm going to show those two pieces together when you're sewing. Please be careful, do not penetrate the needle through the cap. You want to only sew the two closures together, so you have to be very careful kind of like a surgeon who do not sew through the cap at all, because then we'll be stuck to the cap and in your doom and you have a black spot through Your closures will be a hot mess and you'll have a bad day and the world will fall apart. So with all that being said, do not sew through the cap just sew through the closure. So now I'm just going to do the same thing to the other side, I'm going to take the other half of the closure that I cut and sew it to the other side, same exact thing. I did last time. You'Ll know you did it correctly when you have this stupid smiley face on your wig cap. So once you look like this, when you know you've done it correctly now, I'm just showing the closures together. Please remember you can see it much better right here. I'M not sewing this down to the cap at all. The cap is only there for moral support. You really just want to click connect. Sorry, the lace. I don't know why I forgot to say this at the beginning: I'm so sorry, but this is very vital and important. You want to go and buy a flesh, toned, nude, skin colored thread from like Hobby Lobby or the fabric store, because you will need it for the front of this hair see the part that I'm cutting off. If you sew all the way to the front with black, you will be able to see it when you wear the wig. So when you get to the front, you want to leave it available to sew with nude color thread so that it won't be detectable. When you wear the wig ok, so when you find yourself almost finishing at the top of the tracks, you want to get rid of a smiley area and it's not hard at all. When you sew down that last straight-across track, you want to just leave it alone, and I will show you shortly how to solve that little pickup. So now you want a single track it. I know I'm double tracking it, but it came out really thick and I changed it later, single track it and literally just sew across the smile. You don't want the hair to be thicker than the consistency of the frontal and or density. I should say so. Look at all the equal and flow seamlessly, as you can see, that is all closed up all covered up and all ready to style. So when you're done your inside should look something like the Bride of Frankenstein and your outside should look like. Please pluck me is written all over it. Lol see that was not so hard. The hair I'm using is from a black owned business, called atole or e tool or toil girl. I don't know, but it came in this really really cute pull out blue box and the hair came labeled with the inches on it and a nice pretty. Thank you note. The hair is organic raw, Indian hair, so it can be a little. Frizzy requires a lot of maintenance, but I love it. This is not the hair right here. I haven't gotten a chance to wear the hair, but I'm positive that you can pull off any method or hairstyle with this sewing method. So I hope you liked the video. I hope it was helpful and I'll see you guys soon. Bye,


Comments
Tesha Jorden: I love that you put Bible versus into your videos. Thanks for sharing❤
chinenye Anyadi: I mean black women soooo damn talented I mean who would have thought of something like this. Well done girl and thanks for showing us
L R: I tried this method on my wig today & it came out perfectly I literally love it! It was easy & didn't take too long! Looks so good! Much easier for me than a frontal & bigger than a closure! My shit looks good af thank you so much for sharing this method!
Bola Ogunbayode: I don't know but there's something so special about how you explain, talk and how you seamlessly throw random jokes.
Shay_dudu: I legit just finish a wig with ur idea. I couldn't wait and I just tried it out. It came out nice. Next time I will use a closure wit a middle part to cut it evenly in half. The wig I just made was pretty much inspired by you!! I wish I could attach a pic.
Ms. Saint-Louis: Giiiiirl you just killed the game and upgraded it !! Im so doing this method.
Keke1980s: Never seen this technique & I luv it! ...Etolie hair is EVERYTHING! I brought me some New Years & the hair doesn't tangle, nor shed, is full from top to tip, healthy! It's real human hair ❤️
Karys Campbell: This video was really good. It gave a good idea for improvising for those who can’t afford or for some reason are unable to get a frontal. It was also very detailed and amazing. Keep up the good work ☺️
Keanah Marie: you: *drops bible verse* me: *subscribes* God Bless you my sister <3 and THANK YOU FOR THIS VIDEO!!! I read the title and said " no..... way." I literally always had this theory, just never thought it would work lol thank you !
Lisa Li: this explains it so easily for me! I'm no longer anxious about making a lace frontal wig. thanks.
Audrēauna: Looking forward to seeing how many people start using this method! Amazing❤️
Lillyen Cabral: Love the hair!!!! Also, my favorite outfit is the white blouse, ripped jeans and heels! STAY SERVING LOOKS GIRL IM SUBSRIBING!!!!! <3
Kaleah Bee: YOU'RE DEFINITELY THE FIRST TO DO THIS !!!
Kawanna Hardy: GUUUURRRLL!! This is a Great idea!! You're so right, I don't have time for that frontal life and this gives as much flexibility in styling.
Tay Young: Beautiful wig, the last two outfits were my favorite looks.
Jada Pearl: You did a great job girl. Really helped me get a better understanding. Thank you! Great video
Niyah Sade: Being a long time subscriber and rewatching this more than a year later, I can honestly say you have grown so much! Keep it up!
FJ: When my thoughts come to life & it actually is possible !! This is lit
Gina S: You are an absolute genius girl!!! Great video thank you!!
NiykoleJayye: I just found your channel because I want to start making my own wigs and I just adore you! You’re all I need
Nece Gomez: Genius! Ain't nothing like recycling
wryanshope: God I needed this tutorial! Thanks, I appreciate you! Xoxoxo
TashaiKelisa: girllll! im about to try this out cause i like really full hair and sometimes with a frontal you can't add as much bundles in the back cause it will look weird and inconsistent to the frontal esp on the sides !
REALKASHYNIC: You are a genuine genius! This is super helpful for someone who aint got the time ot money to buy a frontal!
Moor Gigi: This is legit genius. On God...I was thinking how can I use two closures. I did not think this way, but my God this is genius. I’m going to tag you when I recreate this! ♥️♥️♥️
Brandi Blackman: Hey Sophia! I love this method! Could you do a video on how you switch between the different styles/partings with this wig method? I'd really appreciate it! I just got my two closures and am about to make my wig now
Raw Hair Wholesaler: So very helpful! Thanks girl you did that nobody what people say
Q P: Absolutely in love with your personality ❤️
Dajsa Magee: So thankful for this tutorial girl.I will try this
peiter1978: Very helpful. I am going to try this. Thank you for this love it
Latoya Andrews: Beautifully done!
Libra Queen: Girl I almost died when u cut that closure lol but this come out so beautiful
kirdora Kirton: The best idea ever. I haven't made a wig yet but this is a great help. Thanks love
Melissa Lewis: Omg!!!!!! Yesssss I'm so doing this!!!! And I have a closure with a hole down the middle that I couldn't figure out how to fix!!!! Yes!!!!! Thank you!!!!!
precious miles: this is perfect i have been wanting to try a lace front but im a silk base closure girl. Definetly trying this with silk base closures.
Best Friend House Party!!!!: Thank u sweetie for this versatile method. I was thinking about buying a wig with this parting but hell I could make this. Thanks 4 helping me save my money!
Royal Ray: I love this method thanks for sharing love!
Jasmine Airel: I needed this video a day ago before I made my wig . But I'm so glad you made this video
Hattie Colley: I adore the Blue Sweater, and Taupe Thigh High Boots. Fabulous!
BB fashions: I love this handwork. Very useful for meeeeee. Thanks sis
Avianca G: Love your video. Great idea to use two closures. Sometimes the frontals are too big and I cut a lot of it off .
Breanna Nunn: Still watching in 2020 love you!! Thanks for all the tips and tricks. I pray God continue to bless anything you touch!
Bionka Deyon: This is literally genius. like so genius!!! You did this
559kelkel: I've been wanting to do this forever but I've never taken the time to sit and think it out....Kudos to you... I think I am going to just connect the closures side-by-side....anyhoo I will tag you on IG
Sheree-Jae Redwood: This was so helpful, many thanks
Dajsa Magee: Ok girl you blew me away with this one!
Sophiology: HERE ARE THE PURPOSES AS TO WHY YOU WOULD GO THROUGH THE PROCESS OF DOING THIS METHOD 1) You have an old closure lying around and cannot afford to buy a new frontal. 2) You want a versatile look but hate the way a frontal looks. 3) You have a hard time making a frontal wig and you find this easier to do.
LeleGLAMXO: Loved this video! Please come back with the unit styled!! I love this concept!
Ashley Glasper: This is amazing because the hair I love doesn't offer frontals. Only lace closures. I see ppl saying wouldn't a frontal be easier. Yes, but that's not always an option!
S La'quana: Love love your tutorials. Outfit #3 & the last 3 outfits are my favorite. But love all the outfits honestly
Just Nathalie: Digging your personality, creativity, and work!!
Ashlee LaNae: genius idea queen!! I'm going to try it and let you know how it goes. Lol
dear D4R1lyn,: all the outfits were so bomb
LASH TECH NIQUE: had to subscribe just off of one vid your personality is just impeccable & ur energy is refreshing. best wishes Queen <3
Lindsey and Kaylinn Miller: definitely love this,, you have to do another one
alexisanyway: I’m extremely late! But I’ve never heard of this before and I loveee it. Thanks girl!
Falling into an inescapable kpop hole: I wish someone could do this for me because I know I definitely can't do this myself ♀️
Cutipop Lerez: This is different and I love it!
marquita83: yess this was beautiful i have never seen this before thank you soo much for sharing!! :) new subbie!
Ashley Huiswoud: this is so coooooool ! im doing this xoxo
NurseKae: Why is this exactly what I was looking for ❤️
Ashley Victoria: sis you smart. I've been thinking of something like this lol and you've brought it to light
K'allDay: Beautiful Lady, beautiful spirit. you did an awesome job! God bless.
lovelybetch1996: You are just so awesome for this !!!
helloandreamae: Yesssss i have 2 old closures perfect for this!
Kristina Powell-Evora: Trying this method tonight. So excited!
LADDIE SYMONE: girl you did that I'm here for it lol
Maya R.💕 Executive Tresses: You are so creative!! Keep it up!
Destony Bell: I love it!!!! Thanks so much
Sweet Tessie: I done this method and I love it
Hannah Brown: You are so adorable!!! I really like your videos and you're naturally funny!
Dani: Just so you know...I was laughing my ass off at the commentary xD The wig came out bomb <3
JeanDeLuxe: Love this
Deja Jackson: You are literally my favorite YouTuber I love all your content just everything
Goddess Pocohontas: Love it can't wait to try! Can you please show us how to pluck and style baby hairs with the two closures, I need that before I can try this Also I realized you used black thread when attaching the half closures on the sides. Do you recommend everyone else to use the skin tone thread because we may not know how to blend?
Lauren Baxter: Love love love your channel and tutorials. You give us every single step and every product. So when you cut the elastic part off of your dome cap do you lose elasticity to your wig? Do you sew in combs to keep it from sliding?
neesha1575: Genius!! I will def be trying this because I had a frontal and nobody ain't got time to be gluing a frontal down all the time I will stick with my closures
stacy longwebb: Such a Kool idea....! I love watching videos that r different than the rest...!❤️
Iyanu Bank-Olemoh: hunny you got a follower just for that bible scripture in the beginning excluding the slay u just did in this video.
Myra G. Love: Great job,Very Beautiful!! Thank you and God Bless!!
A'Nyeshia Taylor: Super glad you made this video cause I have an old closure that I don't like as much as my new one, but dont want to just throw it away thank you❤
Rocquii Racquel: Interesting method!! Good job
Niece: Please do a tutorial on how you style your hair!
Handie Br: Genius!!! Will do this but with 2 silk based closures.
Lampkin girl: I just love the relaxing vibe of your channel ♥️
Patinoo: I love your channel so much girl ❤
IndigoStarrSeed: Ive done this before about a year ago but not with sewing. I used fabric glue and layered the cut closure pieces on both of the sides of the closure so it was a bit more seamless. However, after a while (bout 9 months) from the washing it did start to come apart. Sewing wouldve been smarter but I didnt think just to sew the closure pieces together and not sew through the cap.
kayla lipstick junky: This is a really good idea.. you did great
penjedo: pleeeease do a tutorial on that braid hairstyle ✨
Toni Marie: great technique, I was wondering if it was possible to sew to closures together to make a wig. great video
Sherika Kaay: This is very creative
Urban Era: Couldn’t pick a favorite outfit ♀️ they were all bomb
Atalaya Wise: 1st, 2nd, 3rd or LAST YOU DID THIS WITH CLASS. I LOVE MY PEOPLE WE ARE SO TALENTED AND CREATIVE. (LET'S work on being, kinder, more respectful, less critical.) LET'S uplift each other...The fact that this QUEEN has shared her skills and talent with us (trial or fail) is courageous. (her action helps us learn, critique, execute, and Prevail on a higher scale) For that alone hit the LIKE BUTTON! THANK YOU SOPhIOLOGY! YOU ABSOLUTELY EXECUTED/PREVAILED.... I APPRECIATE YOU QUEEN!! BLQUE LOVE MATTERS!
Atalaya Wise: 1st, 2nd, 3rd or LAST YOU DID THIS WITH CLASS. I LOVE MY PEOPLE WE ARE SO TALENTED AND CREATIVE. (LET'S work on being, kinder, more respectful, less critical.) LET'S uplift each other...The fact that this QUEEN has shared her skills and talent with us (trial or fail) is courageous. (her action helps us learn, critique, execute, and Prevail on a higher scale) For that alone hit the LIKE BUTTON! THANK YOU SOPhIOLOGY! YOU ABSOLUTELY EXECUTED/PREVAILED.... I APPRECIATE YOU QUEEN! BLQUE LOVE MATTERS!
Jazzmine Leigh: Thanks for the explanation of doing this. I was thinking "why wouldn't u just get a frontal and do this?" But I get it now. Nice job.
LEE & Q: Notification gang . You're literally my favourite youtuber! You're so unique and your energy is amazing . You should upload more often ❤
DonNaReD2269: The finished product looked amazing! But I have zero patience for this. I would definitely pay for one tho. Can you do a video showing how you put it on and style it?
Maria Chantae: Girl when you cut the closure and placed them pieces on the outside I was like "Thank you Jesus" I thought I was going mad thinking about putting closures across the front instead of a frontal. Money saved.
Tasha sweetapple: Thanks for teaching me a new way to start a wig? Great idea
Nicole Simmons: I just bought a 7x7 closure from Osolovely hair. I think it's less time consuming than this.