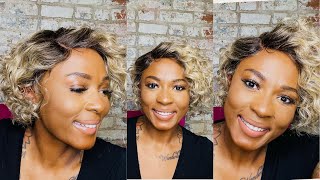
Closure Sew In W/ Frontal Illusion Tutorial
- Posted on 10 December, 2020
- Closure Wig
- By Anonymous
Instagram: @stylesbynaya
TikTok: @nayareine
Hi everyone welcome back to my youtube channel. Thank you all for tuning in to this video. This here will be a closure sew in tutorial, with a little twist of a frontal illusion. So, to start off, i must stress that you all braid down a flat foundation for your clients. Here now my client. She is getting a middle part, so i'm going to braid her base down half and half. I make the braids pretty small because she is getting so in. I want the braids to be tight and neat so when i sew the thread to the tracks and everything that everything stays secure and nothing will be pulling or getting loose anytime soon. I think i had about nine to ten braids on each side. I'M not pretty sure i wasn't counting the braids as i parted, but i was just making sure i could fit as much as i can that i knew i could and i wasn't braiding hairs to height. I just didn't want to make pull it too much, because i was going to be getting pulled with the tracks, but you still want to make sure everything is secure and in place. This is everyone's favorite part of the install i'm going to go in with some wild growth, hair oil and massage her scalp with the oil, because this will be a style that lasts for up to three to four weeks. If she would like - and you just don't want any inching or pulling so now go in with a gotcha beef gel or you can do sprays, anything that works for your client's edges and i basically brush it back and i blow dry it in to make sure All of her edges are slicked back and won't be in the way of the install. Now i go in with a new cap or i don't know sugar cap or whatever, and i go in with my boho glue and i outline her hair or where the closure would be at and i smear everything in and make sure it will dry. Now i usually just forgot to be freeze spray, but it's starting to i'm getting reviews like or seeing that it has alcohol in it and break people out. And i don't want that to be harming my cleanse, especially because this is the hairline and that's the most sensitive part of the hair. I should rather say so: i'm just going to do the glue until i find something that could subsidize that and if you have any suggestions, just put in a comment below and let me know so, then i'm going in with a makeup. That'S close to her skin complexion and i make sure it's her tones if you have to mix in different concealers or foundations or whatever you want to make sure you're, just mixing it in and make sure it matches your client's skin tone. So after that, i'm going to sew down the cap because after i sew this down, i'm going to cut the excess cap off because we do not need it, especially since we're doing a sewing. You don't want that on the hair, because once it comes down to your client wanting to scratch their scalp, you don't want them to be irritated. You want them to have easy access. I go in with alcohol pad and i wipe off all that makeup and oils and everything else so that the glue can apply correctly. I go in with i put apply two to three layers or for it. If you want it to last longer - and i make sure each layer is dry before you add on a second layer so as the last layer is dry, i'm going in with my hot comb and i'm straightening and sticking out the lace so that everything can lay And be more manageable! Now you don't have to rush this step. You place the lace on top in the area where you feel that it will be take your time on this. Do not move fast. Take your time make sure everything is in place and laying down flat and smooth. Once i do that everything is in place, i go in with the hot comb and i make sure everything is melting down and to give it that extra milk i go in with the elastic bin, and i tie it down and make sure everything is melting down. While i sew down the closure, so once we're done sewing down the closure, i'm still letting the lace smell, i'm going to go in and start sewing in her bundles. So she had four bundles and i was able to fit all of them in successfully because she likes thick hair. So you will see at the end she had body wave hair. She had just washed the bundles or whatever. So it's still a little wet and by the way it tends to look well tends to be more thicker, and it is so you want fuller, look, you could get body wave or straight hair still would do but, like i said she had four bundles and everything Went in perfectly, as you can see, and now i'm just taking off the elastic band. Oh look at the milk. Everything is melted and if you have any lace that is left over go ahead and take that off because she did have a used lace, it wasn't a new lace, so i'm making sure i'm taking all of that off. I'M going in with heat protectant and my high silk infusion oil or mist - i don't know and i'm putting it on my client's hair, especially up there at the lace part, because that's what i'm going to need to be slick, i'm going in with the hot comb. Again and i'm slicking all of that down, you see how flat the hair is getting without putting any other product on her hair. Now this part, oh my god, i don't like doing baby hairs with with foam like it never works. I always do it with the gossipy gel it works. For me, it's perfect like this took forever and then that last swoop i just decided to do it with the gossip gel. But overall it came out cute. She liked it. I loved it. So that's all that matters, but i'm going to try so hard and figure out a way to manipulate that process. So, like i said her hair was wet before so i'm going in and i'm blow drying her hair, making sure everything is dry. Before i begin to flat iron because you don't want to flat on on top of well that's just a big mess, a big fool and towards the end of this video, my phone, it stopped recording because it had no storage, that's what it claimed. So i'm so sorry that you all didn't get to see the most important step, but what i am going to tell you is that i am going to link down the product i use i use so at the top of her lace to get it flat. I used a wax stick um, i forgot the name of it, but i'm going to link it down below, so you all can get it and i have a spritz of my favorite kind. It'S called estations, it's green and i spray that on just to lay down her lace and get everything flat. I'M basically telling you all the steps i went through to get the lace part the closure part flat, because my video cut off and i couldn't get the rest. I could only get the end product. I was so upset because that was the part that you all needed, but don't worry, don't fret. I will do a video within two weeks and give you a tutorial, even though i already have videos where i showed you how i get it flat. But this is an updated version, so i will be giving you updated version soon, so being a lookout for that, i'm being consistent now with the videos, so i'm so sorry for being consistent. Guys, life has just been a lot, i'm almost at 600. Subscribers last time i checked so we're like about 400 subscribers away from 1 000. So please, please, please get the word out and share the video um. I also blew up on tick tock y'all, so i have like 16 000 followers on there. I'M gon na link that down below too, but this is the end result. I'M definitely gon na have to do a video on it. So you all can see how i got that top part flat like i'm upset, but it really was just the wax. Stick. The hot comb and my spritz cauli sessions that got the job done and that's all that you really need to get everything done and then i went in with the makeup and i didn't black spray to define her part. Oh i'm so mad. I didn't get this on camera, but look how everything is just in place and melted, and i absolutely love this like a lot so i'll have more videos coming out soon. I hope you all enjoyed this for the most part. You know how to apply everything, so i guess i can help you out with that, i'm so sorry, but also tune into my instagram, because i will be doing more things on there and being more active, i'm going to leave down my tick tock below. So you all can kind of be on there, because i tend to post tutorials on air too now so i'm everywhere i may not be on here, live, but i'm definitely everywhere. I'M i am working. I am doing what i supposed to do for you all. So once again, thank you all for tuning into this video, please, like comment subscribe and stay tuned for many more videos. Thank you.


Comments
Shadezia Lewis-Nelson: I followed this step by step and my installs on my clients have been flawless!
Chris & Jas: You did a great job
Animated Covers: Amazing video
Zyn TyQuia: How long do people usually leave this in specifically a closure frontal illusion? Cause I never had one I usually get braids so if this doesn’t last I mindswell get braids
Tianna Coleman: How long does this usually take ?
Kny: Yassss bomb af
It’s Niyaa: Is the closure 4x4?
SHARYHA b:
itsRiley: Hey, does this hairstyle make your hair fall out
Itsss.Zee_and_Tee: What’s that flat iron name
Malayasia Paige: link to hair ?
nylaa: if you don’t mind me asking where are you located??
jack favvv02: I don't get you can't just straighten your hair instead of going though all that trouble.
Zena Clark: Are you in Chicago?
Gabriella Kennedy: Where are you located