My First 5X5 Closure Wig Install | Beauty Forever Hair
- Posted on 24 November, 2021
- Closure Wig
- By Anonymous
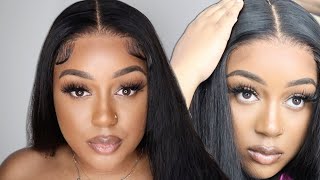
my first 5x5 closure wig install! using beauty forever hair and i cant believe how natural this install looks. this 5x5 closure wig install is hands down my most favorite install ive ever done.
5x5 Closure wig
Texture: body wave
length: 20
hair density: 180%
https://www.beautyforever.com/beautyfo...
+ F I N D M E !
Instagram - https://www.instagram.com/jadesimmone_...
TikTok: @JadeSimmone
+ C O L L A B S/ I N Q U I R I E S:
+ SHOP MY AMAZON FAVORITES
https://www.amazon.com/shop/jadesimmon...
+ FILMING EQUIPTMENT
camera https://amzn.to/3ATKBrg
lens sony zv1 wide angled lens https://amzn.to/3kWCu7V
TRY ON HAULS:
Zara haul https://youtu.be/E5lVJoC1Xq4
Skims haul https://youtu.be/JuvwXfpgJVM
Recreating pinterest outfits https://youtu.be/SW2QQZCgW-4
PLT bikini haul https://youtu.be/dH1XuaalhSQ
GIVE THIS VIDEO A THUMBS UP FOR MORE VIDEOS LIKE THIS!!!
In depth skin care routine https://youtu.be/7xpkBeH5t9s
Chemical peel vlog https://youtu.be/Fl8DOpwVXP8
Measurements:
Bust: 36C
Weight: 116
Waist: 24
Hips:34
Hey guys, what's up hello if you're new here my name is jade, definitely make sure you are subscribed. Today we are going to be installing a 5x5 closure. Wig install this hair is from beauty forever. It is 20 inches, it's body weight, it's clear lace and it is 180 density. Everything will be linked in the description box. I posted some videos and some photos of me and this hair and you guys were eating it up. You wanted to know all of the details and the specs on this hair, so i thought it was only right to give you guys a tutorial, so let's hop into it. So here is the bleach that i am using, and the brand is really really amazing. This bleach with this developer, bleaches the hair, so quick, and so even i feel like it was a really nice brand and i actually enjoyed using it. So i'm just going to go in with a scoop of this powder bleach and make sure it's, even because you want your consistency of your bleach to be kind of like pancake mix and i'm just using some of the developer and a spoon to measure it out. I'M not a professional, so i just wanted to start off with a little bit of product and then work my way up, because i don't really know what i'm doing, i'm just showing you what i did because it worked, and i was like you know what let Me make sure to document this, for you guys, so i just go ahead and mix that together until we get like a pancake, batter paste and then once we do that i'll go ahead and apply it to the wig. So after mixing it up for a little bit and making sure everything is coated and evenly distribute it, this is what the product looks like. It is perfect, i think it's not too runny it's not too thick um and now we're just going to apply it to the lace. We are doing this to bleach the knot so that the wig looks really natural and it just looks like it's growing and coming out of our scalp, i'm using the same plastic spoon, and i'm just going to spread this all over the lace so that it is Evenly distributed and all of my knots are bleached once that is done. I'M going to let this sit on the hair for about 30 minutes. I was sure to set a timer so that i did not mess up the hair. So i went ahead and rinsed out the bleach and now i'm just brushing through the hair, to get it nice and smooth, because i'm going to do a little bit of plucking. Now i'm not a professional, i'm not a pro at one plucking or any of that. So i just kind of go off what i think looks good on me personally and what i think looks the most natural now, thankfully, this is just a closure, so i don't have to really worry about. You know an entire frontal. Looking natural, i just had a smaller section to focus on which i think is perfect. If you're just getting into wigs, then you have a smaller section and you can kind of work your way up to doing frontals, and then i started to part the hair in the middle, which really didn't make a difference, because i ended up re-parting it once it Once it was on my head, so here i am just taking out a little front piece of the frontal section or closure section just because i want it to plug behind the hairline. I didn't want to take too much off of the actual hairline, because i didn't want it to look like it was balding or have any gaps. Because again i am not a professional, and i am new to this. Not true to this. You see what i did there anyways, so i just wanted to make sure i was plucking behind the hairline. So that way i had a little bit of room for era, so i just went ahead and continued plucking until i was satisfied with the desired look and then i would comb through to make sure i was getting all the hair out. So i was aware of how much hair was being taken out per section. Then i did work on the front of the closure. Almost the frontal the front of the closure just a tiny little bit, just to kind of give it a little bit of shape, because i thought it still kind of looked just a little too unnatural and unrealistic. I didn't go crazy, though, because i don't know what i'm doing i just kind of did what i thought looked the best. So then, i just combed through getting rid of all of the hair that i plucked and i was like okay, this seems cool now i went ahead and blow-dried the hair and i am applying some powdered foundation on to this little wig cap and i honestly i Have a lot of hair guys and i really could have went ahead and like braided, my hair down really nice and neat, but i have acrylics and i cannot braid with these long nails. So i just put my hair into two braids and i put a wig cap over it and now i'm putting powder. So once we apply the wig, it looks like my scalp. So next we want to go ahead and apply the wig to our head. Just to see where everything is sitting, and i'm also watching dynasty, which has become one of my fav, shows - and i am adjusting the wig to make sure it fits on my head properly and everything is in place. Once we do that, we're going to go ahead and apply the same foundation that we applied on the wig cap on our hair, and then i slapped that wig back on created my middle part and got it as straight as i thought it should be. At the time we can always go back in and fix it. Then i just went in with some alcohol and a cotton swab, and i cleaned off my skin so that my wig would be able to stick. When i applied the glue, then i just went back in one more time to make sure i knew where the glue were to place the glue i'm using. I forgot what glue i use. I think this is from erica j, the watermelon scent and i just used a popsicle stick and i applied this on the perimeter where i want the lace to be. I believe i did three coats of wig glue, that's it. I just did three layers and used my popsicle stick and really took my time to spread it out and make sure everything dried clear before i lay down my lace, and i think this really played a huge part into making the wig look melted. So now i went ahead and placed the lace right where i wanted it to be, and i took my comb and i went ahead and pressed the lace and the glue together to kind of help it melt. I don't know i saw erica j do it. So if it's good enough for erica j, it's good enough for me. So that's what i did and then i'm taking the back of my comb and just really pressing it in there and i felt really excited. But i didn't want to get too gassed up because things happen now, i'm just taking this eyebrow razor - and i am using this because this makes the hairline look a lot more natural when you're taking off the lace by just kind of giving it like some ridges And some kind of zigzaggy you know motion, so it's not so perfect and it doesn't look square then, once that happened, i went ahead and put on this little scarf. Silk scarf for like 10 minutes, and then i let my scalp and the lace melt or whatever, and then i went ahead and took it off and now i'm just going to kind of add some bio oil and then just kind of straighten it out a little Bit to kind of see what style i want it to go for next i took a little bit of a wax stick from erica j. It took a little bit and i placed it on my part and i pressed it down, so i can get my part to look as natural and straight and just seamless as possible and as you guys can see, i over bleached and that's just a tiny little Bit so we are going to go in and fix that. I just use the same powder that i use to place on the wig in the beginning and on my wig cap, and i am carving out the part and then i'm going to go in with this root spray from l'oreal. I believe i will link it down below and i'm just going to spray that, and you see how that cleaned up that part, it just looks so much more natural and it just looks a lot a lot better. So i pressed it again and then i was kind of watching my show and doing the same thing and i noticed some flyaways and i hate flyaways. So i was really trying to focus on getting those bad boys to lay down, and then i take my little flat iron that i got from. I think this is from either marshalls or home goods. I'M not sure i was in there one day and it looked pretty legit, so i picked it up and i was like why not give it a shot and i actually really really like it. I only have to do one pass with this flat iron because it really gets it straight the first time i just wanted it to be sure that it was extra straight. So i went over it like once or twice per section, and i did this over my entire head. So here we are now i'm just using a brush in the flat iron to get it as straight as possible, and i kind of did this straightening process for nothing, because i ended up doing something completely different with my hair i'll show you guys what i did. I went ahead and took out some baby hairs, so i am no pro at baby hairs on wigs now my my natural baby ears. I got those things i do in the dark, but when it comes to wig baby hairs, you don't want to do too much because you don't want it to look wiggy. Obviously, and i really just took my time and kind of played with them. I use some mousse and then my camera battery died, so i had to change it and sit back down and start over, so i just took some i laid them down and then i looked at them and i was like hey. If that's too thick, i was like you know what no i tweezed them. I literally spent like a good 20 minutes doing this trying to get them the perfect length and the perfect like swoop motion, and then eventually i achieved it. So then it was time to work on the opposite side, and i literally did the same exact thing and i just kept doing the same thing until i got it right or as perfect as i thought it should be and cut a little bit scoop it around Cut a little bit sweep it around, and that was my motion, so i just continued to swoop until i got it right and then, after that, i went ahead and placed on a silk scarf to melt the lace into the scalp one more good time before we Really got into it, so this is actually the next day i lost light and had to film the next day. So i went ahead and used another silk scarf and i put it on and slept throughout the night and i braided my hair into two french braids. So this is how i achieve those super, pretty like body wavy, natural wavy, looking hair, all i did was wet the hair. Just a tiny, tiny, tiny bit brushed it through make sure it was smooth and there was no kinks and like tangles, and then i just french braided it all the way down, and i love the way that this hair turned out. I love this hairstyle. This is literally what i've been doing to this hair since i've had it installed, and you just put some little rubber bands on the end. It keeps it together until the next day and it looks super cute. So what i like to do now is just go ahead and fluff it out and fluff through it, because i want it to look really big and fluffy. And then i like to go ahead and brush out the baby hairs, because you don't want them to look stiff and then just kind of play with the roots and fluff it out until it's the desired shape that you want it. I love the way. This hair looks, i think, if i had acrylics, i mean if i didn't have acrylics, i would have been able to braid it a little bit closer to the root and really get tighter, curls or like waves that i wanted, but i still think it came out Really really cute, i think it's a fun messy way to do your hair and just kind of give it a little personality. So here is what the hair is looking like. I think it looks really really good. I was actually really shocked that i did such a good job to be honest with you, because i don't do wigs, but i think i kind of did a good job. I don't know. Let me know in the comments, if you guys would like to see more wig tutorials for me, because now i'm kind of like a wig of wig, influencer or whatever, and i think it did a pretty good job. So if you guys, like this video, be sure to give it a thumbs up, don't forget to subscribe and i'll see you guys in my next video peace,
Comments
Trez Rambles: This came out so good! I love it
Me AndPocahontas: This came out so bomb !!! I love it
Diamond Fuqua: This came out really pretty on u I love it
Carlene Clark: Yes! Go ahead and Jazz yourself Up ⬆️! ❤️
Amber D: Hi Jade and everyone ♀️❤ What happened to the original upload ❤
Diamond Fuqua: Where did you get your black spray from and you I think it’s called hold stick
weakhotspot: Oh niece the way you ate this
gabi9: You laid this unit fr