Make A Wig Start To Finish | Flat & Perfectly Snugg | + Dying It Plum Purple & Green
- Posted on 18 December, 2019
- Color Lace Wig
- By Anonymous
Please Read...
Hey fairies,
So im finally doing my wig making video and im also doing color as well. You guys have been waiting for this for foreverrrrrrr. I know lol But im happy I waiting because the quality and structure of the video is super good. Let me know what you think.
xoxo
Mama Fairyy
♡ Connect with PrettyProperHair♡
Ig: PrettyProperHair
Website: PrettyProperHair
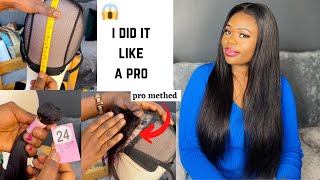
Hair in video: 30,30,28,26,24 18 inch 13x6 frontal blonde bodywave
♡Products in video ♡
Mesh dome cap https://amzn.to/36DAHdU
Needles and T-pins https://amzn.to/2Z05wqy
Hair scissors https://amzn.to/34vChwQ
Nylon thread https://amzn.to/2rWGsVh
Wig stand https://amzn.to/2ErnRmV
Dome head https://amzn.to/35y5d8W
Foam head https://amzn.to/2Epwoqy
Arctic fox Violet Dream, Phantom Green, Purple Rain, Ritual https://amzn.to/34v0MdB
*Ratio 1 bottle violet dream, 1 bottle phantom green, 2 bottle purple rain, 1 bottle Ritual
Bed Head Spray (2 for $17) https://amzn.to/2YX538F
♡ MUST WATCH videos ♡
Layering video
Bed Head Video
Rooting on blonde frontal
DETAILED Plucking video
Nail tech:
Andy Ig: @thatnailsguy
location: Lawrenceville, New Jersey
♡EapHeat ♡
My favorite hot tools line so far!
I used the Hot comb
Save money $$$ off at checkout
Use code "fairy10"
♡ Check out my website ♡
HD lace frontal https://bit.ly/2RL4gUH
♡ Social Media ♡
● Business ig: @fairyystylish (follow for all updates)
● Facebook: Laurasia Andrea
● Instagram: @redfairyy
● Snapchat: @redfairyy
● Personal email: [email protected]
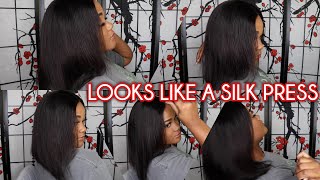
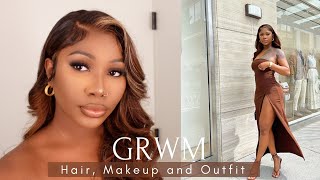
Welcome back to my channel, sorry, John Jo, so in this tutorial, I'm giving you guys a start to finish wave making video not only that I'm going to be showing you guys how to do this plummy purple bow with a hint of green hair, color tutorial at First, I was like yeah, I didn't really know what I felt about it, but once I like styling and everything I kind of just fell in love with it, so I'm gon na be showing you guys all the products that I'm gon na be using. I will also link them down below it's like the typical. You know standard. You know products everybody uses in all their videos, but the only difference is I like to use nylon thread. I hate the standard with making thread it's a little bit too bulky. If you think for me also, I'm gon na be showing you guys the wick standards like to use I've gone through so many wicks tears over the past year, or so. The only difference with this one is. It has like a stony cement type of head and the other ones have like a metal and the other most broke about easily. This one does not I'm going to be using 8gx edge X, GE, X, uh-hum domehead in 22 inch. I am like a 21 and a half, and so all I do to make it smaller is take my mesh dome cap and mark about half an inch up from the spandex part of the dome cap and um. I mark that, because that's where my front was gon na go if you guys are curious about the routing of this front, so go ahead check out my later videos. I will also put it in the video as like a little mark, and I will also put it down below for you guys to go and check out, take the frontal and put it directly where the start of the marquee sharper marquee sharper. What the hell sharpie marker mark is on the dome head and that's where the placement will go and that will make it a 21 and a half inch. Circumference wag I'd like to take a pen place that on the back of the way cat, because sometimes this can come up a little bit when I'm working on the way. So I just mark it in the back to make sure it stays. But I will also take my tea pens and start to place the frontal all around the head, just so that I have an eye for where I want to start sewing down, and I like to start on one side finish that side and then start together. I don't like to like do the whole entire thing at once, because I want to make sure that it's all, even I'm, showing you guys how to use my little stone foam head to place all my needles and thread on this way just makes it a lot Quicker for me to just grab and go and makes the process a whole lot faster. So the way that I like to sew down my front row, and just my bundles in general, is taking the needle putting it through the mesh dome cap and putting it through the frontal loop twice and pull that's the same way that I do my bundles same Way through my friends'll, I just think it's a lot neater. A lot cleaner, especially because we're using a nylon thread nylon thread, is a lot easy to work with then the other threads you get friend abuse by store, like I told you guys before it's just too thick and just a hot-ass mess, makes your weight super bulky And we don't have time to just work on both sides and just pin them down as you go and just start to finish off sewing and then once you get to the end, just loop, it around twice and knot it. And that's how I end up my sewing technique for each area, whether I'm ending off a bundle or just ending off any type of sewing on the way at all. Now we're moving on to sewing on the bundles, I'm just showing you guys these bundles they are. Are this. This hair in general is from pretty proper hair. I don't know why did say beginning I'm using a 13 by 6, 18 inches body way, frontal, I'm also using a 30 30 28 26 24 did at all 5 times twice bundles, all body way from pretty proper hair. They are a black-owned business, shout out to all the black old hair businesses out in this world, so I'm showing you guys with my finger, we're not too so do not sew on the spandex part of the dome cap. I used to do this before. If you go back later on my videos, I used to do this all the time. What that does is takes away from the stretchiness of your wig when you sew on that area, so just do not sew on that. Put the tracks right above it I waited. I like to start to sew my bundles to the frontal. Is I like to double my webs first and then I will also go through the tracks and then go through the frontal, not twice, pull and start to sew per usual. This just makes it so that the bundles are secured to the frontal is not going to be unraveling because we're going to consistently not be hair all the time and also a plus the nylon thread, helps with making it super clean. As you guys can see, it's just very clean stitching and that's all you want to work with you, don't want no bulkiness, no sis, no! I'M moving on to now, using my little trick. I take a white eyeliner from NYX. You can just use any white liner. Does not have to be specific, and I just marked where I want to place my tracks. I don't usually do this on a daily basis. I'M gon na show you guys for a visual purpose, but for my beginners out there you can definitely use this as a guide, I'm lying, I'm actually lying. I did end up using this later on because it is a lot easier to work with, because you literally see where you're gon na be putting your tracks. So this is something I've been starting to do. I recommend for you guys to do it as well, because it just helps you in turn. In a lot I'm going to be now I'm folding over my way, I'm gon na slowly show you guys how to do this, because I've learned this over the past couple of months. It makes my double wedding a lot easier, especially when it comes to footage over the tracks. First, you're going to split your tracks, open, murk, down the first track and then loop it through and then knot it once you do that section, you're going to move the track a little bit over and then you're going to fold both of the tracks over. Like so sounds a little bit complicated, but because your visual learners, like myself, definitely just mute, my ass and re-watch that same part again, it's really self-explanatory, but I like to do it this way because it makes the folding of the track a lot more flatter. Before I used to just fold both over and then sew it that way, but if you split the tracks open do one first and then fold the other and then tie that down and then loop them both through the frontal. Like I'm sure you guys, like you, did on the other side, it makes that whole entire area a lot flatter for you to work with and make sure wigs a lot flatter. So once you do that, don't loop it and get it on a tee pin like I did just loop. It like I was doing before in the whole process, is so simple. I am going to be doing the same fold-over method until about halfway on the way I will actually mark for you guys you guys can visually see where I will stop double busting and folding over my tracks and then once I get to the white mark of The eye line of where I showed you guys on camera, I will show you guys how I like to do my tracks. Moving upward from that area, all righty now we're on to doing not single wedding, but just cutting the web to make it a lot flatter. I never used to do this method before, but ever since I started doing it now, it just makes my tracks or not my tracks. It just makes my wigs a lot flatter at the top, because you don't want a bulky wig. The whole purpose does not have a bulky wave, so I'm just going to be doing the needle through the front, toe and just knotting it and then pulling it through clean stitches all throughout. Until I get to the other side of the row and then I will show you guys what I do so all I'm gon na do is just sew and stitch all the way to the far end, and now I'm going to just cut the tracks and make Sure that you guys have pretty sharp scissors, because this is weren't really sharp. So it was kind of hard for me to cut because the West is kind of thick so make sure you have super sharp scissors so that you are able to do that and all you're gon na do is just cut those two website and then do the Same thing cut it through these double webs put into the front, oh, not in pool and make sure that that area is super secure because you don't want it to come up and it's gon na do the same thing around the top. So, basically, halfway down the way do double webs as well as do the photo over method. Half way up on top of the wig do double webs, but cut your webs so that you don't have that bulky effect, and it makes your wig super flat. Then, once we're all done sewing the tracks on we're now going to cut off the excess part of the wig cap inside where it will be in place of our frontal. Now, moving on to color, I don't know where the hell, my clip of where I showed you guys, the colors I use. I use four colors well technically, four bottles, but three colors from arctic fox, all other colors in the ratio I will put down in the description box this time. I promise I'm going to put everything description rest of what I use and video, and I also use a little bit of green. So if you guys are wondering where the hell I got this whole little hair combo from I asked you guys on my story on Instagram. Make sure you guys are following me because that's where you're gon na see a lot of the updates of my wigs and tutorials before you see on YouTube. But I actually got on my Instagram story. If you guys want to see a plum wig or if you guys want to see a green wig, 90 percent set plum purple 10 % set green. So my slaw is my slice of decided to just do a plum and green wig, literally 90 percent plum purple 10 % green, so I did 10 % of the wig in the back using green. Now, moving on to the plum purple, I honestly felt like in the beginning, first of all, the plum purple came out beautiful. I don't know why. In some of the clips it looks a lot more like a dark purple than a plum, but this is a true color of what the wig really looks like. I just feel like it depends on the lighting. This is what you get. I was getting my straight Bernie buys with this, and it was just bringing me back today back in time to Barney. I first of all, I love the Barney. I don't know who else didn't like Barney, but I remember Barney buddy, like the only character. I really remember Barney and Winnie the Pooh, like literally both of those like my favorite cartoon characters back in the day 1992 tight baby over here. So I'm just going to apply this color all about new eyes and just watch this section of my bow you've seen me color here so many times so yeah I just like to apply the color. I comb the color through I reapply the color again and I just massage it in that's. Like my fourth step of how I like to apply, my colors on my wig so make sure that I get a super good color deposit and make sure that I don't have any like white spots or missing spots all throughout the wig. Now, moving on to the frontal, I will let you guys know. This is why you saw the dark brown on the frontal as routing, because once I went ahead and put on this purple color, that's why you guys saw like a brooding. It was like a dark super super super black violet purple, I'm later on the beginning in the video. This is how I got that effect. I did not use black all I do just do routing on the way and because it's brown, brown and purple just makes like a super deep. You know almost black type of effect, so you know just use your little color wheel technique. If you guys don't know, I'm gon na tell you. This is what makes the brooding looked like a blackish purple. So yeah, like I said, if you guys, want to see how we did the routing on the way, definitely go and check out my later videos. But this is what it looks like. I got no color on the scalp and this way can look like straight scalp on my head. It came out so bomb in at first. Like I said, I was kind of scared because I was like who is purple in this green. I don't really know how it's with the mesh and go together, but let's hope for the best and yeah I let it sit overnight. You guys already know I like to let my wig sit for about least 24 hours to make sure that color is super deposited in the hair, and you guys can see. No color is coming out. This is why I do that some people may be obsessive. This is why I do it to make sure it is super pigmented. On my wigs now I'm going to move on to use a conditioner. This is actually a fade resistant conditioner from one of the boxes from dark and lovely and you guys are like where the hell did. I get it, it's their new formula. I don't have a certain new formula or just a new look in general, but I've never smelled conditioner. That smells like this. I just love you so much and I'm used so many diets. That'S how I get my jet-black hair to be so black. I use a dark and lovely jet-black dyes and I just always collect the conditioners from all the boxes that I use so yeah. I'M not gon na move on to blow drying the wig, so you guys can always see how to color looks. I haven't done this in like such a long time at least a few months or oh, my gosh, I'm back because the next tutorial after this one is going to be another color hair tutorial. So you guys are actually really gon na love that one that one is very entertaining because husband died, my wig and he did a fire ass job. You guys so definitely stay tuned for next video, because it's gon na be very entertaining anyway. Guess you came out fire so now I'm gon na move on to putting on my way. I don't know why, like I said my eye shadow look so blue, it's really not blue. It'S like a dark plummy purple, but the background maybe does make me pick up. Blue, but I have no idea so are they off camera just go ahead and put on my elastic band and my awake combs? I haven't glue this video. This is all I make the videos that I make all the time so that I don't have to have repeatedly put them in the same videos. Go ahead and check out my glueless video go ahead and check out my head video, where I show you guys how to use his bed head spray. I will be doing a video tomorrow actually of me doing and testing our bed hair and hot heat. So definitely make sure you guys check out that video, because it's gon na be very interesting because I'm going out to the club with my friends and I'm testing out and seeing and bed hair can withstand the heat. Hopefully because I don't want to be embarrassed. One thing I want to point out before I shut up is that this frontal looks so realistic. You guys this is a 13-6 like I said before were pretty proper. You guys ain't been skipping around in this video, but I just love the way. This frontal looks, it just looks so realistic. The way that I plucked it, I just did my normal plucking per usual, but I just loved the way that the plucking just looked on this frontal because it just looks so bomb so yeah, I'm just on my normal technique. If I would like to do my frontal slaves go ahead and check out any of my other videos that I have on my channel, because I literally do the whole entire method the same every single time, then I'm just gon na be purling. That'S why I did a curling video go ahead and check out my curling video, which it is posted few days ago on my channel, to see how it to curl my hair, and I will come back and finish. Look you guys. [ Laughter, ], [, Laughter, ], [ Applause ]. So this is how everything is looking. I just felt like this kiss came out so freaking pretty. I just went ahead and put in some clips. I think I got these from Aldo like a minute ago. Probably a couple months ago, and it had green and purple in the clip, so I was like oh no putting those in so yeah. You guys. I hope you guys really enjoyed it. I felt like this color combo was like very interesting. It was kind of scary because I didn't really know how it was gon na look in the end, but I don't know I'm kind of feeling that you guys I kind of tested myself see what see how you know how I was gon na look and I Think came out really good, so let me know how you guys, like hey, hope, to see you in my next video. The next video is gon na be really fun. I'M gon na be doing what husband he comes my way so yeah. Thank you guys. Staying tuned for various mber and we shall be back in the next one - bye guys

Comments
Laurasia Andrea: Im finally doing my start to finish wig. Im happy I waited because I have new equipment and I love the quality. Who agrees?
Annette Jackson: The color is giving female joker vibes for cosplay. Im feeling it
Jo 7296: I can’t cornrow, I can’t sew wefts. I need to get it together in 2020
Jessica Dixon: I got the bed head spray after watching your video on it and I am loving it so far! I'm a track athlete and bed head has held down my wig so well in meets and practices. Thanks to you, I've found a reliable product. Keep up the great work boo❤
Sateriaa Latrice: It’s so melted it doesn’t even need baby hair
yolande Dick: Girl that colour is heavenly , purple is my colour so this wig made me happy and that pop of green was like an extra surprise. Love your work.
desirae b: the lofi hip hop gives your videos such a chill vybeee. LOVE this look ‼️
J Jupiter: lol this intro...fire this look....fire the thumbnail....fire omg thank you for this
bridgeintoloh: I’ve never attempted to make a wig or wear one but this is soooooo pretty! When you started blow drying I perked right up! love it just a much as the navy blue one you did!
Dayna Bledsoe: The way she colored this wig she took her time. Skills love this color
Monique Wishom: I'm so glad you and hubby are back together you guys make a cute couple and plus he's a Warriors fan and I'm from Cali looking forward to his hair tutorial
AmaZoNian DoLL: Always flawless sis!!!! Thanks for the tutorial, I can never get my wigs right, my head is shaped like an egg lol. Oh and we need a makeup tutorial on this look sis!❤❤❤
V Jones: VERY PRETTY!!!! I'm just amazed how you work it with your nails, too!❤
Shirley Compaore: Great video! I finally found someone who answers ALL the questions I had in my head. I've watch some other good videos but I feel like you were very detailed. Thanks
Merle Lawis: I love how the two colors blended beautiful job
Ashanti Traylor: Great tutorial! I don’t like to sew my bundles to my frontal in case I want to replace the frontal later.
Tziporah Dragon: Yes I've been waiting for this color! Grateful for this tutorial!
Danna Banana: I like those colors together!!! It's giving me joker vibes!!! Love!!! I'd even love it as the side by side half and half look
Desiree Chanell: Love this ! Now we need a vid on that elastic band! #Dtown ❤️❤️❤️❤️
Deanna Mo: You do such great work. These colors are sooo beautiful. They actually look good together. ❤
Cinnamon VSG & Karaoke Diva: I saw you at a party recently & realized I watched your channel a few times. LOL I felt like I was seeing a celebrity! Love your channel! New subby ♥
Shakeia Jones: Girl u doing amazing job cause trying to learning how to do my own wigs save me money thanks for sharing your video
Kersha Beaver: yes yes yes haven't seen you do one of these in a mintue
Ms Chambers: Can you also make a tutorial with 5x5 or 6x6 closures ? Love you ❤️
GlamsByNi: thank you soo much for this video, the most detail and easy to follow wig making video i've watched and trust me i've watched a lot lol
renee bayliss: oooomggg is all i can say...You know you did that!! The colors were so deep, i freaking love it!! Awesome video...
QUANI: This is noice. Sis you did that. Plum fairy for the win
Sherice Stona: Thank you so much for making this video it is very helpful. Now sis can we get a start to finish on how you make a closure wig I needs that
Aaliyah Alicia: I really wanted to see what you did with the extra part in the frontal when you were sewing it down? Do you just pull it farther back on the sides or do you cut off the extra frontal?
leilani robinson: Wow, u squeezed 5 bundles on there?! Amazing... Love your tutorials!
WaydaMinJade: I love it. What scissors are being used to cut the lace? Also , what setting do you put the hot comb on? I’ve used it and my color stained the comb.
BeautyByLinnoria: This makeup ddooohhhh...can we get a tut
Tracy Davis: Now you really did the damn thing with this one. And that makeup look is off the charts. You are such an inspiration to an older woman like myself. I bought a canvas head and I want so much to start making wigs.
Dolly Roman: Ouuuu sis!Are we getting a makeup tutorial on this look?Loving this hair color though!Its giving me eggplant vibes.
MoxieRose: This tutorial was helpful for my wig making. Do you have a specific way to sew closure wigs?
Netta: I’m in love
Renee Dunbar: Beautiful❤
Kim Payne: Love the color, little FYI u still can c where u glued the lace from the side when light hits it.
Stacey Reneé: WOW that turned out perfect sis!
Davina Lee: Truly Amazing Great video
Pink Sexyon18: The color is serious. I love the wig, color and makeup. Ready for the vid on the makeup. Great job as usual.
Familyluv#1: So pretty what a wonderful skill to have. It's a form of art as far as I'm concerned. Just beautiful you are.
Talisa Rabb: Thank you so much for this tutorial. It was very helpful.
Amber Rousey: You are so amazing, thank you for your videos!
Wendy Smith: You are so beautiful. I am loving that wig & your eyeshadow. ❤
I am_Shakesha_Sharee: Your so pretty! That hair and makeup combo was sis!
Cherelle Clay: This is SUUUUPPER user friendly! Good lookin out girl!!!
Shameekia Scott: Omg!! Love it !
Kim Buck: Beautiful job!
Asia J: Love the look!!! My two favorite colors!!!
Good Morning Sunshine!: Beautiful!!!
Tammy Phifer: Wow that color is everything magnificent job thanks for sharing
John: Stunning! X
Cathleen Griffin: Looks Beautiful Queen,Great Job
DIY Deanna: Wowwwwwwwwwwwwww we literally have the same techniques!!! Idk why I’m so shocked but this made me so happy
Connie T: Man this is it!!!
Zakeya Brookins: S K I L LZ !!!!! Thanks for sharing in such detail. Blessings.
Ayana Douglas: I’m here for this
Candiblue: Yasss been waiting for this video!
breonna Harley: Love it !! Super smart fold over method ✅
Alyssa Smith: Love this color on you!
Alicia Edmonds: That color is and the eyes
Familyluv#1: I like Maxed Out from Bed Head. Also Alterna'a hemp hairspray works good too for strong hold. Paul Mitchell freeze and shine it's a pump but it's so strong. Kenra has there strong hold famous spray too. However if it's not broke don't fix
BIG SEXXY: GIRL IM SO LOVING YOU FOR HIS FOLD OVER METHOD CAUSE I STRUGGLE WITH THE FOLD OVER PROCESS THANK YOU
Kim Sampson: That wig, that technique that color... Everything Beautiful
Monique Lassiter: Been waiting love!!
Fiona Kyndt: You are a goddess and everything you do is amazing x❤x
Whitney Robinson: First Let’s Get Into This Mf Intro. I rewinded It at least three times cuz I Was Dancing!
Dra'Kerra Terrell: What volume developer you use and how long you process the knots for? This is bomb
neffthegirlneophyte: Husbae? So you guys are back together? I’m so happy for you guys. I was praying that the breakup wouldn’t last
lashay bailey: I really want to buy this unit from you. Sell it to me!
Chris Jarrad: Do we sew through the elastic band when sewing through the frontal
Hilt Momma: The placement of the frontal is very different from what I’m used to seeing. Won’t that make the wig short from front to nape?
KCKrissi: Omg I love it!!!
Ashley Brown: I miss you coloring. I miss the flag serious. My all time fav!
Miss Empress: My mom says I could learn the Barney songs in two episodes minimum
Amena Al-amin: You totally do a Winnie the Pooh inspired wig and I am loving this one
Define My Beauty: When you press thumbs up before you press play. You know you got an Fairy Horde of believers. Love you boo!
Pcsoul8: This is your color also! You go girl!
Cocoa AlmondJoy: baby!!!!!!!! that meltdown is EVERYTHING!!!!!!!!!!!!!!
Starr Jae: Thanks can you do a closure wig video please ma’am
Simoiya Hector-Morales: Fabulous, love these type of vids
Sasha Gold: Gr8 tutorial and u slayed it hair and makeup!!!
Amaru K: Hold on let me put my phone on DND so people won’t bother me
Candy kendricks: Very pretty!!! I really love the colors that is very pretty! I love it!
Cherrisse T: Love it.. so gorgeous
Marvel Hair & Makeup: Are you mixing blue with the green? When you 1st start applying the green it looks like you have blue on top of the green. I absolutely want to try this technique so i want to be sure.xo
I AM UCHE: Thank you.... Your makeup is bomb.
Mariah Felix: Kinda gives me a joker vibe because of the colors
My Precious: So cool!!! Thank you for the video
michelle baker: You are shinning bright like a diamond!!!! I love your videos!!!!
Isabella Peebles: Omg laurissaaaaaaaaaa I’ve been feeeeenin for this video and GURL I just got your Lashes and TUH... you put lily lashes to shame. Had to support my girl.... (❤️your day 1)
TC Jackson: My favorite two colors!
MHIZ JENNY: Please can you make a full details video on how to sew a frontal wig thanks
Toya Fabulous: Love you gurl
Carol Johnson: GORGEOUS!!
Yveness: Nylon thread it is then! Don’t know WHY I still struggle with the normal cotton type thread. Hair turned out as usual.
Mykaylia Walker: I Love You These Bomb Wigs
Skyy Heart: Yess! So Talented. That color is so pretty!
Charmaine Q_ueen: Love love this color it’s hot on you