Beyonce Inspired New Blonde Hair Color || Ms Coco Hair
- Posted on 19 July, 2019
- Color Lace Wig
- By Anonymous
#BEYONCEHAIRCOLOR #BEYONCE #LIONKING #HOWTOBLEACHAWIG
HAIR
Body Wave20 22 24 24 with 20
Same Hair In the Video
➤https://www.mscocohair.com/brazilian-b...
Mscoco Official Store: www.mscocohair.com
( Use Coupon Code: “ Aiyanyi”Get Extra 5% Off)
Top Sale Body Wave With Lace Closure
➤https://www.mscocohair.com/brazilian-b...
Hot Recommend Body Wave Lace Front Wig
➤https://www.mscocohair.com/wigs/lace-f...
New Arrival 5x5 Closure With Bundles
➤https://www.mscocohair.com/bundles-wit...
2019 Promotion Sale( Up to 40% off)
➤https://www.mscocohair.com/hair-weave-...
Contact us: +8615617235920 +1(305) 912 2233 Email : [email protected]
Mscoco Aliexpress Store➤http://bit.ly/2XpdM11
Affordable Body Wave With Lace Frontal➤http://bit.ly/2Jn3qtr
Mscoco Top Selling Products ➤http://bit.ly/2YxACVu
(Follow Us To Win Free Hair)
Instagram:http://bit.ly/2CiZcRj
Youtube: http://bit.ly/2PKCvJ1
Facebook: http://bit.ly/2Lp4r4B
F A V - P R O D U C T S - 2 - U S E
(AFFILIATED LINKS )
BLONDME Premium Lightener 9+ (15.8oz) & Developer 9%/ 30 Volume (33.8oz) DUO SET
Wella t18 (2boxes)
Salon Care 20 Volume Creme Developer, 32oz
Clairol Shimmer Lights Original Shampoo Blonde and Silver 8 oz.
Garnier Fructis Shampoo & Conditioner Set Sleek & Shine
by Garnier
Revlon Colorsilk Beautiful Color, Medium Brown, 3 boxes
L'Oréal Paris Feria (ash Blonde), 1 or 2 boxes
Cantu Natural Hair Wave Whip Curling Mousse
Silicon Mix Intensive Hair Deep Treatment, 36 Ounce
Revlon Expert Tweezer, Slant Tip
Trim Slant/Point Tip Tweezers
Bold Hold AcTive Lace Glue:
Lace Grip
Ruby Kisses HD 2 Color Foundation + Concealer
EyeBrow Razor:
GOT 2B Glued Blasting Freeze Spray
Got2b Ultra Glued
Multi Color Shears:
BaBylissPRO Nano Titanium-Plated Straightening Iron
REMINGTON Pro .5 - 1inch Pearl Ceramic Conical Curling Wand
Wig Stand: GEX Heavy Duty Canvas Block Head Tripod
Block Head: GEX 20"-24" Cork Canvas Block Head Mannequin
S O C I A L - M E D I A
|| Website for Hair || IamAiyanyi.com
|| Instagram || Aiyanyi or https://www.instagram.com/aiyanyi/
|| SnapChat || Aiyanyi
|| FaceBook || Cyn Aiyanyi or https://www.facebook.com/profile.php?i...
| Copyright Free Music ||
CMXV Recordings Youtube Channel: https://www.youtube.com/channel/UC68tk...
Song: https://www.youtube.com/watch?v=2NRVXM...
D I S C L A I M E R
|| FTC: The products in his video was sent to me for review||
+BUSINESS EMAIL(ONLY): [email protected]
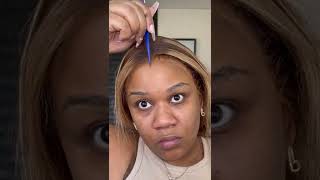
Hey youtube: welcome back to my channel, so today I am gon na. Do a Beyonce inspired tutorial now. This is the picture that I saw her post a couple of like a month ago or so, and she basically broke the internet because she don't typically wear this duck of a blonde okay. This is dark for her, and so I was just like okay, be you killing it and because my ink is coming on, so I was like okay. This is a perfect time to do a Beyonce tutorial inspired tutorials. So I did get this hair from Miss Coco hair. I will leave all the information down below in the description box and I am showing you how I got this color now. This is not a wig making tutorial. This is not a wig installation tutorial. This is simply a color tutorial. Okay, and just so you know how I got the little slight waves. If you guys haven't seen my Hollywood wave tutorial. It'S basically the same thing. I take a section of the hair. I parted. I wrap flat, wrap it around. The actual wand - this is a ring to line. I leave it on for three seconds and I pull her off okay and after that, you just want to comb her out and when you comb her out, it's just gon na go into a wave pattern. Alright and that's basically exactly how I got the waves, I will link a how to make a wig video down below. I will link how I install my wigs video down below, and I will also link how I CRO my wigs down below. So if you are interested in seeing this hair tutorial, you guys are not seeing the full color. I think I'm gon na have to go outside, so you guys could see it because it's looking kind of warm instead of ashy on camera. So we'll do that. If you guys want to see how I got this colored and keep watching alright, you guys, so this hair is from Miss Coco, I'm at this state previously that they did send me this hair, and so I just wanted to show you guys a color tutorial. So I did receive a frontal and four bundles, but for this tutorial I am only using three alright, so let's get to bleaching now this is a blush that I'm using. This is brown blonde brilliance. Now this bleach is very good at lifts up to eight or nine levels. I was just really really nice to use. It keeps the hair healthy, it smells bomb and it's very creamy and when you're doing a big bleach job like this, you definitely want some creamy healthy bleach that'll keep your hair intact, so it won't feel dry. So basically, I'm just parting, the frontal out and I'm laying it flat and I'm just gon na apply the bleach on to start every section that I part making sure about it's very cream, creamy and saturated. I am leaving the roots untouched because we don't necessarily have the color to reach for this particular tutorial, and someone just followed that up and keep doing the same process called parting out. The hair applying the bleach combing it through applying the foil just to keep the roots intact and not colored, so I do want my hair to process evenly. So when I get to the halfway mark, I start covering the entire portion of the hair with foil. I am not closing the hair in the foil, there's, definitely air circulating through the foils, because if you smother their hair it will over process because they cannot breathe a cannot expand. It can't do anything that I have to do so. You definitely want to make sure that there's air ways that the hair can breathe when it's swelling up from the bleach and after all of that is done. I'M a club cover the entire frontal up with foil and I'm a play set aside and let it process remember, keep some air ventilation through this, because you do not want it to over process now. I'M gon na take a bundle, and this is just messy bleaching like I just did not. I like, I was not in a mood for bleaching, so I did it mentally. I do have a neat way to bleach and I am gon na list that video down below for you guys to see. So basically, I just make my bleaching and developer very, very creamy. Okay, so it'll go through the bundle very very easily, and once you do that you want to just massage that color or the bleach into your bundles. Now I kept the rubber band on there because I'm not bleaching the wefts. The weft could stay the color that it is only because we're gon na do a gradient effect anyway, so it really didn't matter when you have creamy bleach it'll be easier for you to comb through your weft or your frontal, or anything like that. So you definitely want to make sure that you have a creamy consistency. You definitely want to make sure that you are parting. This bundle to just get in all the crevices, because you do because I did not open it up and open up the bundle. So I just want to make sure that everything is saturated, I'm a massage the bleach into the bundle and just make sure everything is saturated, and I am going to put it on foil and let that process as well. So after my hair has been sitting for about 20 minutes, I've go through it to see like if it's lifting even did. I miss any spots. If I did miss any spots, I'm gon na make a new batch of bleach and I'm gon na put some more bleach on the bundle. Now I like to beach, smart, okay, and when I say that, because I use 30 volume developer, I would never suggest you guys use 40 volume because you will fry your hair quickly. So I use 30 volume developer and if you do it this the way that I'm doing it right now, you will have a even list. It'Ll get very light for you and you could tone it out too and deposit your colors that you want to. So I'm just showing you what it looks like and after I'd go back and put some more color in it to just make sure that everything is even I let it sit for another 20 minutes, and then I rinse it out and so right here you guys See me checking my frontal checking that elasticity of the hair just make sure that it's not over processed, and it is perfect, so I'm just gon na remove all the foils and everything like that because time for me to do the same thing with this go through It to see if everything bleached evenly, I'm gon na, add a little bit more bleach to it and let it sit for 20 minutes just like the rest of the bundles and then after the 40 minute mark. I am going to wash it out and for to shampoo my hair, I'm going to take some regular shampoos grind your fruity, so I'm gon na make sure it's lathered up, make sure all the bleaches out of the hair - and I am going to proceed after this With deep conditioning all the bundles and the closure or frontal with a silicone mix and I'm a and imma put a little bit of the Garnier Fructis conditioner in that water as well, because it smells so good, so it makes my hair smells really really good. So the water that I'm putting in this bucket - it's just basically hot tap water and then I'm gon na just put both other conditioners in there mix it up, make sure that it is basically dissolved in this water and I'm gon na sell all my bundles. In frontal, in there for about twenty to forty minutes and then after that rinse it out, let it air dry. So after one bleach section, this is what my hair looks like it's very even I have my roots. Everything like that. So I went ahead and made my wig from this point on and so after that we have to tone the hair, so I'm gon na take some of the brassiness off. I do have c 14 t 14 or 3:18, whatever one of those or both of those. So basically, it's two bottles of developer to one bottles of toner from Wella. So I have two bottles. So I need to pick four bottles, four bottles of developer into that toner and basically, what I'll do is shake it all up and one big bottle and then I'll apply it all to the hair and just make it very saturated. Now you want to wring out all the excess water in your wig in your hair, because it'll apply better that way and after you apply everything in the hair, you want to let it sit for about twenty to thirty minutes and then go ahead and rinse it Out you can deep condition it again and you want to go in a shampoo trying to pull it out and then you want to let it air dry and finally, the color. So I wanted a ash blonde and I could not find a box irish-born. So I just got a regular hair color, that's ash blonde, and then I got this Revlon medium brown color, and so basically you want to make sure that your hair is towel dry, because if your hair is dry, your hair is really gon na. Take the color really good, so we want a ashy brownish color right. So basically, since my hair is damped not dripping wet but damp, it's gon na process slower, alright, so we're gon na add the hair color onto the hair. It'S gon na process slower we're just going to do a gradient effect from this point on. I'M apply the dark brown on to the hair, and then I am going to apply the ash blonde to the tips this. This ash blonde color actually made me nervous because it was really like hot pinkish and I was like oh, I don't want to put this on my hair and it just messed up my ends because I did a good lead job, so I was really hesitant, but I did turn out fine. The pinkish is just like, I guess, the toning color that comes with the coloring and so yeah. It did make me nervous stuff. So if you do get the same color, it will turn pink and it will be pink on your hair, but then it's going to tone out that burstiness and turn it to a ashy blonde, and this is where you can get a little bit creative. You can do like some highlights in here, like long highlights of just ash blonde highlights of just the medium brown and just apply it all through there all throughout the hair. Is it's super easy there's, no wrong wrong way to do this, just make sure that it is a gradient effect and if you are coloring, your hair just make sure that you are wrapping foil around the ash blonde pieces, so it won't get muddy with the brown. The brown hair guide, okay and while you're doing this, you definitely want to make sure that you are wiping your hands on a tile that you just do not care about anymore or a shirt. You don't care about anymore, because you don't want to cross the colors with you know, dirty gloves, so you definitely want to wipe your hands down during the process of coloring your hair and for the frontal was super easy. All I did was add some of the dark brown to the roots and then the rest of it was the ashy color. I wanted more of an ashy color in the front to help get the gradient effect and after I applied at all, I put a little bit more died on the top layer of it because I was wearing a center of a middle part. So and then I'm just you know blended it down a little bit and then I let it sit for about 20 minutes after I put all the color on there and just so everything could catch up. And after that I rinsed it out, and here she goes. Okay, so this definitely give me gives me beyonce vibes. This is very ashy, it doesn't look as ashy it as it is on camera, but it was really. It was really ashy and I really enjoyed this like the hair held up. It did shed a little bit, but not too much, but I didn't mean manipulate the hair, the hair lifted phenomenally and it kept its luster and I just make sure that I'd be conditioned it all throughout this entire video. So if you guys have any questions or concerns, you know leave them down in the description box and I'll be in that thing, answering your questions until next time, bye best friend - and I must say this before I get off here cuz. I know my good question. Yes, you rinse out the haircolor, you wash it with shampoo, you, let it air dry or you blow dryer and you style it to your liking. And, yes, I use a flat iron first and then I uh, you know curled her on it. Alright, bye, you guys


Comments
Forceofnature: I love your tutorials. So detailed and you did a beautiful job.
Lawunmi Davies: This is by far my fav look you’ve ever done! Did you add 2 bottles of wells t18 or was it one t18 and one t14 (the video shows you had a t14 set up to use)?
mochapassion02: I love it . I wish I could do this
sheneque henry: This so so gorgeous. Job well done
Girls N Curls: This is gorgeous!!!
Saby Saby: Definitely a SLAY!! ❤️❤️❤️❤️
Ilikeapples: How long did the hair last after the bleaching process if you don’t mind me asking?
lorrietta jude: So did you mix the 30 developer with the quick blue too?
Kierra Malone: Super cute.
Courtney Forever: Pretty! could you just use the purple shampoo to tone instead?
ItsHerLondon: Thanks for this i must try
Fabio Oliveira: You are a very talented baby.
Starr Jae: ❤️
blkbarbie0: Sis u be showing out with these wigs
Rosemakeupartist: Luvvvvv
Paris Tobias: Would you do this for my hair for me?
LSG nyembe: Love this song by Jhene in the background
Deja Packer: Yes sis ❤️
the_comfy_ pa3da: Muva cyn ❤
Joslyn Dillard: Biiiiiiitch I wanna fight you!!!!! I wish you a million subscribers
Kersha Beaver: Hey best friend