*New* 13X6 3D Scalp Knots Wig! #Curlyhair Lace Wig Install! Lace Meltdown #Idnhair #Wiginstall
- Posted on 21 November, 2022
- Color Lace Wig
- By Anonymous
~~~~~~~~~~~~~~~♥#IDNHAIR wig details ♥~~~~~~~~~~~~~~~
IDNhair means "I Define Natural".
Our mission is to give Virgin Human Hair that are practical, beginner-friendly, and natural.
▶ Hurry Up!! Biggest sale ever!!, Code: IDN20 to save 20% off, Special bigger code on Black Friday and Cyber Monday day!! Limited Time!!!
▶ Free shipping & Free returns!!!
▶ Wig Link: https://bit.ly/3UgkvrA
▶ Beige Ojai Special Coupon Code: BO20 -- Get 20$ Off
Nandi New 2-in-1 Twisted Curly Wig Glueless 13X6 3D Real Thin HD Lace Wig
Wig Cap Construction:13X6 3D Full Frontal Clean Bleached Scalp Knots Wig
13X6 3D wig uses the most advanced technology, combining accurate curved lace placement and a perfect cap made, giving the full side parting and caps are more three-dimensional to fit your head.
Length: 20inches
Density: 180%
Hair Texture: 2 in 1 twisted curly
Color: Natural Color
Lace Type: REAL Super Thin HD Lace (Melt Into all Skin)
Hairline: Clean Hairline ( No need to pluck anymore)
Bleach Knots: Clean Bleached knots
-----------------------------------------------------------
Hey loves! ♥ Become a Beige-ian by SUBSCRIBING here ▼
https://www.youtube.com/user/Mahoghany...
NEW VIDEOS POSTED EVERY WEEK!
TURN ON POST NOTIFICATIONS
**I do not own the rights to any of the background music being played in this video. The background music is for entertainment purposes only. Here's the music playlist, check out the amazing Artists below ▼
1.) Mr. Chase - Reach Out - https://thmatc.co/?l=3E2BA760
2.) Ryan Little - Hands of Time - https://thmatc.co/?l=188C4B36
Thanks for Watching!
Contact me: ▼
https://beigemedia.wixsite.com/beigeoj...
L E T S B E F R I E N D S: ▼
INSTAGRAM: BEIGE OJAI
TIKTOK: BEIGE OJAI
TWITTER: BEIGE OJAI
FACEBOOK: BEIGE OJAI
SNAPCHAT: BEIGE OJAI
BEIGE OJAI
P.O. BOX 520
LANHAM, MARYLAND 20703
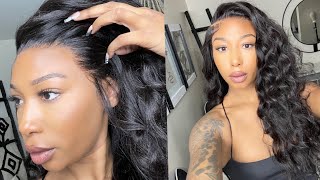
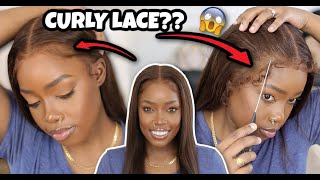
Foreign foreign, hey guys, welcome back to my channel. My name is beige. If you're new here welcome, don't forget to give this video a huge thumbs up and comment down below before you leave. Today'S video is going to be a tutorial on this wig sent to me from idn hair. I will have all of their information the promo codes and the direct links to the wigworn in this video down below in the description box. The wig that I was sent is a 13x6 20 inch, curly, 180 density lace, front wig. This wig features idn's new 3D wig cap construction. So, on ID and hairs new Cap Construction, you do get three Combs and an adjustable strap as well as a removable elastic band, but their new Cap Construction features a more fitted wig cap construction and also longer sideburns. This cap is designed to be worn completely glueless. If you choose to go that route, taking this wig out of the package and placing it straight onto my head, I already see that the hairline is not rounded. Like my hairline, the natural hairline on this wig is more Square, which lets me know that I have to have baby hairs on this wig. The first thing that I'm going to do is get rid of some of that extra density along the hairline. So I will be doing the beige method of zigzag, plucking and parting to just thin out the hairline a little bit more so that it can look a little bit more natural. This step is always optional and the hairline does come pre-plucked. So if you are not comfortable with plucking the hairlines of your wigs, you do not have to do this step, but I do like taking this step to pluck more hairs from the hairline, especially when the hair line shape is not a perfect match for my hairline. It looks a lot more natural to me in my opinion, so I am going to just take my time to thin out the hairline and I'll show you guys the results in a second foreign. Thank you all right so now that I'm satisfied with how the hairline is looking, I'm just going to grab my lace tent and tint the lace of this wig. I am grabbing two different colors of lace tint. The first color is the color of my Foundation, which I'll be spraying along the edge or hairline portion of this lace, frontal and then the second color is the color of my scalp, which I'll be spraying on the inner portion of this lace. Frontal I'll be doing two different layers of each color of lace, tint and blow drying, of course, in between each layer, foreign. So I parted off camera, where I wanted my two space buns to be, and now I'm just going to style the hair. I'M grabbing this extreme hold gel as well as a bottle of water and my Denman brush in a detangling comb in small sections, I'm just going to start by detangling. The section then grabbing my water bottle and fully saturating it with water, then applying that curling gel and then using my Denman brush to get these curls to pop I'm going to follow those steps throughout the entire head and I'll come back for the next step, foreign. So now that I am at the front of the head, I'm just going to prep the space buns by detangling this section and then putting it in a rubber band and of course, because the hair will be in a rubber band. I'M just going to section off where I want the baby hairs to be and how much baby hairs I want before putting it in that rubber band foreign. So now I'm just going to grab my diffuser and start diffusing the hair. This is going to give the hair more body and volume and allow it to dry quicker foreign, okay. So now it is time to cut away that extra lace. I'M just going to move these baby hairs backwards so that I can have a clear view of the hairline and then I'm just going to grab a pair of zigzag scissors and carefully follow the natural curvature of this hairline and get rid of that extra lace. Foreign. So now it is time to prep my skin for the install I'm just going to grab some alcohol and clean off my forehead, then I'll be grabbing scalp protector for Walker tape and applying that to my scalp. So the adhesive of choice today is Wonder: lace bond from even New York, I'm just going to grab the wig and spray that to the edge of the lace on the under portion of the wig and then blow dry for a few seconds. Next, I'm just going to grab the wig place it on my head in its proper placement, and then I'm just going to put my head scarf on for about 20 minutes to allow that lace to set and 20 minutes later. Removing my headscarf here is how the lace is looking, I'm just going to grab these baby hairs, cut them a little bit shorter and then use my gel to swoop them into place, and here's the results from doing that. So these curls are so beautiful, but I do want them a little bit Fuller. So I'm just going to use my fingers and just finger comb through the hair just to give it more body and volume - and here is the result from doing that. Next, we're just going to grab these ponytails and then twist them around and around and around to give myself some space buns foreign look. Thank you so much for watching. If you have any questions, don't forget to leave them down below. In the comment section, I will have all of the information, the promo codes and direct links to this wig from ID and hair down below in the description box. So don't forget to check down below for more information, and I can't wait to see you all in my next video bye, guys, foreign foreign

Comments
Beige Ojai: **THE CUSTOMIZED WIG WORN IN THIS VIDEO IS FOR SALE, email if interested: [email protected]
Certainly Cee Caldwell: HEY SIS HAPPY HOLIDAYS!!!! Hope you enjoy your Thanksgiving this Thursday after that it's Black Friday I love that part of the year. I have so much to be thankful for. I appreciate being child of GOD. NOW YOU LOOK SO BEAUTIFUL IN THIS WIG!!!!This wig is L I T!!!! Looks very natural. The curls are definitely defined in this wig looks like it'll last for a long time. I give it.