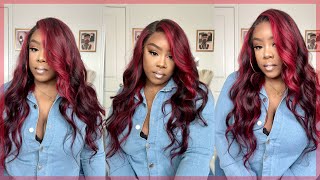
The Best Hair For Fall Burgundy 5X5 Lace Wig|| Luvme Hair
- Posted on 07 November, 2022
- Color Lace Wig
- By Anonymous
Direct link to unit in the video: https://bit.ly/3fzt9mx
Length: 14 inches
Use code Karin23 to get 23% OFF!
Essential Products mentioned:
Ebin Lace Glue: https://www.amazon.com/Wonder-Lace-Adh...
Continuous Spray Bottle: https://www.amazon.com/Sprayer-Continu...
Mini Edge Flat Iron(The one I am using is currently sold out so here’s another one): https://www.amazon.com/Terviiix-Temper...
Where'D, you go hey friends! Welcome back to my channel, so you already know, as you can see by that thumbnail that today we're going to be doing a wig review on love me of course, so I've been working with love me for a while. So if you've been watching my videos, then you already know the deal. We just show you everything that comes in a box. Okay, they send you over some goodies love, it love. It love it. Okay, so we're gon na get into this hair. So this is their Kinky Curly, 99j or burgundy. Um 14 inch 5x5 closure wig, so I'm just showing y'all that it has the adjustable strap and how easy it is to put on it, comes with four Combs and also adjustable straps, okay, okay, so we're gon na get into this lace y'all. This is their top Swiss lace and look at the knots y'all like they're super duper small, which is convenient for those who don't want to do anything to that wig. So this is what you get straight out of the box y'all. You could pop it on just like this, but of course I'm gon na tweak it so right. Now I'm just putting a wig on a mannequin head and I'm just going to lightly comb out the curls. Just so you can see how big the hair gets. Y'All Kinky Curly is Bomb AF like look how poofy it's getting so cute. So with this 5x5 closure, you can also do you use some side parts and again, I'm just showing y'all a view of this beautiful, beautiful, hair, okay, everyone so y'all see that we have the wig on the mannequin head. So I'm just going to give you a little detail before I actually go ahead and transfer this wig onto my head, and this is another wig from love me. I'M gon na go ahead and Link that video, above or in the description box. Whatever make sure you check it out because look at these curls, but it's not about this hair, but this hair is also from love me. So this is the 14 inch 99 J Kinky Curly 5x5 lace closure wig. So you do get this much lace. Hairline looks really good, it's kind of pre-plucked the knots you don't have to bleach, but if you do want to go ahead and bleach it, you can do that. So, let's just get into some of this part in space with the 5x5 closure. Unlike four by fours, you get more space which gives you the opportunity to style your hair, so if you're not into frontals, but you need a little bit more space. Five by five closures is the way to go. So let's go ahead and part it on the side. So right now you know it came like this. In the middle part, all I did was just fluff the curls out. So that's one side, it's pretty much giving you scalp anywhere. You part it um, like I said you do not have to bleach the knots. The curls are really pretty and I know they're going to look even better when I wet them so yeah. This is just a before and y'all gon na see once it's on my head, so this is just after I wash the hair. I went ahead and plucked the hairline and pulled down some baby hairs as well I'll post, the shampoo and conditioner I used on the screen on this clip. I just went ahead and brushed through the curls while they're wet, so you can see how defined they are. Okay, babes, so y'all see me install a wig a million times, so I'm just gon na include like bits and pieces of it. If you do want to see like an in-depth install video, then I have plenty so just go back and check those out on my channel and I'll go ahead and Link a few of them down below. Before I do add the makeup, I do want to show y'all what it looks like just on my head, so I do have on a wig cap and I went ahead and put my cream foundation on there, I'm in the middle of doing a tick tock. So that's another reason why I'm not doing an in-depth tutorial so make sure you follow me on Tick Tock, I'm going to make sure I list that right here make sure you head over there, so girl yeah. This is what the hair looked like after it, air dried overnight um I did not put any product on it. This is just what it's giving by drawing, and this was sitting for like two days, air drying, I didn't rake through the curls or nothing all. I did was pluck the hairline and pull down some baby hairs, um and that's it. The color is everything like I'm obsessed with this color. I'Ve had like a burgundy color before so I'm not really nervous to try this. I am gon na go ahead and connect. My adjustable band just for some extra security. Obviously you can't see much because I got this cap on so what I'm gon na do. This is cute when I comb it out and fix it up and stuff, it's gon na be cute. So what I'm gon na do is actually go ahead and finish my ball cap and then I'll show y'all what the wig is. Looking like once, I put her on my head and then to glue down my ball cap, I'm just going to be using this ebbing or even lace glue. This is their extreme firm hold active glue. If you have any good lace, glues comment down below and let me know okay, so the ball cap is cut girl. I look bald head on the side. This hair right there is just all molded back, don't play with me. So now, let's see what the hair is, looking like, um, no foundation on the lace and then I'll show y'all what it looks like with foundation on the waist. Oh, a comb that went through baby Okay. So this is what it looks like with no foundation on y'all, see this lace, so I am going to add a little bit of foundation and then we'll go from there. So let's actually put some like on the outside. Just so y'all could see the difference. Okay, so you can see that once you add your foundation or lace tint, that the lace is going to automatically blend. So let's do that for the entire wig. Sometimes I even like to take some and go press it and that hairline like that. We do want to insert our cones in the side now this wig ain't going nowhere. Our next step is going to be go. Take care of this Tick Tock. Now I'm gon na tell you all the steps and then I'm gon na come back once you know everything is all good see how the foundation made a huge difference. It tints in my legs completely to the point where you can't see it it's right here. Oh, that looks good. That looks so good, so we're just gon na cut the lace, pull your baby hairs up and remember. We want to go in jagging motions that way you don't be giving Wiggy wig wig. Okay, so, like I said you can for sure wear this wig glueless, this side still has lace on it. This side has no lace slide. Our comb underneath look at that. It looks so freaking good, like you can't you don't even need glue um. What I like, what is glueless, I'm going to cut this lace off and then I'll be back when it is time to do baby hairs now y'all know. Lately the girl's been curling their baby hairs. So if you want to get you a good mini flat iron, I recommend this one. I will leave the link down to Amazon below this little thing gets so hot. It has different temperature controls right here, um and it goes up to 450. lowest. Setting is 290. So these things right here baby they get the job done like. Let me curl them again. It gives you that tight curl come on now, don't play okay guys, so I did the baby hairs. So I'm gon na go ahead and tie my edges down, and this is still glueless y'all still freaking glueless. As you can see, the comb is under there. This is glueless, so I'm gon na just tie it down with my scarf just to make my baby hairs. Last, this is what the curls look like when they are dry. This is what the curls look like: defined air dried after being washed, and then I'm gon na go ahead and rake this side out and then I'm gon na go ahead and Spritz it and do all that good good. So let's go ahead and just y'all see this hair gets super big. When you break your hands through it, you don't want to disrupt the curls too much, but just a little finger breaking don't go all the way through. I went through all the way on this side, as you can see, the curls are still defined and holding this shape. I left this on for like five minutes, not too long at all, and here we go finished results. Of course I want to do my makeup, so y'all could see what the full you know when you dig is giving it's got something different with the baby hair like the little extra swirl. If you don't like it, it's not for you, but I see this color really complements my skin. Oh my God y'all! This is pretty it's definitely getting like Autumn Fall Vibes. So if you're looking for like some Autumn hair, this is the route to go. Oh, my God, it looks so beautiful up against my skin, you ready for the fall sis. This is the fall kit right here, I'll be back when the makeup is on foreign. This hair is eating the girls up my baby hair, a little messed up. Y'All can see the curls are popping, don't play the curls are popping and pretty I love the color. Definitely like I said a million times it's giving fall Vibes, so we love that y'all been getting. Compliments on the color, the hair itself. All of that, so I'm just in love and I'm actually going to be wetting it for y'all. So y'all see me to look like, but before I do that I got ta go, take something got ta, take some pictures but yeah y'all. I will leave all the details down below and on the screen right here. This is the 99j Kinky Curly 5x5 closure wig, and this is, did I say, 14 inches, yes, 14 inches, so this is where 14 inches stop at on me. Let me give y'all a little look of the back nice and full. So in love with this hair, look like mine, I love it. Okay, girly, so your girl took a uh, a full break. I was eating Seafood y'all and the butter was dripping down my face. So I had to get myself together, but anyways we're gon na go ahead and with these curls, this style to me is cute enough. But of course I want to show y'all what the hair look like when it's wet before we go ahead and wet it. I do want y'all to use my code it'll be right here. It is current. Two three Korean two, three Korean two three use that color. So you can save me some money, but let's go ahead and wait this hair in this bottle. Y'All. There is literally just water - and I'm supposed to be linking this water bottle Down Below in all of my videos that I use it in I'll, be forgetting, but I'm gon na go back and do that two nights when I edit. So if you want this bottle, it's very cool. Let me actually show y'all, so it's like a continuous spray bottle, so you just - and you see it's still going so it goes for about five seconds if you need it longer than that. You just give this a few more presses and it'll just without all the mess. So I could use my hands and you see that the water is already defining those curls or you can use your paddle brush to brush it through and to help like with shedding and stuff. I like to start from the bottom and work my way up. That way, you don't have your hair falling out and, as you can see also when you wet the hair, it does get longer that's with hair period. If it's wet it's longer, you know, curly hair has shrinkage. So I see this is not even completely wet. This is just damp and then this is completely dry defined curls. So we're going to continue to wet her up. Okay, so for real y'all see that yeah, like I said, start from the bottom, don't do what I was doing, but once you start from the bottom, the brush should literally go through. Hey y'all, see the difference. If I was gon na use any mousse or anything to help keep my curls lately, I've been using this Maui hold on this Maui moisture, hair, styling, flexible whole coconut milk, curl foam mousse, that's a long name for what, when they get to save moose, um, typically Use any kind of mousse that I have on hand like if it's any kind of curling mousse I'll just go ahead and use it. I haven't found something that I'm like. Oh see that girl, so I've been trying this one now I like it smells good. So clearly y'all I run my mouth too much, so I have to cut this audio off and just do a voice over, but I just went ahead and added that mousse just to keep that wet look all day, so I'm gon na go. Do this side off camera and then I'll be back once it is complete. This is what the hair looks like what and, as I stated before, you are able to do a side, part yeah. So this is the side part and again you could go up the other side as well, but y'all. I hope that y'all got the gist of everything. This really concludes the video, so I hope you enjoyed it. Let me know if you are feeling this wig perfect for the fall. The colors beautiful curls are beautiful, it's all day and a bag of chips. Okay, thank you all so much for tuning in don't forget to use my code. Thank you. So much love me for sending me this beautiful wig and I will see y'all in my next video
Comments
SassyNj !!: Girl you did that ...You know I have been waiting... Now I gotta learn how to do a bald cap because I like how it turned out... Thanks
Moon Beam: You didn’t even need any makeup plus you covered your freckles !! I’m too mad!! But the unit is cute