The Most Natural Wig!!! Multi-Color Hd Lace Melts Your Own Skin Tone
- Posted on 23 November, 2022
- Color Lace Wig
- By Anonymous
hey loves welcome back to my channel :)
▬▬ ★☆ #HAIRVIVI BLACK FRIDAY SALE ☆★▬▬
Discount - Save Money Directly
$40 OFF PER WIG: ROSH40
$30 OFF DISCOUNT: ROSH (NO Time Limit)
Activity - Sephora Gift Card
Place the order during black friday! Get a $100 Sephora Gift Card!
2 Winners will be announced on the December 1st
▬▬▬ WIG DETAILS ▬▬▬
April Wig in video: https://bit.ly/3ULqULL
Hair Length: 16inch
Hair Density: 180%
HD Lace & True-scalp Color: cappuccino
Cap Size: Small
▬▬ NEW WIG ERA▬▬
-True-scalp Tape & Fake scalp Method
-Multi-color & Invisible HD Lace
-Anti-slip Elastic Band
-Clean bleached knots
-Pre-plucked Hairline
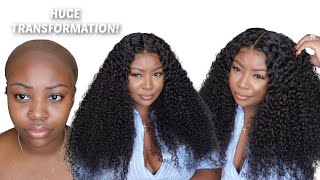
Foreign welcome back to my channel, so I'm back with another video for you guys today we're going to be doing a wig tutorial with no ball cap method, I'm keeping this beginner friendly and super easy to follow. So if you guys want to see how I achieve it, then please continue to watch now. The wig that I'm wearing in today's video is from hair Vivi. It is a pre-made wig, and this wig comes beginner friendly instructions are there to help you and the lace on these wigs are so thin. You guys, like super super thin and as for the hairline, it is pre-plucked hairline, pre-bleach knots, a lot of wig companies do not do that, but they do that and when I say pre-bleach, the knots are bleached to perfection now. This is what the wig looks like straight out. The box, the hairline looks amazing. It looks pretty good, but I'm gon na be honest with you. The perfectionist in me wants to tweeze it just a tad bit, but you could leave it like this now. I will say one thing about the hair BV: wigs, the hairline does go down a bit lower. So if you have a smaller forehead, keep that in mind, but I'm going to show you guys how I cut my lace just to make it work for my forehead. As for the lace on the wigs I'm using the cappuccino shade because it matches my skin tone perfectly, they do have other Shades, so they have the mocha and the cappuccino, and I believe they have also just a transparent lace. Now I will say that the lace is probably one of the thinnest lace I've ever used, so it melts down to Perfection now. I personally do not care for the Combs on the side. I never use them at all. I have no use for them, so I usually take them off. So we have a comb in the back that one. I use a lot to secure the wig in the Box, I'm just going to take the ones off at the side. Honestly, they just irritate my edges, so I just get rid of them and we have the elastic band adjustment in the back. So I'm just gon na adjust that now we're going to use the scalp tape today the true scalp tape - and this is what the wig looks like without the scalpy - you can clearly see tiny little grid lines, but they're not that bad all right. So I'm gon na apply the scalp tape and this is the instructions on how to use it. Now. I'Ve used the scalp tape before, but I did not really quite follow the instructions, so I didn't really do the best job at applying it. But first thing I'm going to do: is I'm actually going to go in with my hot comb to flatten this wig? So when we put it on it's nice and flat, you guys My Heart. Comb literally stopped working right then, and there on me, like. I literally had to order a whole new one but anyways. Let'S move on to the scalp case, so I'm going to cut away the edges because that's what the instruction says to cut away the edges of the scalp tape all right, so it should be looking something like this now, I'm gon na turn the wig inside out Put it back on my canvas heads and, as you can see, there's a bit much at the end, so I'm gon na go ahead and cut that away also because I don't need all of that and you guys they do come in a variety of Shades. I went with the cappuccino, I think it's cappuccino. I will link it in the description box down below, but they do have. I think, three different shades. Now, I'm not gon na put it right at the starting point of the hairline, because you will see it. You want to step back a little, maybe like three um inches away from the hairline and then put it onto the lace and just press it down and literally it's that easy to apply okay, so I cannot see the grid lines it's looking like skin. Now I have used a scalp tape before and the lace was a little bit too dark, so the scalp tape was showing up too dark, so the actual lace. But I have the lace color right this time and I'm really loving how this is looking. I know I mentioned three inches away from the hairline that was wrong. False do not follow that more, like one inch from the hairline now we're gon na go ahead and start cutting the lace, because we're gon na apply this wig um. Please be careful when you guys cut your lace. This lace is so thin. I could barely see it. I kind of like pinch myself with the scissors there, so I'm just putting some hair out of the way I took two pieces out just to create a more V like widow's, peak hairline and I'm gon na go in with some lace glue and apply to my Forehead area and I usually like to use two layers of glue, so I'm going in with my rat tail comb. Now, I'm a little fast when it comes to the application. I do have very very detailed videos if you are a beginner, two wigs on how to actually apply your wigs, so I'm gon na go in with my scissors and cut away that extra piece of hairline extra piece of lace. Remember. I was telling you these wigs. The hairline do go down low, but I love the hairline because it does look more realistic. It'S one of the more realistic wigs I find pre-made wigs that you don't really have to do a lot of work to to make it look. Now I'm just putting my hair out the way and I'm gon na go ahead and cut away. The extra lace on the side, like I mentioned before their wigs, do tend to go a little low like the hairline. So it does look a little lower on me. So I do have to cut away a lot of extra lace and I do cut away a bit of the hairline as well, but the areas that I do end up, cutting I'm gon na have to go ahead and twist. Those areas - and I forgot to mention to you guys that I mean you guys seen that I did not do the ball cap method like I usually would now, because I am wearing the true scalp tape. I don't have to do the ball cap method, like I usually. Would it's still going to give the wig a realistic look now I went ahead and I added some lace glue at the side and you just want to wait until it dries clear before you pull that lace down so once it's dry, clear, I'm gon na go In with my got to be free spray, just at the edges and I'm going to take my blow dryer on a cool setting and just melt that lace down using my raw tail comb if you're new to wigs and you do not want to do the glue Method, you can also do the glueless method, there's a lot of glueless products that you can use to secure your wigs. I do have videos on a glueless application and, as for the hair, VP wigs, you can wear them glueless with absolutely nothing A lot of times. I do wear my wigs glueless as well. I just do the elastic band method because it comes with an elastic band. Now it's not going to be perfectly melted down when you don't do the glueless method, but you know it still looks pretty good. So right now, I'm just gon na go in with the got to be freeze spray. You can also use a melting spray, but I'm using the got to be to melt down the edges and honestly I really love how it looks. So I'm not going to be doing a lot of baby hairs today, I'm not sure if I'm going to do any. Just yet, but yeah, I really like how the edges are looking on this wig now, because I cut off a lot of the hairline to make it fit from my head. I'M gon na go ahead and tweeze away the hairline, because I literally cut away all the thinner parts, so I do have to tweeze it. So the hairline look more realistic and guys. My hot comb was completely broken, so I had to go in with my got to be freezer and spray, the top of the hair just so it could look flat. Usually, when you have a new wig, you need to flatten it down with a hot comb, but I had no hot Combs, so I had to make do and I'm just cutting away a little bit of the edges. I said I wasn't gon na. Do any baby hairs, but I'm just gon na keep it super super natural. So I'm going to cut away a bit of the hair on the sides. I say I was struggling to get this wig flat because I had no hard comb. I went in with a lot of mousse. I usually don't even use this much mousse on my wig, but I really wanted to flatten it down and I'm just gon na go in with my little Edge brush as well just to help to melt down the lace. So I just brush the mousse into the hairline. Now I tied it down off camera, but I didn't get to show you guys that step and you guys I had to go old school. I literally use a iron like an actual clothing iron on the top of the wig, not at this scene, but after I got off camera, I did it off camera just to flatten out the wig. I don't recommend doing that, though, because I don't want you guys, burning yourself with iron. That would not be good, but yeah. This is pretty much the completed. Look. I went ahead and did my makeup I'm really here for this length. I love how it turned out and the name of the wig. It'S called the Leslie. I think it's the Leslie wig. I will put it in the description box down below but yeah. I love the lens. I love the density and I love how it turned out with the scalp tape. Now I added some Foundation powder at the line right at the center part. Just so it Blends in nicely where the tape did not go because it had like a kind of demarcation. Mark so I added a little bit of foundation powder and I'm just gon na go in with my flat iron and just curl the hair under so you can really see the layers in the wig but yeah. This is the completed. Look. I really hope you guys enjoyed this video. Please give me a thumbs up if you do - and I hope this tutorial was very helpful to you so yeah I'll see you guys in another video very very soon. I love you guys so much and thank you for watching bye, foreign

Comments
L B: That lace is perfection
Emoretta Robinson: Even without the straightening comb this still came out beautifully.
Created By Nori Elan: This looks amazing! I love your videos! You're very well spoken, not posing or doing too much. I very much appreciate your videos! I've been following you for YEARS! I loved your makeup tutorials. Thank you for continuing to post! Happy Holidays!!!!!
Jamie-Lee Dalmacio: How are you so beautiful with and without makeup like wow absolutely fabulous as always ❤️
Houseofvanity: Mamma!!! Your just beyond beautiful!!!! Love your videos you got me back at loving wigs!!!!! Thank you for being so inspiring Xoxo house of Vanity
Karen Cha: I literally love live your wig videos. I’ve watched them over and over again. I love them please keep uploading
abawitx: I had tried Hairvivi before and absolutely hated the thickness and bulk of the cap. It was actually too hot just due to the fabric thickness. But this looks more promising now.
Nayyomi&Greg Hiatt: Omg love that you are posting more often I get too excited when I get the notification of your videos
Brown Cow: Absolutely beautiful. I'm 70, and still trying. tyvm
Nicolas Garcia: Eu amo tanto seu canal ❤️❤️❤️✨
eli officialmua: Yesss to the iron it never fails, this looks bomb!!!!!!!
Carlene Clark: You did great work without your regular supplies ❤❤❤❤❤
Ruxy Bratz: Perfect
Юлия Каштанова: Благодарю, очень Красивая Женщина. Привет из Москвы.
Celeena Lee: You should try to do more colors!!!
Queen Monique: Hey sis. I really thought you posted a brown kinky wig from wow African recently.I can’t find it today. I was trying to buy it thru your link.
Nadira Yasmine: Hello beautiful ❤️
Chantel Keona:
Alika Maisuradze: