How To Color A Wig Pink Highlights | Black To Pink Hair
- Posted on 21 February, 2022
- Color Lace Wig
- By Anonymous
Thank you for watching! Don't forget to subscribe to my channel & join the fam today!
NEW VIDEOS EVERY WEEK!
*Click the notification bell so you don't miss new content!*
Please smash the like button & subscribe to join the tribe!
If you have any suggestions for future videos, comment down below! Love you all!
Facebook: DaSnatched Collection
Instagram: Main page https://instagram.com/iamdanackc?igsh...
Online Wig Course - DaSnatched University: https://dasnatcheduniversity.teachabl...
One on one in person wig class - MIAMI, FL:
https://www.dasnatchedcollection.com/p...
Beauty & Makeup page
@dasnatchedbeautyco https://instagram.com/dasnatchedbeaut...
Hair, Wigs & Products page
@dasnatchedcollection https://instagram.com/dasnatchedcolle...
My brand: https://www.dasnatchedcollection.com
TikTok: https://vm.tiktok.com/ZMe3n4y76/
My links: https://linktr.ee/danackc
Business Email: [email protected]
____________________________
Name: Danack C.
Height: 5’3
Age: 24
Location: FLORIDA - Miami born & raised
#valentinesday #pinkhair #watercolor
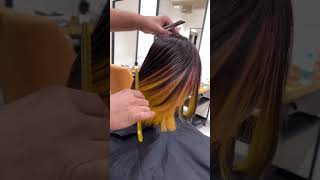
Be strong and courageous do not be frightened and do not be dismayed for the lord. Your god is with you wherever you go, joshua19 hey, y'all, welcome back to my channel. Today we are going to be making this beautiful, pink wig. You guys will see it at the end, so the first thing i want to do is part it down the middle, because this will be a part down the middle, and i want to show you guys the utensils that we're using a bowl um your choice of Bleach and your choice of developer, i'm using quick, blue and 40 volume developer once i mix that together, i'm going to put that to the side, make sure you wear gloves as well. You do not want to find out what happens if you don't wear gloves now. You want to part well i'm parting, the money piece, that's what it's called in the front, a little two little colors in the front. That'S the money piece! So i'm gon na go ahead and bleach that with the bleaching solution that we created with the developer the powder in the developer and then, of course, i put a little bit of aluminum foil to process to make this process faster. You know that heat from the aluminum foil makes the process faster, and then you want to make sure you get every strand of hair the front the back in between just take your time and really apply that bleach throughout all the hair strands. Once you're done, you want to go ahead and fold it, so you can trap all that heat. That'S how i like to fold mine as you can see kind of like how you fold a hot dog y'all and some aluminum foil, some real food to trap. The heat inside is the same concept that you want to do with the wig. Now i'm parting, it down the middle, because i'm about to part um, i'm parting, really random sections. Based on the look that my client wanted. She showed me like a look-alike pick of what she wanted and i usually don't do that. But for her i decided to go ahead and do it because it's fun and it's different - i've never done it before, but i knew that i could achieve it. So i went ahead and did it based on that, but i'm really doing it in random pieces. What in like in a way that, i think, would look good. So i'm bleaching, the very bottom y'all know the sections that you bleach first will process quicker and those will be lighter. So that's why i chose those two sections first, because i want them to process faster and be the lightest parts on this unit. Now i took some pieces on the side. These are going to be like the little highlight colors in pink. It'S going to be highlight colors of pink throughout the wig, so i'm doing that on each side. Again, i'm going through each strand, i'm really taking my time and making sure i get the front and back of each hair folding it up and, like i said, i'm doing the same thing. On the other side, i'm making sure i use a generous amount of product and i'm just really taking my time having fun with it um and yeah. That'S what it's looking like y'all and you just want to make sure you take your time and get the back. Don'T forget to get the back of the hair um now that we're done with the sides, so we're going to do the back same concept. I want to do like highlight streaks throughout the whole wig of pink and then now that i've done most of the uni. I'M going through the back and just choosing random pieces to color again and y'all. Now so y'all gon na see that we're gon na process this wig two times because i want the hair the hair is coming from black to blonde. I want the hair to be as bro blonde as possible before we do the watercolor method. I decided to do the watercolor method because it will be the easier easiest way to achieve the pink y'all will see what i mean. So this is just the step. One of me processing this hair, but i did it two times. Of course, i didn't record both times. Oh, i did end up recording both times. You guys will see that, but i just sped it up the second time around. What i'm doing here is i open back up the money piece that we did first and i'm adding more bleach to it to help it process even lighter and even faster, because you know that bleach will seep in through the hair um, and you just want to Just go back in and apply even more to make sure that it's still processing really good and we need to get it as light as possible. So that's what i'm doing here, i'm gon na do that throughout the rest of the hair as well. Like all the other pieces that i've done already, i'm gon na open them back up and i'm gon na apply more bleach to it, as you can see like the bleach does not look the same compared to when we first applied it. So that's why it's important to do this and when i re, when i re um bleached up hair for the second time, i did the same concept: everything that i'm doing right now when i re-bleach the hair for the second time. I did it again, so you guys enjoy watching me. Do this for a little bit, so here i'm grabbing two pieces by the ears. I decided to add more bleach well bleach to those sections to bring out some more color when we, so when we curl it all that color can show so, like i said, i'm just eyeballing this really and seeing where i feel like you know, some color will Really pop throughout the unit - and i didn't put aluminum foil on those pieces of wig, in which i did wish, i did so if you're watching this and you're following this guide, i've put make sure you put aluminum foil on all the sections you guys will kind Of see why, in the end i don't know - maybe it's just me overthinking that, but that's pretty much it for the first process of the hair. This is what it looked like after washing and blow drying. Now, i'm doing the same thing again. I sped up the process and i'm just going through each section applying more bleach, and this is what it looks like after the second time around. I even bleached the knots this time now we're going in with the color i'm using hawaiian fire. I use mostly this color and i also use a little bit of raspberry prism. You'Ll. See me add that towards the end, so i eyeballed a good amount of it. Now i'm gon na use a comb to mix it all together you can use always you can use a fork, but i'm using a comb because yeah. Why not? This is gon na be the same comb i used to comb the the wig throughout this video you'll. See so now that the mint color is all mixed in and dissolved um i went ahead and just dipped the wig right in, and i'm gon na keep applying that color until i feel like the wig is the color that i want. So that's what i'm doing here, i'm gon na keep applying it, keep pouring it in and now like putting the wig in and out the water until it's the color that i want. So that's what i'm doing here, um and then, of course, you want to make sure you brush or comb throughout the wig. I do advice you wear gloves, especially you have nails on it's going to color your knit it's going to stain your nails, but i have black nails on. So i don't really care um and yeah. Just keep combing the wig and keep applying the color as you can see fit. The water was warm, but i do advise you guys to use cold water because it just like moving forward. I'M gon na do all my color watercolor methods with cold water because cold water um seals the cuticles compared to hot heat. It opens up the cuticles and that's why our wigs bleed. That'S why our wigs bleed more with hot water. So i don't know who started this little hot water trend when it comes to watercoloring, but it's really cold water that you need to use it's something i just learned. So that's a good tip for y'all. So, as y'all saw, i just kept adding more color a little bit throughout this video. I did add again, like i said a little bit of the raspberry prism. I didn't show it on camera, but i just wanted to let you guys know that it really wasn't necessary, because i really believe i would have got all the color that i desired with just the hawaiian fire. I think that's what i showed you guys. It'S just that color. So once the wig was um colored to my desire, i let it sit for a good 15 minutes in that water and then, when i washed it out, this is what it looks like so freaking, pretty and after blow drying. This was the final result. Now i'm just styling it look at the little highlights it looks so freaking good. I feel like this is exactly what my client wanted and i really slayed it. You guys will see the final results in a little bit. Thank you guys for watching, please, like comment and subscribe. Let me know what y'all think i really enjoy doing this. I really have fun doing this and i really will continue to do more colored wigs throughout the year and the rest of my career making wigs. So please continue to watch to see how the hair turns out after curling. I hope you guys love it and thank you for watching bye.


Comments
JayDen mcallister: So dipping the whole wig didn’t effect the color of the black or stained the lace ?
Whoismykekee: I want a cotton candy pink, what color should I use ?
Adarion Johnson: Question ? Ok so I bought a black and grey highlighted wig if I think I water color it like how U did do u think the color would stay on and change it from grey to pink ?
Erick Charles:
SnextFinest: Some good colors
KeepinUpWithCookie: It’s a brown piece
Miss Lovely: Hey did u bleach the lace