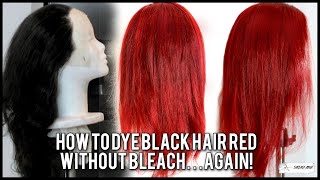
How To Dye Black Virgin Hair & Wig To Bright Red Without Bleach | Barbara Atewe
- Posted on 24 March, 2021
- Color Lace Wig
- By Anonymous
BE SURE TO LIKE, COMMENT, SHARE & SUBSCRIBE!!!
Wassup y'all! In today's video, I'm showing y'all how to dye black virgin hair to bright red with out bleach! I used the L'Oreal Hicolor Hilights in Red to achieve this bright fire hair color in just one step. I also show you how to bleach hair without damage. Enjoy!
#redhair #nobleach #blacktoredhair
⇣ P R O D U C T S U S E D ⇣
(3) L'Oreal Hicolor Hilights in Red ⇢ https://bit.ly/2EOSiHf
Ion Absolute Perfection Booster Step 1 ⇢ https://bit.ly/3rjvRMG
40 Volume Creme Developer ⇢ https://bit.ly/3tMka2M
Ion Color Sealer ⇢ https://bit.ly/2Wirh4z
_____________________________________________
FOR ANY BUSINESS INQUIRIES (NO PERSONAL EMAILS PLEASE): [email protected]
CONNECT WITH ME!! ⇣
Subscribe http://bit.ly/subscribebarbara
Instagram ⇢ @BarbaraAtewe
Twitter ⇢ @BarbaraAtewe
Snapchat ⇢ @BarbaraAtewe
_____________________________________________
MY HAIR JOURNEY:
MY RELAXER TOUCH-UP TUTORIAL ⇢ http://bit.ly/2DWE82Y
MY BIG CHOP ⇢ http://bit.ly/2RvGuh8
I LEFT A RELAXER IN MY HAIR FOR 3 HOURS ⇢ http://bit.ly/355kPAi
I RELAXED MY HAIR TWICE IN ONE WEEK ⇢ http://bit.ly/2LASASu
MY LACE WIG SERIES ⇢ http://bit.ly/33uaWME
MY FLAWLESS LACE WIG INSTALL ROUTINE ⇢ https://bit.ly/3r0A1ue
HOW TO MAKE A CLOSURE WIG ON A SEWING MACHINE ⇢
HOW TO MAKE A FRONTAL WIG ON A SEWING MACHINE ⇢ https://bit.ly/3mjSiyX
_____________________________________________
HAIR INFO:
Editorial Looks Hair Company
TEXTURE & LENGTH⇢
IG⇢ @editoriallookshairco
Email⇢ [email protected]
ORDER YOUR CUSTOM WIGS & EXTENSIONS @editoriallookshairco on Instagram!
_____________________________________________
Location⇢ Austin, TX (Toronto, Canada)
Camera⇢ Canon m100
Lenses: Canon EF-M 55-200mm Lens & Canon EF-M 15-45mm Lens
Age & Ethnicity⇢ 25 & Nigerian
barbara atewe,black hair to red,black to bright red hair no bleach,black to red hair no bleach wig,dying my hair black to red no bleach,from black to red hair,from black to red hair without bleach,hicolor,hicolor hilights,how to,how to dye black hair red no bleach,how to get red hair at home,loreal hicolor highlights red,loreal hicolor highlights red on wig,no bleach,red hair,red wig,loreal hicolor red,hair tutorial,red hair at home
What'S up y'all, my name is barbara atwood welcome back to my channel so for today's video i'm going to be showing how i went from this black wig to this fiery bright ray with no bleach. So please, like comment, share and subscribe and let's get started all right so to begin. I have my 6x6 closure that i just made in the previous upload i'm making this wig for my friend for her birthday. She wants she's a lover of red, so i decided why not give her a fiery bright red for red wig for her birthday, so i'm taking my vaseline and i'm putting it all over the lace just to make sure it doesn't stain, because i will be using The l'oreal high color in the shade red i use three packs along with 40 volume developer and also the ion absolute perfection booster, just to make sure it's like a olaplex substitute alternative. I mean so that um it doesn't damage the hair as it's lifting it. So i'm just making sure that the vaseline is all over the lace, because red is a very hard thing to get out of lace. So you do not want to stain it because once it's there girl it's hard to get out all right. So now i'm just taking the t pins out of the lace um and i'm going to flip it over onto my styrofoam head, i like to use my styrofoam head for when i'm dyeing my wigs. I don't like to use my canvas blackhead because girl she gets messy. I don't have time to be. I don't have time you know so just use a disposable um, well, not disposable, but like a styrofoam wig head, where you don't mind it getting stained all right. So look at her and all of her glory. Okay! So now we're going to mix our color again, i'm using my um three packs of l'oreal high color highlights in the shade red and i'm mixing it with 40 volume developer and the apps. The ion absolute perfection step, one booster, i think that's what it's called. If it's not, if that's not what it's called, i will link it down below and also put the exact name of it on the screen. So i'm just cutting the ends, because i find that it's easier than just squeezing it out through the little hole opening that come that it already comes in the tube with and then you'll see that the little um cup on the side with the whisk in it. That is my bleach mixture, because i do want the front to just feel a tad bit lighter than the rest of the hair. So i'm i didn't include it in this video, but i bleached a little front first and then i rinsed that out and then applied the high color highlights to it. So it's a little bit brighter than the rest of the hair. So all right so now i'm taking my 40 volume developer and i'm just making sure that there's enough, i don't measure, is that like a bad thing, i mean like it came out perfect, but i feel like watching this back. I see that it looks like a little bit too much, but it was the perfect amount because i had i literally ran out after i was done because i literally saturated the entire wig so yeah i don't really measure. I know it's like one to two parts but girl, whatever all right so so now, i'm uh just sectioning the closure away from the rest of the hair, just so that um, i know where i'm stopping and where i'm ending, if that makes sense, um and then I am going to part the front of my wig, where i want the rest of the hair to be brighter, and then i am going to apply the bleach mixture using my highlight wraps. Those things are, god sent because you put it on and you don't have to like do like the whole fold method with like the tail of the comb, just to make sure that the the wraps don't slip off and it allows and since, like once liquid touches It and you fold it over: it adheres to each other. You know it's a really. It'S a good. It'S a great girl, it's a great girl, okay, so we're parting, the hair um i'm taking about. I want to say like an inch and a half from like the start of the hairline and then um, i'm just sectioning that off and then i'm splitting it into two or three. I think i can't remember, and then i am putting my highlight wraps and applying the bleach mixture on there is um uh okay, so i have like my first section sec. I have the first part of the hair sectioned off and then i have my gloves on and then we are just going to slap it on. Since this is not being highlighted. I don't have to like be careful with my sectioning off, because it's all gon na be one solid, color. Okay, so you just wan na make sure that every part of the wig is saturated from root to tip okay, so um, i'm just slathering it on massaging it in, and then i'm also gon na comb. The sections through just to make sure that everything has an even application so yeah, that's pretty much it to be honest with you um, especially since i put vaseline on the closure. You don't got ta like you, know, comb it and be careful with that either, because the vaseline is gon na prevent the lace from staining. So you can really just slap it on and go about your business. Okay, now i do want to say um, apparently the maximum time you can leave this on is an hour, but i left it on for two hours because i had stuff to do um and i was moving around a lot during that day, so um yeah um. I don't think it would have really made a difference between the extra hour. It didn't damage the hair. Because, again, i used the ion absolute perfection step, one booster, whatever it's called and made sure that it was thoroughly mixed through the um, the high color and the developer mixture, so yeah y'all will see at the end there's like no damage whatsoever. I really, i really did that with this wig. I really did that. So, if y'all follow these steps too minus the extra hour, i really feel like it. Y'All could do that too. Okay, so yeah just continue watching and enjoy the vibes and the music, and all that things of that nature uh go go is oh, okay, so after letting us sit for the two hours, because i had stuff to do um i thoroughly rinsed it out, but before I shampooed before i shampooed, i put the ion color sealer because again since we did it red, i want to make sure that the red is sealed in the hair, because red bleeds a lot. You know she bleeds a lot and it's quite annoying. So this is her in her wet state. Look at how bright she looks. I really did that. I really did that so um, i'm taking my eye on absolutely and i leave it in for like um 15 minutes, and then i rinse it out, and i did like the shampoo conditioner all that fun stuff, and this is how she looks at the end. Okay, she's really that girl, so i really hope you guys enjoyed this video, please like comment share and subscribe, and i will see you guys next time: okay, bye,
Comments
Barbara Atewe: Updated Tutorial: https://youtu.be/j3lHlt3lnS8
Sincerely Smak: “I really did that. I really did that” You ready did tho sis! ❤️
Marie Trujillo: Amazing! ❤️
Izolene Netta: Beautiful red. Amazing job
Mamie Richburg: Hello absolutely amazing. Question please did you bleach the knots first
Simone R. Jenkins: Looks Great! What shampoo and conditioner did you used.
Jo: Love It
Mznaidaboo Hughes: Yeah I tried this for my bundles and the hair came out burgundy not red.
Jacqueleen Sykes: Do you leave it in until you see the color start changing ??
Cortney & Keela Robinson: How much of the ion booster did you use?
Chavaun Parkes: Omg I can’t believe this
Janene Newell: Is it supposed to turn dark while dying it ?
Toya smith: So do you do the same steps if the lace wig is a called a natural dark?
Neisha SB: What color can I use in adore for this color wig
I. Storm: Where did you get the wig and whats the density
G. CORP: Whats the song girl!!