How To Dye Black Wig Red Without Bleach Ft Kiss Love Hair
- Posted on 25 November, 2021
- Color Lace Wig
- By Anonymous
Hey Lovelies, in this week's video we are diving into the world of colors. I'm showing you how to dye your black wig red without bleach at home by yourself and I really hope you enjoy it.
----------●Kiss Love Hair●----------
Hair Details: Deep Wave 13x4 HD Lace Wig 180% 26 inch
Direct Link : https://s.click.aliexpress.com/e/_puff...
Prom code on AliExpress: 3KISSLOVE $3 off over $5
Straight 13x4/13x6/5x5 HD Lace Wigs?
https://www.aliexpress.com/item/330469...
Body Wave 13x4/13x6/5x5 HD Lace Wigs?
https://www.aliexpress.com/item/330460...
Highlight 13x4/13x6 HD Lace Wig?
https://www.aliexpress.com/item/330633...
Kinky Curly 13x4/13x6/5x5 HD Lace Wigs?
https://www.aliexpress.com/item/330249...
613 Lace Front Wigs?
https://www.aliexpress.com/item/329756...
★KissLoveHair Official Store on Aliexpress??
https://www.aliexpress.com/store/17274...?
#AliExpresskisslovehairwig#kisslovehairaliexpress#kisslovedeepwavewig
WhatsApp: +86 15137442011 E-mail: [email protected]
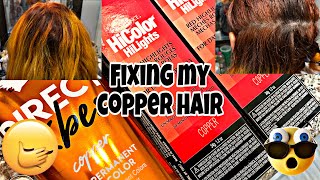
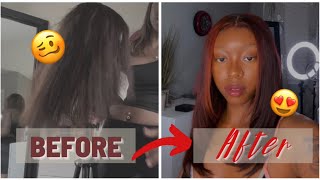
Hey lovelies welcome back to my channel. I am the basil mercy in case you don't already know, and in today's video we're going to be turning this black wig, we're going to dyeing it into a red color without using bleach. Alright, you guys have been saying: give us color, give us color. We want a color tutorial. I decided to go with this very simple tutorial for you guys, and i really hope you enjoy it. Love you so lovelies. The hair we're going to be using today is from kiss love all right. It'S their 13x4 HD deep wave wig in 26 inches, so it comes with a wig cap and also just lashes inside. So i'm just going to go ahead and show you guys how this wig is constructed. It comes with three wig combs at the back, all right and also with adjustable straps. So i'm just going to go in and jump into the bleaching of our knots for bleaching. Our knots, the first thing i do is take my got2b spray and just kind of spray around my hair in the front of my lace, so it doesn't get or interfere with when i'm bleaching all right. So this is what your wig should look like when you're done spraying that it should be all layed to the back. So i'm just going to go ahead with my developer and my bleaching powder mix that together get my right consistency. All right, i'm going to show you the kind of consistency you you kind of want to get alright. So this is the consistency i would prefer you get something that it's still able to be buttery like lay properly all right, and it's still very thick enough not to go through the lace or sip through the lace. Alright, so i'm just going to go ahead and scrub that in at the back of the wig, first of all at the back of the lace, because the front is kind of single knotted and the back is double knotted. So i just went in first with the back. I did that for like 20 minutes before i went in with the bleach again in the front all right, so this is what it's looking like after it finished bleaching pretty right. So i allowed it air dry, and this is what it's looking like so now, we're gon na get into dyeing our wig red all right. So that's the main purpose of this tutorial, dyeing wig red first thing i did was go in with my got2b spray. Again on that lace. You want to make sure it got2b spray is all over the lace. Alright, this just kind of creates a barrier for your lace, not staining, but even when you do this, you just still want to be careful. So i'm just going to go ahead and use my l'oral hicolor all right. This is the color you want to use if you're not using a bleach, all right, it doesn't involve you using the bleach. All you have to do is mix your dye with your developer and you're good to go all right, i'm using a 40 volume developer, like i just showed you all right. So now, i'm just kind of trying to get everything out of the tube all right. So the first thing i do is kind of cut off the back of the tube and just press everything out. Then i open the front and press everything out all right make sure you squeeze all your product out of that tube. Alright, every drop counts. Okay. So i'm just going to go ahead and mix that rogue and magenta that's red and magenta together before adding my developer guys see. This is the mistake i made with this wig. If i knew better, i would have added more developer. One number two: i would have used the measurements, because first thing i did was just went in. I used four total of the hicolor, but i went in with two first of all so because i went in with two and i didn't use a measurement, my developer level and with the first and the second one was different. So you kind of just gave the hair two shades. If you know what i mean, so you want to make sure you kind of go in with a measurement to just kind of see what you need and how to go about it. So now i'm just going to go ahead with the lylan bag over my canvas head, because i don't want my canvas hair to stain. Then next thing i'll do is take my frontal and just separate it from the rest of the hair. Okay, then i go in and section my hair again and just kind of section it for the coloring or the dyeing part, so i'm just going to go ahead and apply what we've mixed and just apply it on the wig. So if you see this - and you see the other one i'm going to mix later on in this video you're going to see that one is a lot more, a lot more thicker and it's a lot more - i don't know you just see the difference with it, But this works too, but i just prefer, if i put in more developer but the thing you have to notice that the more developer you put the more the hair is going to lift in color and the less developer you put, the less the hair is going To lift and color all right, so more developer, more color, basically, so now guys, i'm just going to get into doing my frontal, you want to make sure you're very careful all right. What i do mostly is, i tip the ends of my brush on my bowl and just kind of make sure that i don't have excess dye on it before putting it on the lace, because you don't want that lace to sip through, even though you've got the Got2B protection around the lace. You still want to be very careful when doing this all right. So for this part, what i was saying is that the developer i used for this part was not as much as the back, so it didn't process as well as the front i'm going to show you guys the results it gave wasn't so good or so perfect. It didn't lift as much as i wanted to so i actually went in again and actually re-dyed it. But the thing with me that i actually kept a little bit of dye from the process already because i just knew there was going to be a correction somewhere. So i kept a little bit of dye, so i don't have to run to my local beauty, supply, store and start looking for dye the next day. So I kept a little bit which i'm going to show you very soon. So this is what it looks like after i'm done dyeing it. I just went in and kept it in the bag for three hours. So after three hours i shampooed conditioned and let it dry, and this is the result i got - i'm not really impressed or i wasn't really impressed with it and if you can see clearly the back looks a bit more reddish than the front. The front is giving more of a brown vibe and i was like yo. This is why i saved some all right. This is why i saved some dye left and i'm just going to go ahead and use that to brighten the front. So this is the remaining from the dye i was talking about, so i just left some of it and then i'm just going in with my foil paper and then i'm just going to place that underneath so it doesn't interfere with the other ones. All right. So you see those black beads that i have on this week. I actually went in with the dye again and just kind of touched up on them all right, using the foil paper as a protectant from the other wig. I just kind of went in again and you see this mixture guys. You see how thick it is compared to the other one. I don't know if you can see it, because i went in with a lot of developer for this one, a lot of developer. I don't know the measurement, because i didn't use the measurements very stupid of me because, with the measurements, you're kind of assured that they all process the same and kind of all live the same, but that's fine all right. I actually like the way the wig ended up, so i'm not complaining, but this is what i just did and i didn't even actually spray the front when i was doing this process. I didn't use the got to be barrier or protection and i still just kind of went in very light-handed and it came out really well. My list wasn't stained. I actually just took my time and applied that. So this is what the wig is looking like, after plucking and after drying. I let it dry, i always let my wig dry and for the second time i actually left it for an hour 30 minutes, so it kind of just leave because it has lifted before so i let it lift a little. So i'm just going to go in and start installing this wig. First of all, i take my alcohol on a cotton pad and just kind of clean where i'm going to place the wig all right. So i go in with my edges, brush and kind of just brush my edges into place. Then i'm just going to go ahead and try and do the ball cap method, but i went in with the board vodka method. Okay, so guys using glue for my wig is something i'm very new to i'm a very got to this freeze blast spray girl all right. I really love them to spray compared to the glue, but i'm trying to be more i'm trying to learn how to make my install more flawless and kind of learn how to make it my own hairline and not just the hairline. The wig comes in i'm trying to make sure that i get my hairline and get it to look as natural as possible, so i'm kind of hopping to the glue side and just kind of trying it out. Basically so my install is is coming together. So i'm not a professional, i'm still learning how to install. Basically, i can install a good wig yes, but i'm learning how to be better, because i really want to be able to lay my hair and lay perfectly okay. Okay. So now i'm done with the whole shebang, all right, i'm done with the whole lace cutting and all so i'm just going to go ahead and get rid of that white cast using my foundation and powder all right. So i'm just rubbing that on the white cast and you can actually see the difference on both sides already how one side looks like skin and one side is giving the white cast off so i went in again with baby hairs all right. I decided that this look is not going to be complete without some baby hairs, like just some baby hairs here and there nothing too dramatic, nothing too much and yeah. It was actually very good with the baby hair like he actually just gave it a more. I don't know anymore something something something something all right give it something beautiful finish. In my opinion, anything i've, not perfected. How i do my baby hairs, yet i'm getting there, but for now we always just drop a little something something and just let it let's let it flow as it comes in, and i went in to do my makeup and look at this fine girl like when I took the bandage up, i'm like no, no, no, no, not the bandage. When i took the elastic band off, i'm like god, this girl is so pretty. This hair is so pretty okay. So i'm just going to go ahead with my wax stick and kind of just mold that hair to my head, all right, mold it to my head. Let it you know going with my hot comb and just let the hair be mooded. Let it look flawless. Okay, the thing with me guys, if i was admit i do not know how to cut a center part if i'm not in front of a standing, mirror it's gon na sound, very weird, but i think i kind of got the center of my head in this Video, i'm not so sure but yeah. This is how the wig is looking like when we're done, i'm just going in water once again and wetting the hair all right to kind of just revive those curls all right. I didn't even think the the clothes will come back after the procedure. I'Ve done, but the curls came back and it was absolutely stunning. This is what it looks like when it's wet all right and i'm going to show you what it looks like when it's dried in a second. Let me know which one you prefer. I actually prefer when it's dried than when it's wet, i actually prefer the dry. Look a lot because it just looks very, very cute: there's just something about the dry look and it looks more better when it's dried. So this is the dry laces and gentlemen, and this dry look is given. It is absolutely given i'm in love with how to dry look looks like so lovely. This is the final look. This is how the week came out. I really hope you enjoyed this tutorial. Let me know which other color you want me to try out on this channel because we're going to be trying more colored, hair right here, all right, so lovely. Thank you so much for watching to the end of this video and, if you're, watching the end of this video, you already know you know what you already know: you're the real mvp. I love you and i'll, see you in my next week's tutorial, bye,


Comments
Enecia Sterling: I love the hair hun , it looks so good on you ❤
chinonso Joy: The look, the hair, everything is giving ❤️
Marvy Kim: One of my favorite one's you have done
πg•Vy~Beaute: So beautiful!
Joan Okorie: So lovely can you please do a honey blonde dye
Mathias Joyce: Beautiful
Peace Grace: You are not stupid jare... We all learn by errors. Love the fact you show us your errors too so we don't end up falling into them Weldone hannie
Sylvia Chisom: Which bleach powder did you use?
Seun Shey: It everything for me
Enecia Sterling:
Pabii Moloi: Magic hands