Amazon Prime Wig: How To Get The Perfect Golden Brown Hair Color With Box Dye || Isee Hair Amazon
- Posted on 08 May, 2020
- Color Lace Wig
- By Anonymous
#AMAZONPRIMEHAIR BOXDYECOLOR #BLEACHINGHAIRBROWN #BROWNBOXDYEHAIRCOLOR #ISEEHAIR
HAIR
ISEE Hair Amazon Store
ISEE Hair Brazilian Straight Lace Front Wigs with Baby Hair 150% Density 100% Unprocessed Pre Plucked Human Hair Wigs
GET IT IN ONE DAY with Amazon Prime Shipping
BEST AMAZON AFTER SALE SERVICE
Same Hair in this video: https://amzn.to/3dA0WpU
ISEE Hair Beauty Store on Amazon: https://www.amazon.com/isee
WhatsApp: +8615603743122 (Wholesale Price Provided)
Contact us: [email protected]
IG: @iseehairamazon
https://www.instagram.com/iseehairamaz...
P R O D U C T S - U S E D
(AFFILIATED LINKS )
Bonnet Hood Hair Dryer
Edge Brush
Revlon ColorSilk Beautiful Color 41 Medium Brown
Revlon ColorSilk Beautiful Permanent Color, [57] medum golden brown 2 boxes
Dark N Lovely Permanent Color 378 , Honey Blonde 1 box
Razors For The Lace
Favorite Tweezers
Blond Me Bleach
Quick Blue Bleach
30 vol
40 vol
Silicon Mix Deep conditioner
Cantu Mousse
Flat Iron: BaBylissPRO Nano Titanium-Plated Ionic Straightening Iron
Wig Stand: GEX Heavy Duty Canvas Block Head Tripod
Affordable Wig Stand
SINGER | Heavy Duty 4423 Sewing Machine
ZigZag Scissors
T-pins & Needle Set
- https://go.magik.ly/ml/kkz3/
Nylon Thread
- https://go.magik.ly/ml/kkz4/
Wrapp-it Styling Strips
Mesh Dome Caps
Shapie Metallic marker
S O C I A L - M E D I A
|| Website for Hair || IamAiyanyi.com
|| Instagram || Aiyanyi or https://www.instagram.com/aiyanyi/
|| SnapChat || Aiyanyi
|| FaceBook || Cyn Aiyanyi or https://www.facebook.com/profile.php?i...
D I S C L A I M E R
|| FTC: The products in his video was sent to me for review||
+BUSINESS EMAIL(ONLY): [email protected]
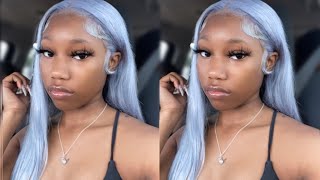
Hey best friends, welcome back so I see a company that I've worked with. You know more sometimes sent me this week. This is a 22 inch straight wig and it came with like instructions and some stocking caps and stuff like that. So I might a fight this week. Okay, I added an elastic band. I cut off the sides, um combs and I added three rows of tracks in here, because I just want to do it fuller, because I knew I was going to go in and bleach this wig to a honey Brown stage, and so this is what the hairline Looks like and the lace is medium brown, okay, so for this tutorial I use some box dye and some bleach you're gon na need both I use Revlon and dark and lovely. I mix the colors together because that's this is what I had on hand. I had a lot of upside so and you need some good bleach, so this is the bleach I'm using. This is blondie 9 with bleach, and I use a 30 volume developer for this. I went in and I separated the hair just divided it into two and I'm just gon na go in and generously apply the bleach to the hair. Now I started using my brush, but then I just went in with my hands because it just did a faster job for me, so you're gon na see me switch from using the applicator brush to be actual to my actual hands. So I wish I would have used more of a dark and lovely lighter color than the golden medium Brown from Revlon, because the medium golden brown really stood out. It came out to be a really pretty color, but I really would have liked it to be a little bit lighter than what it was, but it was bomb. It looks super bomb on my skintone. I will leave both other colors that I use down below in the description box, for you guys as well of the bleach. You know I'm gon na just leave everything down in the description box, for you guys i order majority of the stuff from Amazon, so it is easy for you to guys yeah. I am sorry if you hear this beeping, my garbage truck is outside so sorry girl. I am leaving roots on to this wig. I did not want to bleach this wig all the way through from the webs to the tips I saw. I just wanted a root and then I'll bleach, the mid-shaft and in the tips, so I'm basically very generous with my bleach. If I needed to make another batch to apply it on there out, I do I do. I would have done that. I think I made a batch and a half for this entire wig. This is 22 inches. I think it's a hundred and thirty or hundred and fifty density, but, like I said since I was coloring a lighter color since lighter color, it kind of lighter colors. To me looks like it it's like finished, so that's the reason why I added more hair in today. You don't have to do that. That was just something that I did and I want this week to be glueless. I ended up wearing it glueless. I didn't fully secure it down when I applied it at the end of the video, but you'll see it on me, so you can see the actual color so yeah, I'm just gon na go in and get massaged with this bleach into the hair. A when I bleached this way, it does not take me a long time at all, like the only time it will take me a long time. The bleach is, if I'm doing actual like highlights or something but just a slap in the bleach on applying a bleach on just to get a lift real quick. This is what I normally do so after basically, I finished this side. I'M gon na do the same thing to the following side: I'm not gon na show that on camera, because it's repetitive but i'ma, let it imma let this leech sit on this hair for 45 minutes. If you do want a higher lip, I will say you need to incubate this hair, meaning you need to use some foils or you need to use some saran wrap something that'll, keep the heat and help this process a little bit more. If you want this color to be a little bit brighter okay, so I left the bleach on for 45 minutes after I left it on. I did go out and rinse the bleach. Oh no! I did not use any soap. I did not use any toning shampoos at all, just bleep. I rinsed it out just make sure that all of the bleach was out of the hair. This is the color that I got. I did not incubate my hair, I just let it air process, and now I am gon na go in with my box dye. So I'm using three for this length and three was more than enough hair. I mean more than one more pair more than enough color for me to use, so it comes with your color and your developer. I do not want to use this developer, so imma, throw this developer away, isn't unnecessary. You can see how much developer is in those bottles and then you can replace it with a 40 volume developer. So so I won't get access again. I am NOT using the Bogside developer that comes in the box. I I'm throwing it away and using a higher developer, which is 40 volume, okay, usually box. I either has 15 to 20 volume developer in there. I don't want to use that. I want something a bit stronger, that I help even out the color and help lift it a little bit alright. So that's where I'm going for even a lift job, even color job, okay, so i'ma for all three bottles of the color inner it does not matter. If it's two different brands is gon na mix well together, and I am going to pour my developer in there and mix it all together and just thoroughly apply it on the wig, and that is it again. I am not using a developer in heaven in the backside, because I get access question so many times when I do this method, I'm not using that. I'M using 40 volume developer that I bought separately because the color and the 40 volume is gon na deposit. The color and lift it a little bit, so it's going to help that bleach job even out. I hope you guys got that alright, so I'm just gon na go in and just thoroughly apply the color after I did this you're gon na see me um get a little bag. One of my wig bags that I ship, like you, know some wigs in that. Doesn'T God I don't have bags for it and I'm gon na put the remaining of the color, because I'm going to have color left in that bag, and then I'm gon na sit my wig inside that bag, not letting the cut the lace touch the color, I'm Not letting my lace touch the color whatsoever and then I'm going to put it in my headed dryer and let it process for 15 minutes on high alright, and so after that, you're gon na see what the wig turned out to look like. So this is what the color came out. Looking like well, this is the finished wig actually um, it's the perfect golden medium brown and I actually really love the color. It looks really good on my skintone and I'm not usually a brown person, but I am loving this color okay but, like I said it could have been a tad lighter tad bit lighter, but I'm not complaining, but yeah she's very flowy. The hair is not over-processed. She still have movement, she still had body. She still, she still passed luster. So this is the wig. I'M gon na just go ahead and um, like you, know, slap her on real quick. I didn't feel like wearing makeup because I got sure I was gon na get dressed later on that night, so I was just like okay. Let me just finish up this video. I'M gon na show you guys what she looks like. I am gon na wear her glueless. So if you were to wear your wigs glueless, you are going to need some type of adhesive to help you or some type of mousse to help. You lay your lace down because it's not gon na just lay down and you're gon na see what I mean by that all right. So this is what my hairline looks like and she look she's lookin real good she's, lookin, real good, and so I'm gon na just go ahead and cut the lace. So I'm gon na take some scissors to help me get the initial shape for my widow's peak because I naturally have one. So I like to mimic that in my wigs and then I am gon na go with my eyebrow razor and I am going to just cut off the lace. So once again, I'm not really going to like glue or Joe my wig down. I'M just lay it. Let it lay down flat, so the lace is not gon na be completely flat to myself to my face, and it will never be completely flat to my face. You are going to have to use some type of mousse, gel or glute in order to lay your lace completely down, because your ear tabs will flap okay, sis, I'm just letting you know so I just want to put the wig on to show you guys how It looked on me and my skin complexion and everything like that, and I think this color is so beautiful, like it turned out better than what I thought it would so here you go here goes like it definitely blends in with my skin. You just need to use some type of adhesive so, like I said, I've worked what I see before numerous of times and I've never had an issue with it here. I'Ve definitely purchased from them, and I've also received here from them. So I can honestly say that the quality has been the same. This is lifted hair, so you are gon na have to take care of it. You have one happy D condition it you know with silicone mix, I will say if you have any kind of color treated, hair use silicone mix, and it will last you forever. You want to make sure that your wig is very hydrated, so it won't break off. You know won't alright, but other than that. I hope you guys enjoyed this video if you have any questions or concerns feel free to leave them down. In the comment section - and I will list everything that I use in this video down and down in the description box, for you guys just got ta look for it. Bye best ranch,


Comments
janet nash: I found your channel in December of 2019 and I was hooked. I love your easy, breezy explanations. I've colored two very dark brown wigs:, one ombre blond and the other blond highlights. I am hooked, I will NEVER pay for a pre-colored wig again! Next project, sewing a wig from scratch!!! They say necessity is the mother of invention. I say, a Black woman knows how to bend inventions to fit her style. Thank you for making your videos so easy follow. Keep up the good work!
Kia: Glad I found your channel I’ve been binge watching and learned how to make a wig FINALLY I’ve made two far and making another one tonight Thank you
NubianLioness: I have a question Queen! What will determine whether it’s best to hand sew as opposed to machine sew?... is it the hair quality or just a preference in regards to time? You’re videos are the TRUTH! By the way. Much appreciated. Just watched the beginners wig making vid and subscribed!
kay: The quality of that wig looks niceeee
Glammed Butterfly70: Omg you are my go to youtuber when it comes to wig making. You helped me learn sooo much.
strawberryvines: Now I was upset when I didn't see a video for that blueberry yum yum wig but I did need this video lol keep them coming.
bėthaniė tøwnley: this deserves more views ❤️
Brittany Diaz: Im so glad i found this channel
Barefoot Contessa: I’ve never subscribed to anyone so quickly. Where th have you been all my life lol. You’re so talented and such a good educator. I’m so grateful. Thank you PS I’ve binged on your videos like a crackhead. Ok bye
Chinaija: Did you cowash or deep condition after you rinsed the dye out?
Tabitha Hampton: Very informative
Kimberly Paulino: Do you have a video on how to add tracks to a wig ??
Alexis Mason:
Reshine Hair: check your email pls dear
Raychel Taylor: Can you make me one ill pay for