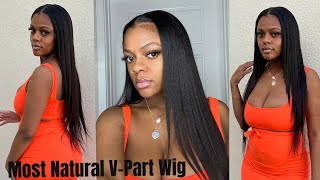
Unice Highlighted Wig Customized | Dyed The Roots | Beginner Friendly
- Posted on 24 September, 2020
- Color Lace Wig
- By Anonymous
THANKS FOR WATCHING!
WIG IN VIDEO:
https://www.unice.com/unice-lace-closu...
UNICE HIGHLIGHTED FRONTAL WIG:
https://www.unice.com/unice-13x4-strai...
IG @casandraramble
What'S up family, thank you so much for tuning in to my channel. If you're not already a subscriber make sure you go ahead and subscribe, i'm gon na go ahead and jump right into this video. As you can see by the title, i am dying. The roots of this wig, it is a beautiful, beautiful, beautiful wig. However, i do not like the coloring on it. The roots are just a little bit too light for me, and the highlights are just a little bit too much just a little too much highlight so i just wanted to tone it down a bit and we're just again going to jump right into the video. So really the only thing you're going to need is this revlon hair dye. It is in the number 20, which is brown black, and i also just used the got to be glue spray to spray, my lace to make sure that if something were to seep through it wouldn't go on the lace. So that's a good little trick there and then, of course, some t-pins just to secure the wig and let's get it, let's go y'all all right. So again i am starting off with just spraying the wig, which i've already did just that. First part of the lace, and then i went ahead and just put my t-pins in to secure my wig. Now this i know you guys are noticing this bag on the mannequin head, and i only do that because it helps not allow the um dye to go through and hit your mannequin head and honestly, this mannequin head is a hot mess, so i mean it is Just a good trick that you can use to keep your mannequin heads looking decent um yeah, so you can do that and again, i'm just going in right now with the t, pins and uh securing the wig to the mannequin head. If you haven't already saw, i do have an unboxing of this wig posted on my channel. So if you want to see you know, the unboxing of the video definitely go ahead and take a look at that i mean this. Wig is definitely definitely beautiful. It'S soft! It'S flowy the only thing i just had to do something with this color y'all, because it's just too much like it's just too light for me, bronzy, the highlights is just a lot you know, so i wanted to tone it down a bit darken it up. A little bit to my liking and just make it flow a little bit better like it's just i don't know, i feel like this wig definitely needed a touch and um if you stay tuned to the end of the video you're gon na see the difference like It'S definitely a difference and definitely needed so first thing i'm going to do is start off with the revlon hair dye and honestly, i have no problem dying hair. I actually love doing it because it's easy, i mean you really just read the box and it tells you everything that you need to do off of the box um, but right now, i'm just going ahead and putting two ponytails in the hair to section off the Hair, i definitely wanted to focus more so on the roots. I do not want to touch the ends, because i do like the ends and the highlights at the ends, but i just wanted to definitely focus on the roots and the top half of the hair. So again, just following the instructions on the box to put your gloves on mix in the developer into the um white bottle and then shake it on up, yes, honey. I had to put these gloves on because i cannot be getting my nails with hair dye on it mm-hmm all right, so i went ahead and just tested out the hair and put a little bit of dye in make sure you know i liked it and it Took to the hair? Well, so everything looked good, so i'm just going right in with the hair dye and again i'm just focusing on those roots. I did speed this part up a little bit, so i did move a little bit slower than what the video is showing you guys right now. However, i started at the roots and then just worked my way down now. I did not want a harsh line going across the hair, so i kind of just use the hair dye that i already put at the top end of the hair and then kind of just rub it down. So it gives more like an ombre effect and not so much like a harsh line, but i'm just going through all over the hair in sections and going ahead and doing the roots of the hair. Another pointer is just be very careful that you're not getting hair dye on your gloves, because of course you know you are using your gloves to hold the end of the hair. So you don't want that part to be darker, so i was just making sure that i won't get any hair dye on my actual hands or on the gloves itself. Even if you have to have a towel next to you or just be careful, you know making sure that the hair dye just stays on the butter knife and when you're parting, you know the hair with your finger, then just make sure you're not getting any hair Dye on it and then i'm just repeating the same step, just breaking it off into sections and then i'm rubbing the hair dye through the hair, keeping it at the top end of the hair and not getting it on the ends and again just repeating this process. Over and over now at this particular part, i did go ahead and separate that blonde strip in the front, because i still wanted that blonde strip to show um in the front. So i decided not to make sure that i didn't get any hair dye on it, and do you guys see this thick blonde strip on the side of the hair like i just couldn't get with it? I had to to get rid of that part all right. So, moving on to the front of the hair this section here, i want to make sure that i dye it dark brown, but i did not want to get it on this again. The blonde strip so definitely try to be careful on the roots, making sure you don't get any of the hair dye on the lace as well as not on that blonde strip either, and i'm just repeating the same steps all around the hair. Just putting that dye. On those roots, all the way around making sure that it's lavered in and almost like an ombre going down the side of the hair, then i'm just going in on the opposite side and doing the same exact thing. Splitting it up into sections applying the hair dye at the roots and then just rubbing it all in not going too far down. But again you know having that ombre effect. Now i'm just going to the other side and i'm doing the roots on this side of the hair and again just going as close as possible, as i can to that middle part. But at the same time you know not so close, so that is hitting the actual part or the actual lace. And then i did go ahead and do the blonde root just the root, not the actual strip itself. Pardon me for being in the camera, but what i was doing here was just making sure that they were even on both sides, because that would just look a hot mess if one side of your hair was black to one part and just not even so, that's A hot mess, so i was just looking at making sure that that was even and wherever necessary, applying more of the dye to make sure that you know it's covering all those lighter areas. There do not neglect your edges, like the edges of this hit of the wig, not actual baby hair edges, but i mean, like the perimeter of the the wig, make sure that you get hair dye in there as well, because if you, you know your hair blow Back then, that side is just going to be a totally different color, so just make sure that you go inside on this area as well. Next step, i did - which i believe is very very important - is to make sure that you go in and brush the dye or comb it into the actual hair. Just so that it's not clumpy or it's not uneven in any way. Make sure that the dye goes in all the way through, so i went ahead and just combed it now, as you can see, i did not comb it all the way down to the roots. I stopped exactly where i want the hair dye to stop and that's important, because the hair dye, of course it's you know, it's still wet like it's liquid, so it'll it'll hit the bottom of the hair as well, and we don't want that. We just want the roots, so just make sure when you're brushing through that you stop exactly where you want the hair dye or the darker hair to stop. If that makes sense. Next, i went ahead and washed out all of the dye. I let it sit for 20 minutes. I set my alarm for exactly 20 minutes to let it process, and the only thing i used on the hair was the conditioner that came with the hair dye all right guys - and here is the hair after i washed out all the dye and conditioned the hair With the revlon conditioner - and it came out very, very pretty, as you can see, the dye took very well to the hair and the roots. Look absolutely amazing. I mean definitely exactly how i wanted it to look, so i let the hair dry for the entire day. So i started this early in the morning and then it dried all day was pretty dry. I did have to blow dry it a little bit just the back of the hair, just to get it completely dry, and this is the hair just wanted to give you guys a quick preview of the hair when it was dry um. I did start curling the hair already, but, as you can see, the roots took very, very well exactly how i wanted it to and the blonde strip it looks so good with the hair. So it came out exactly how i wanted to, and this is just me curling the hair, and this is the final look of the hair once it was curled, it came out so pretty i used my wand curl and i just you know, broke it up into Little sections - and here is the hair the next morning. The only thing i put in it is a little bit of the garnier fructis oil for my hair, and that was literally all i put in it, and it came out so good. I love how it came out. Thank you guys so much for watching this video make sure you like comment and subscribe and i'll see you in the next one.


Comments
2721kitcat: Hey beautiful, I didn't know how I felt about this wig but you made it
Kgothatso K: Have this same problem, was trying to figure out why I don't like my wig ,thank you for the video.