The Perfect Ginger Color | Isee Hair
- Posted on 20 October, 2021
- Color Lace Wig
- By Anonymous
Ginger Wig Color
Thanks For Watching! ♡
What type of videos do you want to see from me?
●▬▬▬▬▬▬▬▬▬♛ISEE Hair♛ ▬▬▬▬▬▬▬▬▬ ●
I am using the brazilian straight lace front in this video: https://www.iseehair.com/isee-hair-bra...
What I used:
4 bottles of Adore 58
Got2be Glue
Dye Brush
Padded Brush
》》》》》》》》》》》》》》》》》》》》》》》》》》》》
F A Q
Camera: Canon m50
Lights: https://amzn.to/3uti0WN
Age: 21
Nationality: Nigerian
New York City
⇢ Instagram: @lavishliving_jay
⇢Tiktok: @lavishliving_jay
Business inquiries: [email protected]
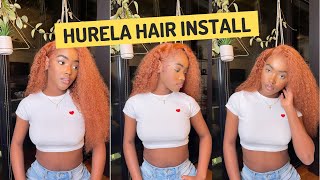
Hey babes, it's jessica, rosemary today's video. We will be achieving this ginger toned, color wig, so we're working with icy hair company. This is my first time working with the hair and you guys i love the outcome of it. I did run into some issues due to how thick the lace was, but i was still able to melt it to my best ability. So i'm just going to list out the items that you will need for this process for bottles of adore 58 got to be a brush and your dye brush the hair that we're working with today is their 613 straight lace, front, wig and 150 density, and it Is in 26 inches in the middle of me editing. I came up with three tips for you guys. The first tip is, if you want to avoid having a pastel, color use, less water and more dye. The second tip is blend the clump out of the dye before dipping your wig to avoid patchy areas on your wig. The third tip is the more round you do, the more concentrated, the more saturated your hair will be. I did three rounds of dipping just to make sure that the ginger tone was concentrated in the process of you dying. Your hair make sure that you open up the middle or in between the hair. So you won't miss a huge area of the wig. As i was dipping the hair, i forgot to open up the wig and i ended up missing a huge area found out. My main focus was that area that i missed, and also the frontal area, because i wanted the frontal to also be the same color as the rest of the hair, or you know at least be like a darker shade. I didn't want to look too pastel like how i was looking like here know. The third round is really necessary. If you want everything to like mainly be uniform, well, watercolor method, it's never a guarantee that everything is going to come out the same color. So that's. Why i did like an extra round, so it was basically just to seal in everything, and this is the outcome. The color is beautiful, so vibrant, just what i wanted, but i did mess up guys. The lace unfortunately got stained. Although the lace got stained, i was able to make it work by blending my foundation into it. The shade and the foundation shade was really close and toned. I'M sorry guys, do you guys see this color like this ginger is given honey? Is i'm gon na, as i was washing the hair, i really been noticing how the hair is typically six month b. Hair is not the best hair, so this it's literally processed hair, see which side i should do. I definitely don't want to do a middle part, because i don't really look good with the parts i'm going to most likely do a side part. This is a tip for my big-headed girls, where the lace and the mesh meet you want to cut in between. This. Will help pull the lace forward and help give the illusion that the wig does fit your head, but in reality it doesn't like. I said in the beginning of the video, this lace is very thick, which unfortunately ended up giving me a really hard time um. I was having issues with laying the lace, so i had to. Basically i made up my own technique, so i basically laid one side first and let that side dry and lay the other side afterwards, but i did the other side off camera because i started panicking. I i know y'all, probably like girl. Why is the baby hair so long? I was practicing paris danielle the fluffy, baby, hairs method and obviously i'm not good at doing baby hair, so guys, don't fry me. I was just trying to think i ended up fixing it off camera because, like i said a couple seconds ago towards the middle of this video, i was panicking because i thought i messed up the wig like it just wasn't. Looking like how i wanted it to look, so you kind of see that here but yeah i had to go off camera and fix it because, obviously girl, the the baby hairs was too damn long. So i went off and fixing it as you can see through my thumbnail picture. My baby hairs look so much better, so this is what is getting um. It'S really cute, oh my god, i'm actually so in love with this color wow. I love the way this install turned out. It'S so silky, so bomb of course hit the like button and don't forget to comment and subscribe. You
Comments
Natalie: I love this! Good job