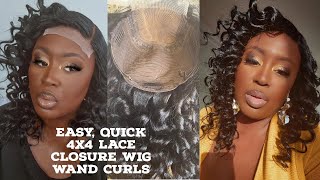
Beginner Making Closure Wig Ft Isee Hair
- Posted on 19 December, 2020
- Color Lace Wig
- By Anonymous
Hey y'all! This was my first time making a wig and being successful with the outcome of it. Hope you enjoy and I will make a detailed video of wig making soon!
Hair:
https://www.iseehair.com/isee-hair-9a-...
Music by: SouthStreet24-Media
Hello and good morning welcome back to my channel it's kelsey, so um. Remember when i did that unboxing video with the ic hair. If you don't go watch the video um. I said that i was gon na get a wig made, but i thought it would be more interesting to go ahead and try to make the wig myself i've made wigs before for the past, like maybe four years ago now, when i was a senior in high School and that i mean back, then i thought that it was okay, but then looking back on pictures, it just looked like. I had a helmet on my head because it was a a frontal and back then frontals, weren't like as popping as they are now. So i was just trying to do something and um yeah. It wasn't that great, but i think that i think i could do this. So if you don't remember it's some curly hair, i got three bundles and i have closure, so i'm gon na start off with bleaching the knots on this closure and then we could get to sewing, and hopefully this won't take up problems like that. So, let's get into it. So these are the supplies. I got a little styrofoam head mesh cap, elastic, wig band, wig grip for when i put it on developer right side scissors. So let me go on here. Where'S the boat - and i also have a bowl and i'm gon na - be mixing it with this. It'S probably gon na melt it, but whatever so yeah. Okay, ladies, so for this part i am just doing equal part, developer and equal part lightener, because you just never know how much you really need for this and i'm not a professional. So i just judged by um the consistency and how creamy it gets. You want it to be really creamy, so that's just all that i did for this portion of it and now it's time to lace, lemonade, creamy, crack onto that closure. So i just tried to tuck away the baby hairs as much as i possibly could and you'll see me readjusting that later, because it kept popping up. But i just um kind of just laid it on there into a smooth layer and try to spread it as much as i possibly could, because this is a mixture that once it starts reacting, you kind of want it to start reacting in all areas. At one time, so it isn't one area, that's lighter than another one, so um yeah i'll. Just i'm doing that right now and yeah, that's pretty much it i'm just gon na guess and say that that's ready! For this part, i was just looking to see if there were any dark spots left and if it were, it was okay for me to rinse the closure, and i determined that it was okay for me to rent. So i did so. I am a college student and i'm not a professional, so i just use what i have around laying around my house. So i found these push pins to keep my lace cap in place. So that's what i'm doing now and i use that to keep my my closure also in place throughout the duration of me, making this wig. This was not the best method because the closure kept falling off. So i recommend, if you have the time to go, get some proper needles from the beauty supply or maybe from the fabric store to um, really keep those things in place. I recommend that it kept the cap in place, but the closure kept falling off. So if you would like to use larger pans for that by all means, go for that, but this is just what i did for this portion just not to go in blind. You want to trace um the lines for where you want to lay down your whips and where you want to lay down your closure. So i, like i said, i'm a college student, so i grab an expo marker. You can use a sharpie. You can use um a regular marker. I just had an expo marker, so that's what i use to trace around um my areas and i actually follow this throughout me - sewing my whips down onto the wig cap and um. If you have a darker cap than mine, my cap should have been darker, but i went to the booth supply and i just told them give me what i need to make a wig, and this is what they gave me and i just stuck with it, and I figured if it's too light, then i could just tempt the lace or i could just spray some of that um root cover-up spray on it to make it match to the color of my scalp, but um yeah, i'm just tracing to it's about an inch apart. I didn't measure i was just drawing, but if you have a darker cap you could use a fabric marker which is like oh, it could be white or maybe like silver, something like glittery to make your line show up. So you can follow it and it'll make the process a hundred times easier, and these lines are just a guide. You do not have to follow them by any means, because at the end i got a little crazy with it. I don't know what i was going for or what i was doing so yeah, it's just a guy. You know first time things so you know don't follow step by step, but you know just take it. Everything with the grain of salt - and just you know, do what you think is necessary for you to do great as well. The wefts are double bonded when i start sewing - and i was originally sewing on my bathroom countertop - but that was very difficult for me to do, because my my styrofoam head kept slipping. So i was trying to think of other alternatives while filming this portion, so um yeah. So at this point in the video i started sewing my wefts onto my cap and the angle isn't the greatest thing, because i'm i was not sure that i was going to post this video at all. But what i did was i took my tripod that i normally film on and i took off my ring light and i just stuck my styrofoam cap onto my tripod just so. I could have something eye level that i could use so that i could sew on. So it wouldn't be as hard on myself to do. I didn't film. The whole process of me sewing because that struggle was real. I spent the majority of me sewing my webs onto the cap with the wig head in my lap, so um. Maybe i i could do another video and try to attempt to show y'all how i did that, because i have plenty of hair to make another wig with. It is just a struggle and if y'all want to see my struggle, that's cool, we can struggle together and we can figure it out together. Just let me know, and we can just continue the struggle until we get better and then we're going to be slamming wigs together. Okay, i'm sewing the closure to the hair wefts. Now now, when i do my own sew-ins, i normally sew the wefts. I don't want to say this: i normally sew yeah. I normally sew the wefts onto the closure, but for the wig i sewed the closure onto the wefts. It'S weird because of the direction that you have to sew. The closure onto the wefts versus vice versa. It'S kind of hard to explain, but i hope that you can see what i'm doing in the video. I think it's pretty clear and i'm sewing the closure onto the webs, i'm putting my needle through the thread and just pulling it straight through, and it should be a clean sole and it shouldn't be any bumps based on how you line up the closure. In the beginning, my so i thought i was recording in the beginning of me cutting out that portion, but i cut out the portion underneath the closure, because that is where my scalp will be at and i'm showing y'all that you just want to cut off the Excess, but not too much because you don't want to cut off where you've sewn your wefts to this is a beginner wig. So i bought an elastic wig band for my wig to be a glueless wig, because ain't nobody got time to be deal with glue. I did not plan on sleeping in this wig. I planned on more throwing it on and off more so when i wanted to wear it. This was not meant to be a long-term wig, so i just i'm measuring how tight i want the band to be, and you want this to be kind of tight, so it could fit to your head, so the wig won't be too tight or too loose. You want it to be just the right amount of tightness, so it conforms to the size of your head, so you won't have to use glue in the end. It kind of just takes away that extra step. Okay, i'm getting somewhere with this. Whoever is out there making wigs. I commend y'all, because this is hard it's very hard i was struggling. I probably um won't put too much on my struggle in this video because i just it was hard. It was hard. So i'm about to cut this lace. I kind of plucked it a little bit, i'm going to put some concealer or foundation on the parts i'm going to spray. This down put some foam boost on it, make the part flatter some more and yeah. I think i think i did well. I think i'm doing good, but we're gon na see the finished product. I don't know about recording all of this, because it's just hard it's hard out here for a real one. You know, but i will try. I'M gon na be looking in the mirror, not at the camera, so now some good ones out there who got time. I'Ve been doing this since 11 o'clock this morning. It'S not 4 p.m, 404 to be exact. So my real ones me - i guess i guess whatever whatever i'm gon na take this off, do some foundation concealer, throw it back on and then style and then i will show y'all my finished look and your girl is done. All three bundles are in this. Okay. So all in all this has been one of the longest processes that i have gone through for doing hair. Even when i do my own sew-ins, i feel like that's easier than this, but at least i have me a nice little wish for the holidays. So that's a good thing, so yeah i'll probably be making some more wigs from like old hair that i have that's still decent and if y'all would like to see more content like this, like maybe more more of a detail, see i still don't know how to Blend it good, you know it's all a work in process, first wig stepping stones. It looks good from a distance and kind of good from up close but anyways. All in all. I think this is some pretty good hair. I see hair mongolian, um curly, so yeah don't forget to like this video comment and subscribe to my channel, and i will see you guys on the next video peace


Comments
Kelsey Lynette: ❤️❤️