How To: Cherry Red Hair Tutorial | Water Color Method!
- Posted on 25 January, 2019
- Color Lace Wig
- By Anonymous
Subscribe to my channel ⇨
https://www.youtube.com/channel/UCLZUP...
For all business inquiries, please email: [email protected]
Hair Details!
Coupon code: Dana
Juliahair.com official website: https://goo.gl/9Mxt38
Brazilian 613 body weave 20 22 24 in the video: https://goo.gl/CJG9Ts
Pre-sale for Valentine's Day: 29th, Jan-2nd, Feb
Unlimited 6% off, Code: V6
Valentine's Day Promotion: 8th - 15th, Feb
Over 1 lot, get 5% off, Code: L5
Over 1 lot, get 10% off, Code: L10
Aliexpress Julia Hair store: https://goo.gl/2B7qFW
Top Selling Hair on Aliexpress: https://goo.gl/jLFLHi
Amazon Julia Hair store: https://amzn.to/2L3XHvm
Subscribe Julia Hair on YouTube: https://goo.gl/6z9tvz
Follow @juliahair_no1 on Instagram: https://www.instagram.com/juliahair_no...
SOCIAL MEDIA
Instagram: https://www.instagram.com/_danaalexia/...
Twitter: https://twitter.com/_DanaAlexia
Snapchat: shortylex
Tumblr: https://www.tumblr.com/blog/shortylex
COUPONS & CODES
Vanity Planet Spin for Perfect Skin Brush System $100 use code "danaalexia" to get it for $30
"dana" to get a discount on any products from www.banishacnescars.com:
Banish Kit: http://bit.ly/1SMGik3
Pumpkin Enzyme Masque: http://bit.ly/1VJq40Z
Vitamin C Serum: http://bit.ly/1ru8TnB
Vitamin C Beauty Elixir: http://bit.ly/1SXN8FT
Sign up with Boxycharm to get their monthly beauty boxes for only $21!
INFO:
Camera: Canon Rebel T5i
Editing: Final Cut Pro X
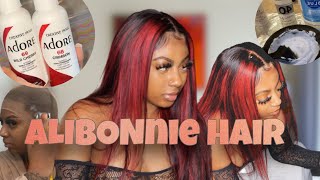
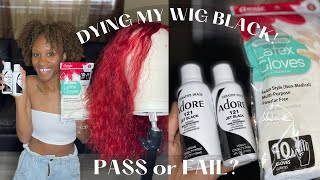
Hey guys like Mike summation, I don't my name is Dana Alexia and if you're ready without a welcome, as you guys can see, she is red and went ahead and switched it up. I had to it's getting so bored at the black hair, so yeah. Today'S video is going to be showing you guys how I achieved this beautiful, beautiful, beautiful cherry red color. I don't even know what to call this. I haven't named this way get easier, but this video is going to be showing you guys how I achieved this gorgeous hair color and also how I styled it. So this video is going to be a voiceover a Mexican, so I'm not professional, never claimed to be won't, be I don't do hair. I just do care for myself and to be honest, I kind of love. I have a love-hate relationship with doing hair and for me personally, I like to do my hair myself most of the time, because I save a lot of money. You know I got bills to pay shedding crazy, so this is why I is in my own hair. So I'm gon na keep it real with you guys. I struggled really hard to get this hair color. Thank God. It came out really really nice, so this hair is from Ali Julia hair. This is my first time working with this hair company ever and I am really impressed. I have seen a lot of videos of people using their hair coloring, their hair styling their hair. So the brand itself is not new to me in terms of like hearing the name. However, the product itself is new to me, because this is my first time actually working with this hair, and I must say, the hair is really really good. Considering what I went through to achieve this hair color, you guys I received 3 bundles. I don't remember the exact length, but I will have them listed down below I received was 3 6 13 bundles, which is blonde. If you don't know what 6:13 is it's basically blonde hair, I actually only ended up using two bundles for the wig and on the front. So I kind of knew everything to do that already, because when I do get my hair professionally neat, the stylist usually only ends up using two bundles and then a frontal, because apparently I have a small head. So I knew I also didn't want. I don't like it bulky, you know from past experiences, I don't like bulky wigs or bulky someone's anything I don't like about. The old frontal actually was the natural black color. Unfortunately, I really tried to get her six thirteenth frontal to make my life so much easier, but unfortunately they don't sell six. Thirteen frontals, that's what they told me. So the friends'll itself did not get as blonde as how you know 6:13 hair. So I was working with like a honey blonde type of hair. I'M not sure if you guys can tell for those of you that are new to my channel, but usually when I do a hair video, it will just do my hair myself. There'S always that one [ __ ] up that I have and I like to include them in my videos. Just because I mean there's always gon na be somebody that has a little bit of difficulty with it like myself and that's okay, I just like to show you guys, so you can prevent it because trust me, it's frustrating and you know if I can help some People out with, I really would like to because this [ __ ] ain't easy honestly truly, so I can't tell you guys how many times I colored this hair so initially when I had colored this hair and I filmed it for the first time thinking you know. What'S gon na come out like this long story short, you guys didn't work. The first time I reached the frontal as expected, because to be honest I don't know if it's just the way I bleach hair, but whenever I have to bleach an actual frontal or just bleach hair. It never gets blond on the first child to ended up getting to the lightest honey blonde after bleaching it for the second time. Of course, I refused to bleach the hair for the third time, because not ruin hair dodge was just like I'm something go ahead and color the frontal and see how it turns out before I actually ruin the entire quality of the front salt. So, as for the three bundles, considering that I started off with three bundles of bleached blonde hair, each bundle came up a different shade of bright. One was blood, orange one was crimson and one was like a purple burgundy, so I was just like okay, of course I was so frustrated, so I actually wanted to go purchase more hair dye. The same box died and I was like okay, I'm gon na make these ratios perfect and long story short all hairs, a look a little bit better, but it's still, you know, didn't work out. So I was like you know what I'm gon na. Do the watercolor method, because at this point you guys know coloring hair by hand takes so long and at this point I've already done it twice. So I'm irritated. I don't want to do it again, so I went ahead into that and that is actually how I achieved this color. So I'm gon na show you guys what the hair looks like in the beginning before doing anything to it. So you guys can see what I was working with and then I'm gon na go ahead and show you guys what the hair looks like after and how I fixed it to get this so either way. If you guys do what I did in the actual right part of the video which is me doing the watercolor method, the proper way you guys will end up or should end up with hair like this, the bundle that was the darkest that I showed you guys Was like a purple burgundy, I didn't end up using that bundle because after I had done the watercolor method, it still was too dark compared to the rest of the hair, like all these matched pretty well, but the last bundle it was just way too dark. So luckily I only need two bundles for my little head, so I was like alright thank God. When I actually had made the wig. I noticed that the frontal was gon na be darker, but actually you can't really tell it looks fine, I'm so happy with my hair and I'm so relieved that this thing is finally on my head. Let me just say that the quality of this hair really like she she held it down. I'M not gon na lie cuz. I was thinking after going through all of that with the bleach and the coloring. I had left her alone for a little while because I was just like so over it. So I was thinking that when I had picked the hair up again to work on it again that the hair was gon na be totally butchered stiff damaged. But she has life and the quality is just totally good. I didn't film me making the wig part, because this is actually my first time making a wig in probably like 2 or 3 years, and of course I didn't want to film it, because, to be honest, you guys I felt like I had lost my touch. I didn't know what I was doing and the wig is a little bit too small, so the side of the front, so it isn't even all the way on my edges, it's fine because I just cared we're in a middle or side part this side, as you Can see I can have out so if I ever want to, you know, put it behind my ear: it's a little whatever it's this side, this side, no, but it's okay, so we're just gon na go ahead and get into this video. Finally, I'm so sorry that I have to talk so much, but I just needed to let you guys know what I went through and you know do's and don'ts just yeah, let's just let's just get into enough alright. So, let's get started so when I had initially colored the hair. This is a box I that I used. This is raging red from the olive oil hues box dye and I actually mixed it with one of the adore dyes in intense red, and I guess that's why each bundle came out a different shade of red. One was crimson one who was blood orange one was a really dark purple. I mixed it in the mixing bowls and I also used 40 volume, developer and powdered bleach to bleach my frontal, which I did have to bleach twice. This is a mandatory, but I do highly recommend using some sort of deep conditioner to deep condition, any hair that you bleach. So that's what I use. I got it from Sally's and this is the hair from Julia hair. So just came in this cute pink box. Just wanted to show you guys the packaging, because this is my first time receiving hair from, and this is the six one three bundles. So I got three bundles of these. This is actually my first time working with six one three hair, and so this is Brazilian body wave. The hair was really really soft and barely any shedding, as you guys can see something, and then I'm going to show you guys the frontal, which is Brazilian body wave as well. However, it is the natural black color because, as I mentioned, they don't have any six one three frontals available. So after I had colored the first bundle, I went ahead and showed you guys what it looked like. So this was not what I was going for initially. I was going for a really dark red a little bit brighter than burgundy and, as you guys can see, that's how light the front will got so, instead of me bleaching the frontal for the third time. I just decided to work with it and see. If I could still achieve the color before possibly ruining the hair, so I just boiled some hot water and I put it into a bin. Unfortunately, this is the smallest bin that I had the other one I had was way deeper, so you guys wouldn't even be able to see what I'm doing so and then for the remainder of the water. Just used my pipe and, as I previously mentioned, I'm already working with red hair. So I'm going to be going in with the adora semi-permanent hair, color in intense red, and this bottle was actually only half full. So I just went in with another full bottle of the same color and then mixed it up into the container, so I'm gon na show you guys how Brown I wouldn't even say this is blonde. How brown the frontal is, so I'm gon na go ahead and do a strand test just so that you know I don't end up wasting my time and you know it actually ended up coming out really dark red, as you guys can see. So after checking it. I was okay, we're safe and I'm just gon na go ahead and do the whole thing, so I actually ended up doing the bundles first, so I'm going in with the first bundle. This is the bundle that was the second darkest to the burgundy. So I'm going in and just dipping that into the water for rinsing, not rinsing it out, but straining it out and just dipping it back and again. I want to see it kept each bundle in the bucket for about two minutes cuz. I really like you guys. I really wanted to get this color right, so I did this a few times for about a span of two minutes and proceeded to the next bundle. So it's Justin C. This is the next bundle. This is the one that was a really bright red and, of course, I kept taking it out to check it to make sure you know the color was actually working. So for the frontal. What I didn't get to show you guys was. I actually sprayed the lace on the inside put some got to be free spray, because I did not want to ruin the lace and, as you can see, the frontal was actually breaking the after doing this method. So I was really really happy so now we're gon na proceed to putting on this wig. So this is what it looks like after I made it into a wig. I did actually stay in the lace a little bit from the hair dye, but I rinse it out with some cold water and some shampoo, and I think it was okay. I was kind of optimistic about the lace being stained. My biggest issue was, more so getting the wig to fit, because, to be honest, you guys when I made the wig it was way too small. I didn't have the proper mannequin canvas head, so I used a foam head. It is a very similar size to the canvas head. However, if my head was any bigger, I would have been completely screwed. Luckily, I got it to fit. So what I'm doing is tying up the hair and I'm gon na look at where on the wig cap is passing. You know where the hair line is, and basically those little pieces of the wig cap that are sticking. I'M gon na be trimming off with some scissors for those of you that know how I like to customize my wigs because of the shape of my hairline and my edges and baby hairs come further out than the rest of my hairline. I like to typically customize wigs on my head, so that is why the wig hasn't been customized and tweeze. Yet so I'm just trimming off those little pieces. But for some reason I don't know if it's I mean it has to be properly, because the wig was too small because of the head that I made it on. I could not get the edges to align with my hairline like at all. If you guys watched my last video, what I actually did was I tweezed hair off of the front row of where the hair was and made a completely new hairline, and I wasn't even able to do that because I didn't have enough hair and it's not like. I cut off hair from the lace. I think it was honestly because of what I made the wig on, because I told you guys I haven't made a wig in a really long time, so I was a little bit rusty. But luckily you know your girl came through and I finished and I don't know how this somehow just I just I made it happen. I made it work, so I'm just cutting off the extra lace and even as you guys can see the ending of the front. So we were like the sideburns would be actually go past, my ear all the way to the back behind my ear. So I just of course had to cut that off and make my own sideburns. I completely reconstructed this week and I'm going to be going in with some glue, I'm using deep ghost bond, hair or lace glue, and actually I'm going to be switching over to bold hold. I want to try that one out, because this is the second time that I was putting on a wig and for some reason it would not stick you guys this wig lifted so many times I probably put like three or four layers, so I think it's time To try something new but anyways as you guys can see. This is what it looks like when it dries down and I actually forgot to apply some foundation. So I'm gon na take my fancy Beauty Pro filter foundation in 370 to apply on that wig cap because, as you guys can see, this wig cap is actually way too light. And you know we need this to look like scalp, so I'm actually just making sure to put it only by like my edges and the front will be doing parting, just where I need it. No, I'm not gon na put it all over the wig cap and waste product. There'S no need for that, and I'm gon na go ahead and pull that wig down and just start to lay it on the edge of that wig cap. And I don't know if you guys can tell, but I'm pulling really hard like. I had to pull it really hard because it was so tight and like it was really tight. So I'm literally, I don't want to say fighting with this wig, but I had to tug at it and like lay it down, I couldn't let go because the whole thing would just like slide back and that's why I did this side first as well, because I Already knew that side was not going to be covering everything so which was pretty frustrating, but because of how far I had already gotten with you know this wig and everything I went through. I just wanted to finish it and see the finished product regardless, but once I finally got it to laid down, I went ahead and tied it down with the paper styling strips from the beauty supply store, and so now we can finally get into customizing and styling. This unit, I was so happy and excited to be past that difficult part, so I'm just gon na go ahead and start tweezing everywhere on this front, so you guys know the drill, if you don't know the drill, literally just tweeze everywhere, so especially by the part. What I should have done as well was made sure the part was completely straight before doing this, but I was just so eager to finish this wig you guys, so I was like alright. Let'S do this, so I had to do a lot of tweezing. I can't remember if the front will actually came creep left, but from my observation, when I first started working on it before actually cutting off the lace and tweezing off a lot of the hair. The front of the hairline was a bit thinner, so I think it was pre plucked actually, but of course, even with pre plucked frontals, you still have to do quite a bit of plucking. I'M gon na go in with the lot of body foaming mousse and I'm gon na apply this on top of the way I like to use this for flyaways and also to get rid of any bulkiness bumpiness. So I'm going in with my curling wand to lay that down when you apply heat to foaming mousse, it literally like molds into not molds, but it's gon na flatten. Whatever is sticking out, and I actually decided to cut some layers in the front because the hair is really long and it was just a lot for my face, especially because it was middle part, it was just it was too much. I needed to frame my face. A lot more, so I actually cut quite a bit of layers. I haven't done this in a while, but it turned out really really well and once I had cut the layers in the front, the wig actually started to come out a lot nicer like I really started to feel in. I think it started to actually look really good. So after getting the layered look that I want, I'm gon na go ahead and actually do a little bit of baby hair. So I'm taking that front piece and I'm just taking the got to be glute gel and I'm using the black bottle by the way and my edged toothbrush and I'm just doing a little bit of swoop. I'M gon na do some on the other side as well, and honestly, baby hairs is what really starts to bring any frontal closure just anything all the way together, especially if you are someone like me that I don't know, wigs can easily look very Whiggish on me Because of my hairline and my forehead shape, I don't have like the not the right forehead shape, but I don't know: let's just look at crazy, okay, some time. So I need baby here and, as you guys can see it's already looking a lot more flattering. A lot nicer, a lot more natural, but of course we're still not done you know it's doing some plucking. That part is not nice, so I'm gon na go ahead and fix that first, I'm actually gon na cut some more layers. I don't know I felt like I just needed a little bit more framing. You know to my face, I'm just showing you guys how much more hair I took off from those layers. So after I tweeze a little bit more, I went ahead and put on my face because Lord I just I needed a face to rock this color. Well, not necessarily, but you guys know the best way to see a hairstyles. Full potential is to beat your face. So you can just see how the entire look looks together, so I'm gon na go in with my baby bliss Pro flat iron and just flat iron, any hairs that need to be straight. I'M also gon na be straightening, my part, because it was a little bit crooked and because I had already kind of set the hair in that direction. Any hair that I had to flip over to the other side of the part. Of course, I had to manipulate with the straightener and also some of the foaming mousse just to get it to lay nice and flat so now to really bring this wig together. I'M gon na do some more baby hairs, as you guys can see, you can see that the right side of the frontal isn't all that great, so we're just really gon na be focusing on the left side, because that's all I have so I'm just going to Be taking really small sections of hair and sharing them out with some scissors or thinning them out with some scissors and using that same got to be glue, gel and my edge brush to swoop them. When I find that the baby here starts to get kind of clumpy, I like to use the other side of the brush where the little comb is, it actually helps to like smooth it out again. So that's a little pointer for you guys for doing baby hairs and, as you guys can see, because I had trouble getting the wig to lay down the glue kind of flakes up. I really don't like the school anymore, so yeah, I'm gon na, be switching, and I can't say that with practice I actually have been getting better at doing sideburns. I used to be terrible, but I think I'm getting a little bit better, so you want to make sure you cut them not too long, because that's what I did at first and I had to go back and trim them again and then I just did another Baby hair, on top of the sideburns to kinda, you know make it look a little bit more natural. So this is what the baby hairs look like. I just can see it really brought the wig together even more. I was having so much issues with this part, but other than that, you guys. I really really like this wig. I think it came out really good. I had not zero faith, but I had no idea honestly truly how it was gon na turn out. So I'm really really really pleased and I love her she's gorgeous. So. Lastly, I'm gon na add a little bit of finishing touches to this wig. I'M gon na go in with some foaming mousse and put that at the front. This is gon na, give it that sleek. Look. I really like doing this cuz. It just makes it look like you know like a fresh perm or I don't know it just makes it look so much more fresh and sleek. So that's what I went ahead and did and then applied heat to it to really you know, set that into place and then I'm just gon na go ahead and show you guys what the hair looks like I'm gon na even stand up for you guys. So you guys can see the full color at the back movement body. She'S come a long way and she looks really really good. I'M just really proud that I slayed this week so all right. So this brings us to the end of this hair, coloring and silent tutorial. I hope you guys have been watching it. One thing that does bother me about this unit is the fact that, if you guys can see, but it's like kind of poking up right here on this side, I don't know why that is. But if you guys know the trick, I usually like to do with the like actual clothing iron is no irons on the top of your wig. I know it sounds crazy, but it honestly makes the biggest difference. You know I don't have one right now. I need to go, buy one actually after I film this video, but I went to my mom's house on the weekend. I I heard the top of my wig and it was flat. That'S the only thing. I know that gets rid of like this little thing right here. Let see if it was flat. It would be like yes, but then we have this situation right here. So I use my curling wand, which is all I have and setting lotion, but the iron does the best or a hot comb, but yeah either way it's so cute. So it's really not that serious. I hope you guys, like the finished, look as well. I you know considering what I had gone through, I didn't know it was gon na turn. Out like this, I thought I was gon na look like Takashi, so you know she's come a long way, she's really like she's a miracle. Baby she's come a long way and she made it. So I hope you guys enjoyed watching this. Video don't forget to subscribe to my channel down below hit the notification bell so that you are aware, when I upload and I'll see you guys in my next video bye,

Comments
KENNEDY MEYERS TV: This is so pretty and full for only two bundles! this color on your is sooooo pretty
Qya Atèara: The wig is cute and the install is nice . Another way to make the part look natural is adding like foundation powder or anything that’s closer to your skin complexion
Latifah Shakur: Im about to dye these bundles red too lol, your hair came out so nice!
Mia Luvs: I have experienced sliding and loosening with ghost bond glue when my wigs don’t really fit too well. So that might be the reason as to why the glue was acting up. I love the color on you !!
Brianna Bryan: a tip to getting ur hair to lay extremely flat is using bit of hairdressing on the roots of the frontal then passing through with hot comb/flat iron :)
Cassandra Moise: Absolutely beautiful sis!!! I’m in love with the color!!!
khaiyag101: Tutorial start at 7:13
Miss Red: So to achieve the color you got, if we are starting off with 613 hair would you recommend using ONLY the adore intense red or using both the olive oil box dye raging red and adore intense red mixed together?
Gamingwitblossom: I was just thinking about dyeing my hair ruby red.. then there go you yes I love it your hair nails and make up is so pretty
Coren’s Corner Boutique My Paparazzi Journey: Your hair is so pretty. Thanks for sharing. Enjoyed watching❤️
Selena Murrell: Wow just the color I neededhope it looks as good on me as it does on you!
PATRICIA WADE: really pretty...you did a great job!!
Ashley Wilson: Girl you did an amazing job ❤️ ! Doesn’t even look like you struggled to get this look
Shania Mitchell: Intro and all that .. red looks good on you honeyyyy & pass all the trouble it still came out great love it
tomboy dee: You did a wonderful job
JustAbtPerfect: Great job!!!
Tyler Charnelle: How long did the dye last before fading ?
Typically Toni: Love this colour on you!!
Denise Hightower: This is so pretty on you i love it xoxoxox
ISLANDBEAUTY: Love this color on you ❤️❤️
sharla scurlock: Getting to the point of the video!!!
Ivory Green: Oh yes sis this is now YOUR color!!!
Kyria West: Did you cut the cap out? I have a big head. And I know that cutting the cap from under the frontal actually loosens the rest of the cap and it ends up fitting perfectly.
Thspecial Th: Hi firstly you look pretty with the color I love ❤️ it. (1) Do you shampoo the hair after it is color? (2) Does the color bleeds?
Gabrielle Irving: In order to lighten hair on the first try you can try using 40 developer instead of 30 it’s quick so you have to be attentive but it does lighten first go around .
9wardnola: what can i say so pretty and sweet and this red hair looks so fresh like always. I'm so in love and more
Swttster: Loving the new intro
Prettyprin: Did you bleach the frontal hair before dying it ?
Princess L: Hello what are all the hair dye colors you used to achieve that color please?
SAMUEL Blackman: Look Amazing ☺
Kadajah Henly: what colors or dye would recommend to get this exact color ?
Lendie Dorval: Yasssss this helped a lot
Bella Rican Mami: What color adore dyes did u use ? I want this cherry red it’s not too. Bright love it
TOWANDA the STYLIST: Wow your hair is so Gorgeous ❤️
Charlestine Williams: You slayed that! but side note what lip gloss is that?
MrsClassicCouture: Usually when my wig isnt 100% flat it's because my braids won't braided completely flat
Tiarra's World: Yassssss Hair This Color Is Bomb And You Look Gorgeous Girl
Charity’s Glam: Love the color but the video just was to full Of complaints but it came out great!! ❤️❤️❤️
Makiyah Michelle: love this color on you
Alexus Dillon: So bomb. ❤️
Simone_Diva: I love it D sissy that is a gorgeous color on u red is ya color
Mariah Shyanne: Boutta order a platinum wig, if she not lookin right on me, imma DO THIS
Adriana Humphrey: color is bomb ❤️
Kersha Beaver: Great job
Mariah Alex: Girl yes I don’t know If my wig is going to successful unless I have my makeup done
Chris Simpson: Your stunning ❤️
Toya Marsh: throwback hair color love it
Jeanell Reynolds: The color is so beautiful.
Zoren Tucker: Finally found someone with my hairline and small head.
Alexis Needam: Can you put the product details in the description
Chrystian Allure: I love red hair on you
Just_Khenya: Siiiiiis ! Red is your color fasho
m: u look so good
RealNettieB: Love hate relationships with hair yessssss!!! Shit ain’t cheap yasssss! I’m rocking with u
Brianna Bryan: wearing wigs too small will rip out ur edges fyi .. especially with adhesives .. but it looks great
Bri: Hey love, what do you use to create your thumbnails
Cynthia Wilson: LOVE IT ❤❤❤❤❤❤❤❤❤❤❤❤❤❤❤❤❤❤❤❤❤❤❤❤❤❤
Mon Platin UK: Wow this colour We would love it if you would collaborate with us as we have some amazing products for you to try out. Contact us on how we can work together!
m: what numbers and names of the dye?
thankfullytrue with the Roberts Family: She sounds bit like Rihanna sometimes. Shes stunningg
Gigi: When I do the watercolor method my color doesn’t stick, like its rinses out my color when I wet it
Shara Tanae: Did you clean your forehead with alcohol? It keeps my hair down 2weeks plus ♀️
Just Janesia: if you don't mind me asking how did you make your intro? I've been trying to make one and I need guidance lol
Aquarian231990: Pretty boo ❤
Ms. Price: ❤️❤️❤️
KENNEDY MEYERS TV: Everyone does the watercolor method in a bin, can you do it in a stopped sink I wonder?
Ashley R: Sis wow, you finessed that
Life As Saffoni:
pinkhead: That height at the crown is why I won’t wear a wig. But this color is beautiful
stab me: Ur so beautiful ;c I have strawberry blonde but I hate it on me :/
KenniKurls: What colors you used
Marielle L'amour: I’m mad she didn’t pluck her part but its really cute tho
Fashion Ivania: I love
Clotaire Junior: so cute❤❤❤❤❤❤❤❤❤
KenniKurls: What colors on the bottle
Katarina Ducasse:
Caramel Crunches: Nice
Ty Major: Yassss
slumped xx: Cuteeeeeee
Tiffany: I think it would be easier to make the wig then dye it rather than dying each bundle. Also with this method does it bleed or does the color wash out?
Akili Gross: Can something comment the colors she used please
Sally Wills:
Azspen Henderson: Damn that’s a bath tub love the color
jen: K but this colour sissss
Sarah Lee: So jus to clarify th only color u rlly used is intense red from adobe?
Beloved: Wish I could pull this off but I’m afraid
Caitlin Cuyler: You sound like rihanna